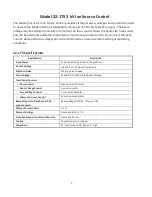
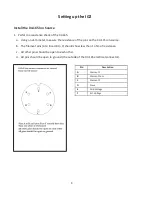
rbd instruments IG2 Скачать руководство пользователя страница 12


11   


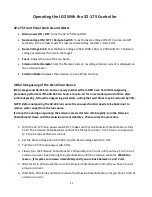
Opera�ng the IG2 With the 

32-175 Controller 


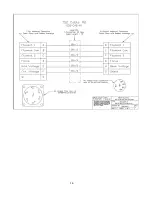
32-175 Front Panel Controls and Meter 


Main power ON / OFF

: Turns the 32

-

175 ON and OFF


Beam voltage ON / OFF / Remote Switch

: Turns the beam voltage ON, OFF and on and off 

remotely.


In the remote mode TTL low (or shorted relay contacts) = Beam ON


Beam Voltage Knob

Sets 

the Beam Voltage to 500, 1000, 1500, or 2000 volts DC. The Beam 

voltage accelerates the ions to the target.


Focus

:


Adjusts the size of the ion beam.


Emission Poten�ometer

:


Sets the filament current, resul�ng emission current is displayed on 

the emission meter.


Emission Meter: 

D

isplays the emission current, 25mA nominal.


Ini�al Out

-gassing of the 04-165 Ion Source 

IG2 packages and 04-

165 Ion Sources newly purchased from RBD have had ini�al outgassing 

procedure performed. If the 04-165 Ion Source is up-to-

air for an extended period of �me a�er 

ini�al outgassing, follow the outgassing procedure, no�ng that wait �mes may be reduced by 50%.


NOTE: Before outgassing the 04-165 ion source the vacuum chamber needs to be baked out to 

remove water vapor from the ion source. 

If at any time during out

-gassing the emission meter starts to climb rapidly, turn the Emission 

Potentiometer down until the emission current stabilizes. The

n resume the procedure. 


1.


With the 32

-

175 main power switch OFF, make sure that the Emission Poten�ometer is fully 

CCW.  The Emission Poten�ometer controls the filament current.  0 to 10 turns correspond

to 0 to 2.0 amps of filament current.


2.


Set the Beam Voltage Knob to 500 V and the Beam Voltage Switch to OFF.


3.


Turn the 32

-

175 main power switch ON.


4.


Slowly turn the Emission Poten�ometer CW typically 6 to 7 turns un�l you have 1 to 2 mA of 

emission current.


Keep turning the poten�ometer un�l the emission ac�vates

Watch the 

meter – 

if it spikes, turn down immediately until 

you are back between 1 and 2 mA.


5.


Wait for 10 to 20 minutes then turn the Emission Poten�ometer CW un�l you have 5 mA of 

emission current.


6.


Wait 10 to 20 minutes and then increase the Emission Poten�ometer un�l you have 10 mA of 

emission current.


Содержание IG2

Страница 1: ...IG2 Manual For Use With the 32 175 Control RBD Instruments Inc 2437 NE Twin Knolls Dr Suite 2 Bend OR 97701 541 330 0723 WWW RBDINSTRUMENTS COM...

Страница 2: ...nstall the 04 165 Ion Source Control 10 Remote Switching the Ion Beam 10 Opera ng the IG2 With the 32 175 Controller 11 32 175 Front Panel Controls and Meter 11 Ini al Out gassing of the 04 165 Ion So...

Страница 3: ...technical informa on and instruc ons provided in the included documenta on It is also expected that unless Operators have the skills and knowledge required by maintenance personnel Operators will not...

Страница 4: ...either express or implied including but not limited to implied warran es of merchantability and tness for a par cular purpose This limited warranty gives customer speci c legal rights Customer may hav...

Страница 5: ...uded from the Limited Warranty for the speci c product of which they are a part However each of these expendable items will have its own warranty and will be replaced or repaired in accordance with it...

Страница 6: ...ioniza on chamber and are then focused at the target with energies of up to 2K eV The impurity content of the ion beam is minimized by using an o axis lament geometry A focusing lens permits high ion...

Страница 7: ...The diagram below iden es the dimensions of the RBD 04 165 as well as its sec ons Please note that the ver cal dimensions re ect the 04 165 dimensions when the op onal X Y aligner RBD part number IG2...

Страница 8: ...ng conditions 32 175 Specifications Specification Description Input Power 120 or 230 VAC 47 63 Hz Single Phase Output Voltage 5 kV to 2 kV in 500 volt increments Ripple to Noise 30 mV peak to peak Foc...

Страница 9: ...for damage If there is any damage please report it to the shipping company immediately 3 Verify that you have the following items If any are missing please contact RBD Instruments at 541 330 0723 or...

Страница 10: ...f the pins on the 04 165 ion source b The lament pins A to B and B to C should show less than 1 ohm of resistance c All other pins should be open to each other d All pins should be open to ground the...

Страница 11: ...lowing switches and controls on the 32 175 Control front panel a Set the Beam Control switch to O b Set the Beam Voltage Select dial to 500 which is its lowest se ng c Turn the Focus Adjust dial arrow...

Страница 12: ...reduced by 50 NOTE Before outgassing the 04 165 ion source the vacuum chamber needs to be baked out to remove water vapor from the ion source If at any time during out gassing the emission meter start...

Страница 13: ...e then slowly increase the emission current knob un l there is 25 mA of emission current 5 Back ll the chamber with Argon to 5 to 6 X 10 5 Torr 6 Set the beam voltage knob to the desired accelera on v...

Страница 14: ...nches Note that the IG2 EAPR requires a large ID tube approximately 1 5 to work properly The IG2 EAPR ange which is tapped for six 28 moun ng bolts is mounted to the vacuum cham ber at the appropriate...

Страница 15: ...rr with an inert gas such as argon Positive ions are created by electron impact within the ion gun s ionization chamber The ions are then extracted from the ionization chamber accelerated through a fo...

Страница 16: ...15...

Страница 17: ...16...

Страница 18: ...17...

Отзывы: