background image

Chapter 3: Commissioning Procedures

37

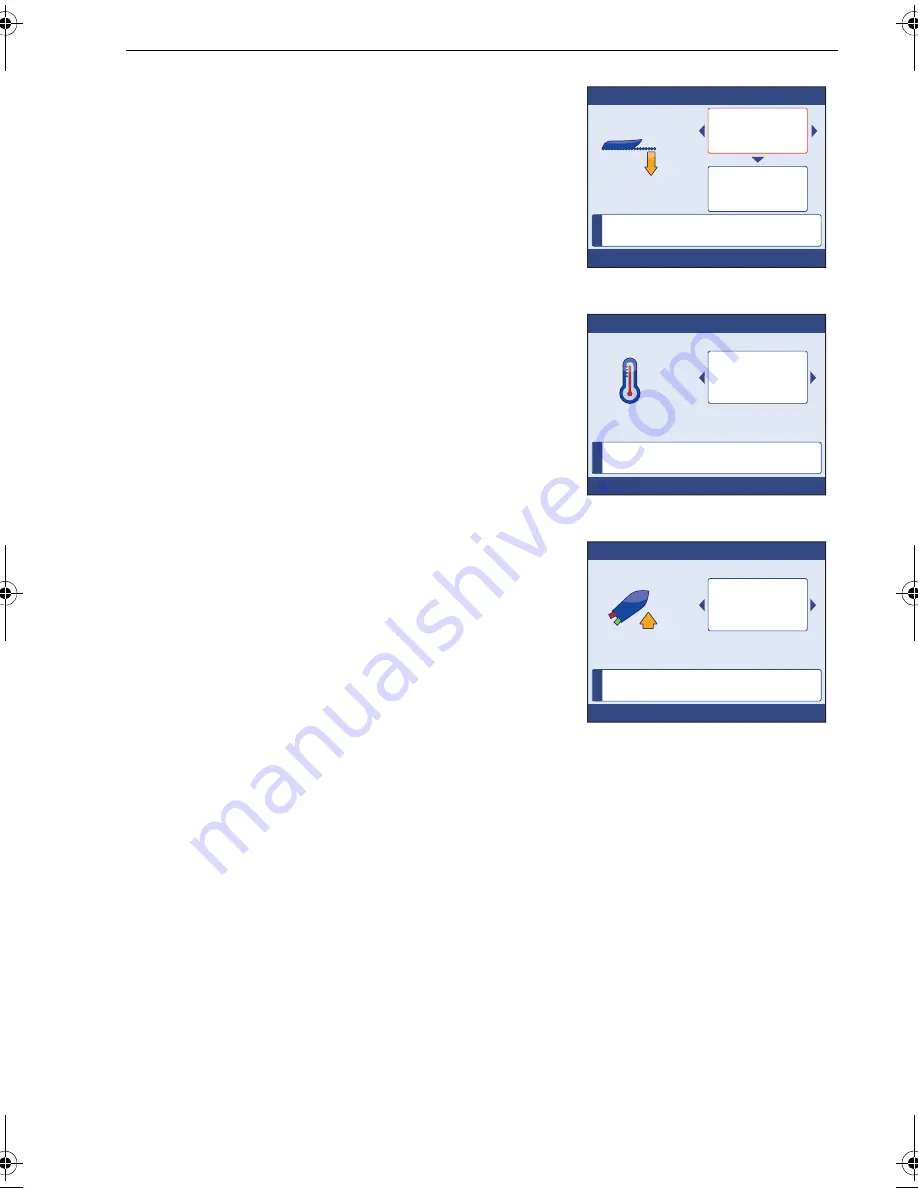
4. If necessary, press 

PAGE UP

 to select the 

upper (offset type) adjust box.

5. Scroll to either 

Water line

Keel 

or 

Transducer

as required. If you select 

Transducer

, an offset 

value of zero is automatically applied.

6. If you have selected:

• Either 

Water line

 or 

Keel, 

press 

PAGE DN

 to 

select the lower (offset value) adjust box 
then scroll to set the correct value.

Transducer

, ensure the offset value is zero.

7. Press 

OK

 to save the offset value and display 

the 

Temperature offset

 page.

8. Using a suitable thermometer, measure the 

water temperature, then scroll to set the correct 
system temperature value. 

9. Press 

OK

 to accept the value.

10. Press 

CANCEL

Calibrating trim tabs

If the boat has trim tabs, carry out the following procedure:
1. With the 

Transducers found

 menu displayed, 

select 

Trimtabs

. to display the 

Trim tabs check


(up) page.

2. Raise the trim tabs to the fully up position, then 

press 

OK

. The 

Trim tabs check

 (down) page is 

then displayed.

3. Lower the trim tabs to the fully down position, 

then when instructed to do so, press 

OK

.

End of transducer setup

When the dockside transducer setup procedures have been completed, carry out the 
relevant 

Miscellaneous setup

 procedures.

i

D1

1

176-1

Press OK to accept

Depth Offset

Keel

2.5

FT

Warning! Incorrect depth offset may lead to
vessel running aground.

i

D

111

7

9

-1

Press OK to accept

Temperature Offset

7

Adjust temperature until it reads
actual sea temperaure

C

°

i

D1

1336-1

Press OK to accept

Trim tab check

Press CANCEL to exit.

Ensure both trim

tabs are fully

up, then press

OK

87099_1.book  Page 37  Thursday, March 12, 2009  10:18 AM

Содержание ST70 Instrument

Страница 1: ...www raymarine com ST70 Document reference 87099 1 Date January 2009 Installation Guide ...

Страница 2: ... 45STV 60STV AST Autoadapt AutoGST AutoSeastate AutoTrim Bidata G Series HDFI LifeTag Marine Intelligence Maxi view On Board Raychart Raynav Raypilot RayTalk Raystar ST40 ST60 Seaclutter Smart Route Tridata and Waypoint Navigation are trademarks of Raymarine UK Limited All other product names are trademarks or registered trademarks of their respective owners Handbook contents copyright Raymarine p...

Страница 3: ...1 Displays 3 Functionality 3 Dimensions 3 Keypads 3 Power supplies 4 Dedicated display power supply 5 Positioning ST70 displays keypads 5 Siting requirements 5 Other considerations 5 1 3 Equipment tools 6 Parts supplied 6 Parts not supplied 8 Optional cabling and connectors 8 Chapter 2 Installation 11 2 1 Procedure 11 Cabling 11 Display power cables 11 SeaTalk ng connections 12 Mounting connecting...

Страница 4: ...up 26 Initial setup end routine 27 Next actions 27 3 3 Dockside setup 27 Autopilot system 27 Dockside wizard 27 Hard over time 31 End of autopilot dockside setup 32 Transducer setup 32 Introduction to transducer setup 32 Accessing transducer setup 33 Calibrating conventional transducers 35 Calibrating smart transducers 36 Calibrating trim tabs 37 End of transducer setup 37 Miscellaneous setup 38 S...

Страница 5: ...sducer 50 Return to normal operation 51 3 5 Checking autopilot operation 51 General 51 Checking rudder gain 52 Checking counter rudder 52 Rudder damping 53 Setting AutoTrim 53 3 6 After commissioning 53 EMC conformance 53 Appendix 1 Specifications 55 Display 55 Keypads 55 All types 55 Instrument keypad 55 Pilot Controller power boat keypad 56 Pilot Controller sail boat keypad 56 Index 57 Templates...

Страница 6: ...vi ...

Страница 7: ...e installed commissioned and operated in accordance with the Raymarine instructions provided Failure to do so could result in personal injury damage to your boat and or poor product performance WARNING Switch off power supply Ensure the boat s power supply is switched OFF before starting to install this product Do NOT connect or disconnect equipment with the power switched on unless instructed in ...

Страница 8: ...gine start does not have a separate battery Use Raymarine specified cables Do not cut or extend cables unless doing so is detailed in the installation manual Remember Where constraints on the installation prevent any of the above recommendations Always allow the maximum separation possible between different items of electri cal equipment This will provide the best conditions for good EMC performan...

Страница 9: ...onnectivity Technical accuracy To the best of our knowledge the information in this document was correct at the time it was produced However Raymarine cannot accept liability for any inaccuracies or omissions it may contain In addition our policy of continuous product improvement may change specifications without notice As a result Raymarine cannot accept liability for any differences between the ...

Страница 10: ...x ST70 Installation Guide ...

Страница 11: ...stalling Mount and connect the displays and keypads Install the transducers Fix equipment in place Commission the displays before use Getting assistance If you require assistance with installation please refer to your dealer and or visit the Raymarine web site at www raymarine com 1 2 Planning General information An ST70 system comprises one or more color displays controlled by one or more keypads...

Страница 12: ...ng backbone kit 5 Way Connector D11350 1 SeaTalkng backbone SeaTalkng backbone Wind transducer Transducer pod DST800 Smart transducer DT800 Smart transducer ST70 Instrument displays ST70 Pilot Controller display ST70 Instrument keypad ST70 Pilot Controller keypad 12V dc 12V dc 12V dc 12V dc SeaTalkng Power Supply Power Supply for ST70 displays Fuse Fuse Fuse ...

Страница 13: ...termine whether the display functions as either an Instrument or a Pilot Controller Dimensions Figure 1 2 Display dimensions Keypads Three types of keypad are available namely Instrument keypad Pilot Controller keypad for power boats Pilot Controller keypad for sail boats 7 44 in 189 mm 0 26 in 6 5 mm 1 66 in 42 3 mm D11374 1 6 0 in 152 mm ...

Страница 14: ...er LEN for each product Each display has a LEN value of 1 and each keypad type has a LEN value of 2 When planning an ST70 system take into account the total LEN of all the products you intend installing to ensure SeaTalkng is not overloaded Refer to the SeaTalkng Reference manual to ensure correct installation 3 62 in 92 mm 0 27 in 7 mm 1 36 in 34 5 mm D11375 1 5 35 in 136 mm 3 62 in 92 mm 0 88 in...

Страница 15: ...mum viewing angles are From above 30 From below 60 From the each side 55 It is protected against physical damage It is at least 9in 230mm from a compass It is at least 20in 500mm from radio receiving equipment There is reasonable rear access for installation and servicing It is within 400 mm of a SeaTalkng T piece or connector block or another ST70 display or keypad Other considerations When plann...

Страница 16: ...ated parts supplied Stud x 4 Finger nut x 4 ST70 display Mounting bracket Seal Suncover SeaTalkng spur cable 1 metre Power cable Installation guide User reference guide CD ROM SeaTalkng blanking plug ST70 Installation Guide Document reference 87099 1 Date October 2008 D11385 1 Warranty booklet ...

Страница 17: ...rol Card 2 Setting display brightness Card 3 Setting local time Card 4 Setting screen colors Card 5 Choosing data units Card 6 Data list Card 21 Pilot Controller Set up Pilot Controller display Card 7 Basic autopilot operation Card 8 Using AutoTack Card 9 Using autopilot Track mode Card 10 Using autopilot Wind Vane mode Card 11 Using autopilot fishing patterns Card 12 Using autopilot for power ste...

Страница 18: ...aTalkng backbone kit You may need other SeaTalkng components to achieve this Figure 1 6 Optional SeaTalkng parts D11409 1 Power drill Jig saw 92 mm 39 16 in hole cutter 5 mm 3 16 in drill bit 8 mm 5 16 in drill bit 64 mm 21 2 in hole cutter D11410 1 Spur cable Backbone kit Part numbers Part number A25062 A06038 1 ft 3 in 400 mm A06039 3 ft 3 in 1 m A06040 9 ft 10 in 3 m A06041 16 ft 4 in 5 m Backb...

Страница 19: ...Chapter 1 Getting started 9 For further information on SeaTalkng products refer to the SeaTalkng System Installation Guide talk to your dealer or visit the Raymarine web site at www raymarine com ...

Страница 20: ...10 ST70 User Reference Manual ...

Страница 21: ...ch ST70 display and keypad by carrying out the procedures for Cabling Mounting connecting Cabling Figure 2 1 Typical cabling at rear of displays and keypads Display power cables Ensure you have a suitable power supply for the displays as described in Chapter 1 then run a power cable supplied from the intended location of each display via a 5 A fuse or equivalent protective device to the display po...

Страница 22: ...ou can either flush mount or surface mount your ST70 displays and keypads Figure 2 2 Example of flush and surface mounting Use the appropriate template to facilitate the installation of each product Templates for flush and surface mounting are provided as follows Keypad templates are included at the end of this Installation Guide Display templates are provided with each display on a separate docum...

Страница 23: ... do not have an additional power cable connection To mount an ST70 display or keypad 1 Use the appropriate flush or surface mount template to cut the mounting slot for the display and to drill holes for the fixing screws 2 Clean and de burr the mounting surface 3 Fit gaskets and brackets Note Stick the self adhesive side of the gasket to the display or keypad NOT to the mounting location Figure 2 ...

Страница 24: ... 2 4 Flush mounting a display Connecting Make the necessary connections to each product see Figure 2 5 At each display and keypad make at least one SeaTalkng connection At each display also make a power connection Flush mounting D11389 1 ...

Страница 25: ...llar clockwise 2 clicks until it snaps into the LOCKED position 1 Rotate SeaTalk connector collar to the UNLOCKED position 2 Ensure SeaTalk cable end connector is correctly oriented then fully insert 4 Ensure display power cable connector is correctly oriented fully insert then secure ng ng ng ...

Страница 26: ...ith the accompanying instructions Connecting Conventional transducers CAUTION Do not use the wrong pod Using the wrong type of pod could cause damage to your equipment Before connecting always ensure that the pod you intend to use is compatible with the transducer type Conventional transducers and associated pods are available for wind depth and speed Each transducer connects via a dedicated pod t...

Страница 27: ...ed depth temperature transducer typeDT800 Connect the fitted SeaTalkng spur cable from each smart transducer to a convenient point on the SeaTalkng backbone Figure 2 7 Connecting smart transducer 2 3 Commissioning requirement WARNING Product installation operation An ST70 system must be prepared for use in accordance with the Commissioning Procedures before it is used for operational purposes Fail...

Страница 28: ...18 ST70 User Reference Manual ...

Страница 29: ...pilot calibration procedures in this chapter are those for a typical Raymarine autopilot system If necessary adapt these procedures to suit your system If you need assistance please contact your Raymarine dealer Control information As the ST70 displays do not have fitted controls all control actions are made at the appropriate ST70 keypad Information on keypad controls commissioning and menu maps ...

Страница 30: ...t Display again while the currently selected display is highlighted i e within 6 seconds this selects the next display in the system Repeating this action enables you to select each display in turn 3 2 Initial setup Carry out the initial setup procedures in the following sequence Switch on Selecting language Setting vessel type Setting display types and groups Allocate keypad Set date and time for...

Страница 31: ...cally apply the optimum system settings for your vessel type The options are Power Cruiser settings Note that the Power Cruiser settings apply as follows Power Cruiser 1 vessels capable of speeds up to 12 knots Power Cruiser 2 vessels capable of speeds up to 30 knots Power Cruiser 3 vessels capable of speeds greater than 30 knots Race Sail Inboard Speed Boat Sail Cruiser Power Cruiser 1 Catamaran ...

Страница 32: ...ress OK to display the Configure this display page For unassigned displays e g at first switch on the legends Group and Number are dis played If the selected display has already been set up this shows the current group and number in the group for the selected display 2 Use the Select Display button as necessary to move the screen highlight to the display you want to set up i e so it is the selecte...

Страница 33: ... ting up i Press OK at a keypad you want to link to this group ii Wait until the confirming popup disappears iii Repeat i and ii for each keypad you want to link to this group Note Remember you can only link Instrument keypads to In strument groups and Pilot Controller keypads to Pilot Controller groups 11 When you have allocated all the required key pads to this group press MENU to save the group...

Страница 34: ...t want to change any Time Date values proceed from Leaving date time setup below Setting date format To set the required date format 1 At the Time Date setup menu scroll to the Set date format option then press OK to display the Set date format page 2 Scroll to select the required Date Format then press OK to save the format and return to the Time Date summary page 3 Press OK to select the Time Da...

Страница 35: ...ur date and time formats and values are set as required 1 At the Time Date setup menu scroll to the Continue option 2 Press OK to proceed to the Units summary page 3 Proceed from Data units below Data units The Units summary comprises two pages and shows units currently in use You can accept all or change any of the data unit settings You can set Speed to either miles per hour kilometers per hour ...

Страница 36: ... you do not want to change any data units proceed from Leaving units setup below Changing units To change any data units 1 With the Select units menu displayed scroll to select the type of data you want to change i e Speed Depth Distance Wind Speed etc 2 Press OK to display the setup page for the units you have selected 3 Scroll to select the required units 4 Press OK to save the units setting and...

Страница 37: ...wing sequence Autopilot system Transducer setup Miscellaneous setup Autopilot system CAUTION Before starting any dockside setup procedure ensure the boat is securely moored alongside The autopilot dockside setup procedures comprise Using the Dockside wizard to Set drive type Perform motor phasing check Perform rudder check Setting rudder hard over time The exact procedures are dependent on the typ...

Страница 38: ...and motor checks Use the procedure for either Systems with a Rudder Reference transducer or Systems without a Rudder Reference transducer as appropriate Rudder and motor checks for systems with a Rudder Reference transducer After setting the drive type the Rudder check page center is displayed if your system has a Rudder Reference transducer If this is the case carry out the rudder and motor check...

Страница 39: ... OK to display the Motor Check entry page i D11168 1 Press OK to accept Rudder Check Turn the wheel hard to PORT and press OK Press CANCEL to exit i D11169 1 Press OK to accept Rudder Check Turn the wheel hard to STARBOARD and press OK Press CANCEL to exit i D11170 1 Press OK to accept Rudder Check Center the rudder and press OK Press CANCEL to exit i D11171 1 Press OK to continue Rudder Check Tas...

Страница 40: ...t the rudder and motor checks as follows 1 Press OK to display a Motor Check caution page 2 If it is safe to proceed press OK then check which way the autopilot drives the rudder direc tion Please center and let go of rudder and release any rudder drive clutch Press OK if it is safe for Autopilot to engage the rudder drive Press CANCEL to stop Motor Phasing Non referenced D11611 1 Rudder drive has...

Страница 41: ...applicable to boats with a rudder reference transducer On boats without a rudder reference transducer it is of critical importance to set the hard over time to ensure accurate autopilot operation To do this At a convenient Pilot Controller 1 Press MENU to display the Main Menu 2 Scroll to Autopilot calibration then press OK to display the Autopilot Autocalibra tion menu 3 Scroll to select the Driv...

Страница 42: ...tic variation Required display response Trim tab calibration Introduction to transducer setup Depth speed and temperature data are derived from transducers in the boat s hull Either of the following transducer configurations may be fitted to provide this data Conventional transducers i e separate Depth and Speed with the water temper ature sensor built into the Speed transducer Smart transducers e...

Страница 43: ...een the transducer and either the waterline or the bottom of the keel on your vessel as appropriate See Figure 3 1 Figure 3 1 Depth offsets Accessing transducer setup Use the Select Display button on a suitable Instrument keypad to select a convenient Instrument to carry out the Instrument system dockside setup procedures To access the required transducer 1 With any operational Instrument page dis...

Страница 44: ...ting con ventional transducers or Calibrating smart transducers as appropriate The correct Water Temperature using the procedure described under either Calibrating conventional transducers or Calibrating smart transducers as appropriate Trim tabs D11173 1 Press OK to continue Transducer Setup ST70 will now search the network for transducers Press CANCEL to abort i D11208 1 Press OK to continue Sea...

Страница 45: ...he DepthOffsetoption then press OK to display the Depth Offset setup page Check the type and value of the offset currently applied If the offset type is what you require and the value is correct for your boat press CANCEL to return to the Depth transducer menu then proceed from step 6 Otherwise proceed from step 3 3 If necessary press PAGE UP to select the upper offset type adjust box 4 Scroll to ...

Страница 46: ...offset The use of the correct depth offset is critical to the safety of the vessel If an incorrect offset value is applied this could result in misleading depth information being displayed with a consequent risk of running aground Take great care to ensure you set the correct value Use this procedure to calibrate Depth Temperature values for a smart transducer 1 With the Transducers found menu dis...

Страница 47: ...CEL Calibrating trim tabs If the boat has trim tabs carry out the following procedure 1 With the Transducers found menu displayed select Trimtabs to display theTrim tabs check up page 2 Raise the trim tabs to the fully up position then press OK The Trim tabs check down page is then displayed 3 Lower the trim tabs to the fully down position then when instructed to do so press OK End of transducer s...

Страница 48: ...an up to date chart of the area in which you intend using your boat to ascertain the correct value of magnetic variation Note As the magnetic variation is dependent on your geographical location you may need to change the magnetic variation value during a long voyage To set the magnetic variation 1 With theAdvancedOptionsmenudisplayed as above scroll to select the Variation option 2 Press OK to di...

Страница 49: ...nse rate Changing display response rate The display response rate determines the rate at which data readings update You can adjust the response independently for each display and for individual data types to best suit the conditions under which you are operating If you want to change the response at any display 1 With the Main Menu displayed scroll to Display Settings 2 Press OK to display the Dis...

Страница 50: ... the wheel to move the rudder To the port end stop and note the angle on the rudder bar To the starboard end stop and note the angle on the rudder bar 6 Observing the Rudder limit page scroll to set the rudder limit to 5 less than the lowest angle you have noted in each case 7 Press OK to save the setting and return to the Drive settings menu Setting rudder offset The Rudder offset page is availab...

Страница 51: ... sufficient open space for calibration The open water calibration manoeuvres require a clear familiar area of water with enough depth for your vessel Ensure you are not likely to collide with any vessel or other obstruction during calibration WARNING Unexpected turns The autopilot may make unexpected turns during open water calibra tion Maintain a speed that will enable safe turns Sea Trial Warnin...

Страница 52: ...etic deviation correction procedure commonly called swinging the compass involves turning your boat in slow circles so the autopilot can automatically determine the deviation and apply any correction required The correction procedure reduces deviation errors to a few degrees As magnetic deviation can cause significant compass errors on your boat you MUST complete the compass swing before any other...

Страница 53: ... SeaTalk SeaTalkng or NMEA the autopilot is set to the GPS heading while you steer to a known magnetic heading This step provides a rough alignment to reduce the amount of subsequent adjustment required If GPS data is available align the compass as follows 1 Steer the boat on steady course and travel above 3 knots 2 Follow the on screen instructions until the screen displays the OK message then pr...

Страница 54: ...y completed 3 Ensure it is safe to proceed then press AUTO to start the AutoLearn During AutoLearn Maintain a normal cruising speed at least 3 knots A number of instructions will be displayed Follow these instructions to complete the procedure WARNING Clear water When using Autolearn you must have significant clear water both in front and to the sides of the vessel This is needed to accommodate a ...

Страница 55: ...have completed the appropriate procedures proceed to Return to normal operation Preliminary procedure To carry out any Instrument seatrial calibration procedure switch on the display then when an operational page is displayed 1 With an Instrument operational page displayed press MENU to select the Main Menu 2 Scroll to Advanced options 3 Press OK to display the Advanced options menu 4 Scroll to th...

Страница 56: ...lect the Calibrate Vane start screen 5 Keeping the boat speed below 2 knots and observing the screen turn the boat in circles then press OK to start the calibration 6 Observe the Calibrate Vane run screen and continue turning the boat If the boat speed is too high during calibra tion a Slow down message is displayed If this happens reduce your speed Calibration completes automatically 7 When calib...

Страница 57: ...ess OK to accept the value and return to the Wind transducer setup menu 4 Press CANCEL to return to the Transducers found menu Speed calibration The object of speed calibration is to ensure that the speed readings at the ST70 Instruments are true indications of the boat speed ideally over the speed range of the vessel i e from stationary to top speed In order to take into account the changes in wa...

Страница 58: ...ting speed calibration To calibrate the Speed transducer 1 With the Transducers Found menu displayed see Preliminary procedure on page 45 use the appropriate Instrument keypad to scroll to the Speed option 2 Press OK to select the Speed transducer setup menu 3 Scroll to the Calibration option 4 Press OK to select the Speed Calibration screen 5 Press PAGE UP to highlight the calibration speed field...

Страница 59: ... only need to carry out a manual speed calibration if SOG data is not available If you have successfully calibrated your system using SOG data ignore this manual procedure To manually calibrate a conventional speed transducer 1 Using the appropriate start speed cal ibration procedure above display the speed Calibration screen and select the calibration speed field 2 In conditions of zero tide and ...

Страница 60: ... kt These values provide acceptable transducer performance in most circumstances However you can insert and delete different calibration speeds up to a maximum of eight to provide a range of speed values to best suit the way the boat will be used To do this 1 With the Transducers Found menu displayed see Preliminary procedure on page 45 scroll to the DST option 2 Press OK to select the DST Details...

Страница 61: ...n procedures return to normal operation as follows 1 With the Transducers found menu displayed press CANCEL to select the Search Results screen 2 Press CANCEL to select the Transducer Setup screen showing the search initiation message 3 Press CANCEL to select the Advanced options menu 4 Press CANCEL to select the Main Menu 5 Press CANCEL to return to normal operation 3 5 Checking autopilot operati...

Страница 62: ... a long time to make the 40 turn with no overshoot as at B in Figure 3 3 the rudder gain is too low Figure 3 3 The affect of different rudder gain values If necessary use the Setting rudder gain procedure in the ST70 User Reference Manual to improve autopilot performance Checking counter rudder To check the counter rudder setting 1 Ensure you have set the response to level 5 as described above 2 M...

Страница 63: ...t less stable If the autopilot Gives unstable course keeping and the boat snakes around the desired course decrease the AutoTrim level Hangs off course for excessive periods of time increase the AutoTrim level If necessary use the Setting AutoTrim procedure in the ST70 User Reference Manual to improve autopilot performance 3 6 After commissioning When the dockside setup and open water calibration ...

Страница 64: ...54 ST70 User Reference Manual ...

Страница 65: ...y 3 W Inrush current max peak 1 A SeaTalkng power supply Voltage working 9 V to 16 V dc Voltage nominal 12 V dc LEN 1 Inrush Current max peak 1A Approvals EMC Directive 2004 108 EC Australian NZ C Tick Power supply SeaTalkng Voltage working 9 V to 16 V dc Voltage nominal 12 V dc Power consumption Maximum 11 W standby 3 W LEN 2 Inrush current max peak 1A Weight 10 5 oz 300 g Approvals EMC Directive...

Страница 66: ... 92 mm x 5 35 in 136 mm x 2 24 in 57 mm Buttons Power STANDBY MENU CANCEL Select Display AUTO DODGE TRACK Rotary Control Rotate to select adjust Press in to perform OK function Dimensions overall 3 62 in 92 mm x 5 35 in 136 mm x 1 63 in 41 5 mm Buttons Power STANDBY MENU CANCEL 1 10 OK Select Display AUTO DODGE TRACK 1 10 ...

Страница 67: ...erature 36 display response rate 39 drive type 28 ground wind calculation 38 magnetic variation 38 rudder motor checks with rudder reference 28 without rudder reference 30 smart transducers set depth offset 36 starting 33 transducers 32 trim tabs 37 Documentation ix Drive type 28 E EMC information checks prior to use 53 conformance vii installation guidelines viii Enhanced warranty ix G Ground win...

Страница 68: ... 22 display response rate 39 display type 22 drive type 28 ground wind calculation 38 hard over time 31 initial 20 local time 25 magnetic variation 38 rudder motor checks with rudder reference 28 without rudder reference 30 rudder limit 40 rudder offset 40 select language 21 speed calibration 47 conventional transducer 48 smart transducer 50 swinging the compass 42 time format 24 transducers 32 tr...

Страница 69: ...nt templates for the ST70 displays are provided in a separate document 87107 provided with the product ST70 keypad flush mount template Drill hole 8 mm 5 16 in diameter in 4 positions Bezel edge Sun cover edge Remove material from shaded area only UP ST70 Keypad FLUSH MOUNT Template 81 mm 3 2 in 125 mm 4 92 in D11378 1 ...

Страница 70: ...60 ...

Страница 71: ...unt template Drill hole 5 mm 3 16 in diameter in 4 positions Bezel edge Sun cover edge Remove material from shaded areas only UP ST70 Keypad SURFACE MOUNT Template Cut hole 64 mm 2 1 2 in diameter 57 8 mm 2 27 in D11379 1 97 8 mm 3 85 in ...

Страница 72: ...62 ...

Страница 73: ...ampton Road Portsmouth Hampshire PO6 4BQ United Kingdom Tel 44 0 23 9269 3611 Fax 44 0 23 9269 4642 www raymarine com Raymarine Inc 21 Manchester Street Merrimack New Hampshire 03054 4801 USA Tel 1 603 881 5200 Fax 1 603 864 4756 www raymarine com ...

Отзывы: