5.3 Base station mounting
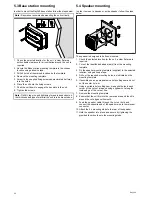
In order to mount the Ray260 base station follow the steps below.
Note:
Raymarine recommends mounting the unit vertically.
1
2
3
D12242-1
1. Check the selected location for the unit, a clear flat area
with suitable clearance for air ventilation around the unit is
required.
2. Secure the Base station mounting template in the chosen
location using adhesive tape.
3. Drills 4 holes at the marked location on the template.
4. Remove the mounting template.
5. Screw in the supplied fixing screws approximately half way
into the holes.
6. Place the unit onto the fixing screws.
7. Push the unit down to engage the key slots in the unit.
8. Tighten the screws.
Note:
Drill bit, tap size and tightening torque is dependent on
the thickness and type of material the unit is to be mounted on.
5.4 Speaker mounting
In order to mount a passive or active speaker follow the steps
below.
D12608-1
0
The speaker is designed to be flush mounted.
1. Check the selected location for the unit, a clear flat area is
required.
2. Cut out the identified shaded area(s) from the mounting
template
3. Fix the speaker mounting template (supplied) to the selected
location, using adhesive tape.
4. Drill out the required mounting holes, as indicated on the
mounting template.
5. If possible use an appropriate size hole cutting saw and cut
out the center hole, or
6. Using a suitable hole cutting saw, make pilot holes in each
corner of the cut out area and using a jigsaw cut along the
inside edge of the cut out line.
7. Remove the mounting template.
8. Ensure that the unit fits into the removed area and then file
around the cut edges until smooth.
9. Feed the speaker cable through the cut out hole and
connect the opposite end of the speaker wire to the relevant
connector.
10. Attach the 4 x mounting studs to the rear of the speaker.
11. Hold the speaker into place and secure by tightening the
provided thumb nuts onto the mounting studs.
28
Ray260
Содержание Ray260
Страница 2: ......
Страница 4: ......
Страница 18: ...18 Ray260 ...
Страница 30: ...30 Ray260 ...
Страница 52: ...52 Ray260 ...
Страница 60: ...60 Ray260 ...
Страница 64: ...64 Ray260 ...
Страница 68: ...68 Ray260 ...
Страница 72: ...72 Ray260 ...
Страница 73: ...Chapter 12 Technical support Chapter contents 12 1 Raymarine customer support on page 74 Technical support 73 ...
Страница 80: ...80 Ray260 ...
Страница 92: ...92 Ray260 ...
Страница 93: ......
Страница 94: ...www raymarine com ...

