


Chapter 2: Installation
19
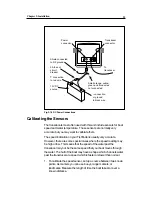
Mounting the Display Unit –
Standard Mount
You may mount the display unit on any flat surface using the bracket
supplied. See Fig. 2-13. (There is also an optional kit which allows you
to flush-mount the display in a flat panel or dashboard). Follow these
instructions if you are using the standard mounting bracket:
1. The “LCD” type display used on this unit is easier to see from certain
angles. Before selecting a permanent mounting location, make
temporary power connections and turn on the unit. This will allow
you to test the visibility of the display from several different angles.
2. Separate the display unit from the bracket by unscrewing the two
attaching knobs.
3. Mount the base of the bracket using the supplied screws.
4. Attach the unit to the bracket again using the knobs.
5. Adjust the display unit for the best viewing angle. You can tilt the
display up or down.
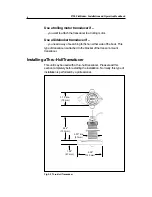
Fig. 2-13 Mounting the Display
Flush Mount
In order to do this installation, you will need the optional flush mounting
kit. See Fig. 2-14.
1. Select a mounting location on the dashboard or control panel.
Choose a clear, flat area at least 9" wide x 8" high (230 mm x 210
mm). Be sure you will also have at least 6" (152 mm) of clearance
Содержание L750
Страница 2: ...L750 Fishfinder Operation Handbook Raymarine...
Страница 3: ......
Страница 9: ...L750Fishfinder InstallationandOperationHandbook vi...


