background image

4.4

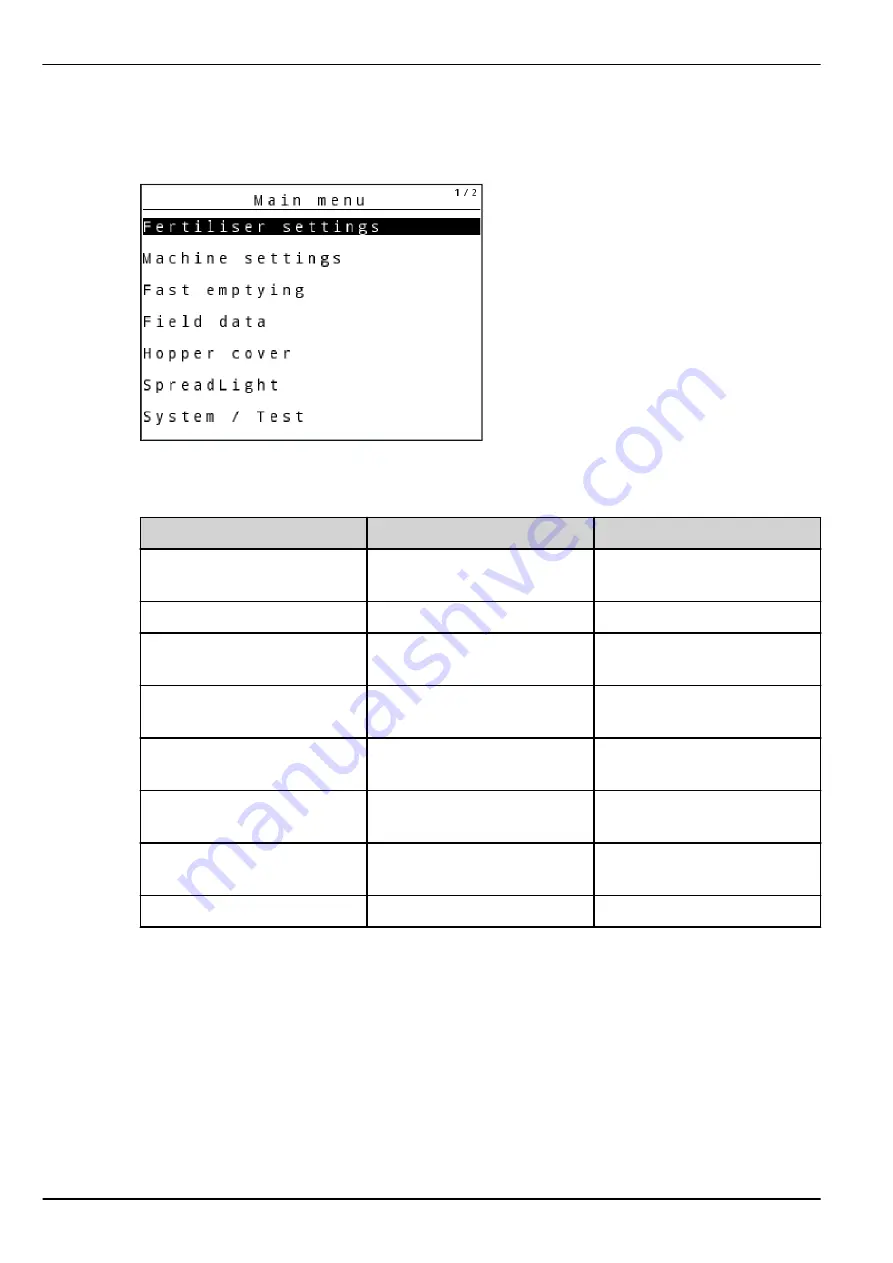
Main menu

Fig. 20: Main menu

Sub-menu

Meaning

Description

Fertiliser settings

Fertilizer and spreading
operation settings

4.5 Fertliser settings in Easy-
Mode

Machine settings

Tractor and machine settings

4.7 Machine settings

Fast emptying

Direct access to menu for fast
emptying of the machine

4.8 Fast emptying

Field data

Opens the menus for selecting,
creating, or deleting field data

4.9 Field data

Hopper cover

Opening/closing the hopper
cover

4.13 Hopper cover

SpreadLight

Activation/deactivation of
operating lights

4.12 Operating lights 
(SpreadLight)

System/Test

Settings and diagnosis of the
machine control unit

4.10 System/Test

Info

Machine configuration display

4.11 Info

4. Operation

40

5902662

QUANTRON-A AXIS/MDS

Содержание QUANTRON

Страница 1: ...use This operator s and assembly manual is an integral part of the machine Suppliers of new and second hand machines are required to document in writing that the operator s and assembly manual was delivered with the machine and handed over to the customer Version 3 52 00 5902662 h en 1021 Original instructions ...

Страница 2: ... unit QUANTRON A has been calibrated at the factory for the mineral fertilizer spreader with which it was supplied It cannot be connected to another machine without new calibration Please enter the serial number of the machine control unit and of the machine here When connecting the machine control unit to the machine these numbers must be checked Serial number of control unit Serial number and ye...

Страница 3: ...5 1 Operating screen icons 19 2 6 Structural menu overview 20 2 7 WIFI module 23 3 Attachment and installation 24 3 1 Tractor requirements 24 3 2 Connections sockets 24 3 2 1 Power supply 24 3 2 2 Forward speed signal 25 3 3 Connect control unit 25 3 3 1 Overview of connections to tractor 26 3 3 2 Overwiew of connections to machine 28 3 4 Metering slide preparation 32 4 Operation 33 4 1 Switching ...

Страница 4: ...ng 70 4 9 3 Stopping the recording 72 4 9 4 Deleting field data 72 4 10 System Test 73 4 10 1 Setting the language 74 4 10 2 Display configuration 75 4 10 3 Setting the mode 76 4 10 4 Test diagnosis 77 4 10 5 Data transmission 80 4 10 6 Total data counter 81 4 10 7 Service 81 4 10 8 Changing the system of units 81 4 11 Info 82 4 12 Operating lights SpreadLight 82 4 13 Hopper cover 84 4 14 Special ...

Страница 5: ...6 5 6 Spreading with the MAN km h operating mode 97 5 7 Spreading in the MAN scale operating mode 97 5 8 GPS control 98 6 Alarm messages and possible causes 102 6 1 Meaning of the alarm messages 102 6 2 Fault alarm 106 7 Special equipment 107 8 Guarantee and warranty 109 Table of contents QUANTRON A AXIS MDS 5902662 5 ...

Страница 6: ...rding to the severeness of the risk and the probability of its occurrence The warning symbols draw attention to the unavoidable residual risks inherent in the design to which users of the machine are exposed The warnings used are structured as follows Symbol signal word Explanation Level of danger of warnings The level of danger is indicated in the signal word The levels of danger are classified a...

Страница 7: ...ormation but which constitutes neither warnings nor hazards 1 3 Notes on text descriptions 1 3 1 Instructions and procedures Steps that the operator must carry out are shown as follows u Instruction for action step 1 u Instruction for action step 2 1 3 2 Lists Lists without a specific sequence are shown as lists with bullet points Property A Property B 1 3 3 Menu hierarchy keys and navigation Menu...

Страница 8: ...osis Voltage means that you can reach the Voltage menu item via the System Test menu and the Test diagnosis menu item The arrow corresponds to confirmation with the enter key 1 User instructions 8 5902662 QUANTRON A AXIS MDS ...

Страница 9: ...DS 11 1 Q MDS 18 2 Q MDS 12 1 Q MDS 20 2 Q MDS 17 1 Q MDS 19 1 Q AXIS M V8 8 section steps Function AXIS M 20 Q V8 AXIS M 30 Q V8 AXIS M 40 Q V8 AXIS M 20 EMC V8 AXIS M 30 EMC V8 AXIS M 40 EMC V8 AXIS M 30 EMC W V8 AXIS M 40 EMC W V8 Spreading depending on forward speed Mass flow control by measuring the torque of the spreading discs Weigh cells 2 Layout and function QUANTRON A AXIS MDS 5902662 9 ...

Страница 10: ...unction AXIS M 30 EMC VS pro AXIS M 40 EMC VS pro AXIS M 30 EMC W VS pro AXIS M 40 EMC W VS pro Spreading depending on forward speed Mass flow control by measuring the torque of the spreading discs Weigh cells 2 Layout and function 10 5902662 QUANTRON A AXIS MDS ...

Страница 11: ...3 USB port with cover For updating the PC The cover serves as protection against dirt 4 V24 data port Serial interface RS232 with LH 5000 and ASD protocol designed for connecting a Y RS232 cable to a remote terminal Plug connector DIN 9684 1 ISO 11786 for connecting the 7 pin to 8 pin cable for the speed sensor 5 Mounting bracket Attachment of the control unit to the tractor 6 Power supply 3 pin p...

Страница 12: ... device on off 2 Display Display of operating screens 3 T key TELIMAT Key to display the TELIMAT settings 4 Start Stop Start stop spreading 5 Clear Reset Clearing an input in an input field Resetting the excess quantity to 100 Acknowledgment of alarm messages 2 Layout and function 12 5902662 QUANTRON A AXIS MDS ...

Страница 13: ...celing entries and or returning to the previous menu at the same time 9 Navigation field Four arrow keys and one Enter key for navigation through menus and input fields Arrow keys for moving the cursor on the display or for highlighting an input field Enter key to confirm an input 10 Function keys F1 to F4 Selection of the functions next to the function keys on the display 11 Weighing Trip count D...

Страница 14: ...rtant information concerning the operation of the machine is displayed in the operating screen 2 4 1 Description of the operating screen The exact representation of the working screen depends on the actual settings selected and on the machine type Fig 3 Control unit display example AXIS M operating screen 2 Layout and function 14 5902662 QUANTRON A AXIS MDS ...

Страница 15: ...g slide scale opening left Current opening position of the left metering slide 2 Operating mode Shows the current operating mode 3 Icon TELIMAT This icon appears on the right for AXIS and on the left for MDS if the TELIMAT sensors are installed and the TELIMAT function is enabled factory setting or the T key is activated 2 Layout and function QUANTRON A AXIS MDS 5902662 15 ...

Страница 16: ...of the function by means of the function keys below 8 PTO speed Only EMC function Current PTO speed See 4 6 6 PTO speed 9 Drop point Current position of the drop point 10 Sensor brd spread AXIS only This icon appears if the limited border spreading system is in the operating position and the function is enabled factory setting 11 Section left Display of the left section status See 2 4 2 Display of...

Страница 17: ... metering slide status Fig 7 Display of the MDS metering slide status A Spreading operation inactive 1 Section deactivated 2 Section activated B Machine in spreading operation 3 Section deactivated 4 Section activated 2 Layout and function QUANTRON A AXIS MDS 5902662 17 ...

Страница 18: ... with AXIS VariSpread 8 1 Activated sections with 4 possible spreading width steps 2 The left section is reduced by 2 section steps Further display and setting options are explained in chapter 5 3 Working with sections 2 Layout and function 18 5902662 QUANTRON A AXIS MDS ...

Страница 19: ...ty adjustment plus Quantity adjustment minus Quantity adjustment left plus Quantity adjustment left minus Quantity adjustment right plus Quantity adjustment right minus Manual quantity adjustment plus Manual quantity adjustment minus Left spreading side inactive Left spreading side active Right spreading side inactive 2 Layout and function QUANTRON A AXIS MDS 5902662 19 ...

Страница 20: ...ding mode Pressing and holding 500 ms immediately deactivates an entire spreading side Increase right section plus The minimum mass flow is undercut 2 6 Structural menu overview The Easy Expert mode is adjusted in the System Test menu 2 Layout and function 20 5902662 QUANTRON A AXIS MDS ...

Страница 21: ...Easy Mode 2 Layout and function QUANTRON A AXIS MDS 5902662 21 ...

Страница 22: ...Expert Mode 2 Layout and function 22 5902662 QUANTRON A AXIS MDS ...

Страница 23: ...pp on a smartphone you can communicate spreading tables wirelessly to your control unit Please refer to the manual for the WIFI module Contact your dealer to install the FertChartApp on your control unit The WIFI password is quantron 2 Layout and function QUANTRON A AXIS MDS 5902662 23 ...

Страница 24: ... forward speed must be selected by using the correct gear ratio in such a way that it corresponds to a PTO speed of 540 rpm A 7 pin socket DIN 9684 1 ISO 11786 Via this socket the control unit receives the pulse for the current forward speed The 7 pin socket for the tractor and the forward speed sensor can be obtained as an expansion kit option see chapter 7 Special equipment 3 2 Connections socke...

Страница 25: ...PIN 2 theoretical forward speed e g gearbox wheel sensor 3 3 Connect control unit After having switched on the QUANTRON A control unit the machine number is briefly displayed Note the machine number The QUANTRON A control unit is factory calibrated for the fertilizer spreader with which it has been delivered Connect the control unit to the correct fertilizer spreader only Depending on the equipmen...

Страница 26: ...nit to the actuators of the machine using the 39 pin machine cable u Connect the control unit to the tractor s power supply using the 3 pin plug connector 3 3 1 Overview of connections to tractor Standard 1 Serial interface RS232 8 pin plug connector 2 Option Y cable V24 RS232 interface for storage medium 3 Connection for 39 pin machine plug rear 4 7 pin plug connector conforming to DIN 9684 5 Bat...

Страница 27: ...Y cable V24 RS232 interface for storage medium 3 Connection for 39 pin machine plug rear 4 3 pin plug connector conforming to DIN 9680 ISO 12369 5 Battery 6 Forward speed sensor 7 Option GPS cable and receiver 3 Attachment and installation QUANTRON A AXIS MDS 5902662 27 ...

Страница 28: ...Forward speed sensor 7 7 pin plug connector conforming to DIN 9684 8 Option QUANTRON A electricity supply via ignition switch 9 Option GPS cable and receiver 3 3 2 Overwiew of connections to machine MDS Fig 11 Schematic connection diagram of QUANTRON A MDS 1 39 pin machine plug 2 Metering slide actuator left right 3 Option level sensor left right 4 Option TELIMAT sensor top bottom 3 Attachment and...

Страница 29: ... A AXIS M variant Q 1 39 pin machine plug 2 Metering slide rotary drive left right 3 Option level sensor left right 4 Option TELIMAT sensor and or GSE sensor top bottom 5 Hopper cover 6 Option SpreadlLight 3 Attachment and installation QUANTRON A AXIS MDS 5902662 29 ...

Страница 30: ...2 Weigh cell left right machines with weigh frame only 3 Metering slide rotary drive left right 4 Option Level sensor left right 5 Option TELIMAT sensor and or GSE sensor top bottom 6 M EMC sensors left right center 7 Hopper cover 8 Option SpreadLight 3 Attachment and installation 30 5902662 QUANTRON A AXIS MDS ...

Страница 31: ...left right machines with weigh frame only 3 Metering slide rotary drive left right 4 Option Level sensor left right 5 Option TELIMAT sensor and or GSE sensor top bottom 6 Torque speed sensor left right 7 Drop point adjustment left right 8 Hopper cover 9 Option SpreadLight 3 Attachment and installation QUANTRON A AXIS MDS 5902662 31 ...

Страница 32: ... the AXIS fertilizer spreader Operation of the actuators by the control unit QUANTRON A can cause damage to the metering slides of the machine if the stop levers are incorrectly positioned Always clamp the stop levers at the maximum scale position Fig 15 AXIS metering slide preparation example Observe the operator s manual of your mineral fertilizer spreader 3 Attachment and installation 32 590266...

Страница 33: ...g menu items In the Fertiliser settings menu Spreading disc see 4 6 7 Disc type PTO see 4 6 6 PTO speed In the Machine settings menu AUTO MAN mode see 4 7 2 AUTO MAN mode and chapter 5 4 1 Switching on the machine control unit Requirements The machine control unit is correctly connected to the machine and the tractor For an example see Chapter 3 3 Connect control unit The minimum voltage of 11 V i...

Страница 34: ...tes regarding the display and navigation between menus Accessing the main menu u Press the Menu key See 2 3 Control elements The main menu is displayed The black bar indicates the first sub menu Not all parameters are displayed simultaneously in one menu window The arrow keys enable switching to the next or previous windows 4 Operation 34 5902662 QUANTRON A AXIS MDS ...

Страница 35: ...t various actions Text input Value input Settings made in further sub menus Exiting menus u Confirm settings by pressing the Enter key You will return to the previous menu Or u Press ESC The previous settings are retained You will return to the previous menu Or u Press the Menu key The operating screen is displayed again Press the Menu key again to return to the last menu 4 Operation QUANTRON A AX...

Страница 36: ...t kg ha m For weighing spreaders only Display of the remaining quantity in the hopper 4 3 2 Display rest quantity Meter counter Display of the distance traveled since the last reset of the meter counter Reset zeroing by pressing the C 100 key Zero scales For weighing spreaders only Weighing value for empty scales is set to 0 kg 4 3 3 Zero scales 4 3 1 Trip counter In this menu the values of the sp...

Страница 37: ...ess the kg key The operating screen is displayed again Checking the trip counter during spreading During spreading i e with the metering slides open you can open the Trip counter menu to display the current values If the values are to be permanently monitored during spreading freely assignable display fields in the operating screen can also be assigned the kg tripvalues ha trip or m trip values se...

Страница 38: ...e Application rate and Working width values cannot be changed in this menu They are for information purposes only Fig 19 Menu kg left 1 Remaining quantity input field 2 Application rate display field from Fertiliser settings 3 Working width display field from Fertiliser settings 4 Display of the area that can be spread 5 Display of the distance that can be spread u Access the menu Weighing Trip co...

Страница 39: ...g the scales the following requirements have to be fulfilled the hopper is empty the machine is at a standstill the PTO is switched off the machine is in a horizontal position and off the ground the tractor is at a standstill Zero scales u Access the menu Weighing Trip count Zero scales u Press the Enter key The weighing value for the empty scales is now set to 0 kg The Weighing trip counter menu ...

Страница 40: ...u for fast emptying of the machine 4 8 Fast emptying Field data Opens the menus for selecting creating or deleting field data 4 9 Field data Hopper cover Opening closing the hopper cover 4 13 Hopper cover SpreadLight Activation deactivation of operating lights 4 12 Operating lights SpreadLight System Test Settings and diagnosis of the machine control unit 4 10 System Test Info Machine configuratio...

Страница 41: ...u the fertilizer and spreading settings can be changed u Access the menu Main menu Fertiliser settings In the M EMC function the mode is automatically set to expert Fig 21 Fertiliser settings menu for AXIS Easy mode Fig 22 Fertiliser settings menu for MDS Easy mode 4 Operation QUANTRON A AXIS MDS 5902662 41 ...

Страница 42: ...he operator s manual for the machine 4 6 4 Drop point Vane setting Input of vane settings The display is only for information purposes Please observe the operator s manual for the machine Start calibration Accessing the sub menu for executing the calibration 4 6 5 Calibration 4 6 Fertiliser settings in Expert Mode The Mode setting is described under 4 10 3 Setting the mode In this menu the fertili...

Страница 43: ...4 Fertiliser settings menu for MDS Expert mode Fig 25 Fertiliser settings menu for AXIS MDS tabs 3 4 Sub menu Meaning Description Fertiliser name Fertilizer selected from the fertilizer chart 4 6 11 Fertilizer charts 4 Operation QUANTRON A AXIS MDS 5902662 43 ...

Страница 44: ...ve the operator s manual for the machine Start calibration Accessing the sub menu for executing the calibration 4 6 5 Calibration PTO AXIS M Influences the EMC mass flow control Factory setting AXIS M 20 2 30 2 540 rpm AXIS M 50 2 750 rpm 4 6 6 PTO speed Spreading disc Setting of the spreading disc type mounted on the mineral fertilizer spreader Influences the EMC mass flow control Selection list ...

Страница 45: ...nt cm rear Selection list 0 6 40 40 50 50 60 60 70 70 70 76 Manufacturer Fertilizer manufacturer input Composition Percentage of the chemical composition Distance factor Input of the distance factor from the fertilizer chart Required for OptiPoint calculation Calculate OptiPoint Input of the GPS control parameters 4 6 9 Calculate OptiPoint GPS Control info Display of information of the GPS Control...

Страница 46: ...ased the dosing quantity is reduced If the flow factor is reduced the dosing quantity is increased An error message is displayed if the flow factor is outside the preset range See chapter 6 Alarm messages and possible causes If you are spreading organic fertilizer or rice you need to reduce the minimum factor to 0 2 Otherwise the error message will be displayed constantly If you have obtained the ...

Страница 47: ... spreading See 4 10 2 Display configuration and 4 7 2 AUTO MAN mode Minimum factor The machine control unit automatically sets the minimum factor to one of the following values depending on the entered value The minimum factor is 0 2 if the entered value is less than 0 5 The minimum factor is 0 4 if you enter a value over 0 5 Display of flow factor with M EMC function AXIS only Enter a value for t...

Страница 48: ...oint using the fertilizer chart u Enter the determined value in the input field u Press the Enter key The Fertiliser settings window is displayed with the new drop point AXIS M VS pro With the AXIS EMC mineral fertilizer spreader the drop point is set via the electrical drop point adjustment exclusively u Access the menu Fertiliser settings Drop point u Determine the position for the drop point us...

Страница 49: ...d for the weighing spreaders function and for all machines in operating mode AUTO km h AUTO kg This menu item is inactive In this menu you can determine the flow factor based on a calibration and save it in the control unit Execute the calibration Before spreading for the first time If the fertilizer quality has changed significantly moisture high dust content granulate damage If a new fertilizer ...

Страница 50: ...ey ensure that nobody is present in the hazard zone of the machine Acknowledge the Approach drop point alarm message by pressing Start Stop u Press the Start Stop key The drop point is activated The alarm is cleared The second calibration page is displayed u Set the spreader side on which the calibration is to be carried out Press the key to select the left spreading side or Press the key to selec...

Страница 51: ...owever a minimum of 20 kg should be calibrated u Press Start Stop again The calibration is completed The metering slide closes The third calibration page is displayed WARNING Risk of injury due to rotating machine parts Any contact with rotating machine parts drive shaft hubs may lead to bruises abrasions and crushing injuries Body parts or objects may be caught or drawn in Switch off the tractor ...

Страница 52: ...yed CAUTION Risk of injury due to automatic adjustment of the drop point When the Start Stop function key is pressed the drop point is automatically moved to the preset value by an electrical actuator Speedservo This may cause injury Before pressing the Start Stop key ensure that nobody is present in the hazard zone of the machine Acknowledge the Approach drop point alarm message by pressing Start...

Страница 53: ...erent spreading discs on your machine you must enter the correct type in your control unit u Access the menu Fertiliser settings Spreading disc u Activate the spreading disc type in the selection list The Fertiliser settings window is displayed with the new spreading disc type 4 6 8 Boundary spreading quantity In this menu the application rate reduction for the TELIMAT boundary spreading unit can ...

Страница 54: ...lculate OptiPoint The first page of the Calculate OptiPoint menu is displayed The indicated forward speed refers to the forward speed in the area of the switching positions See 4 6 10 GPS Control info u Enter the average forward speed in the range of switching positions u Press the Enter key The third page of the menu is displayed Fig 27 Calculate OptiPoint page 3 No Meaning Description 1 Distance...

Страница 55: ...ly to the corresponding settings menu of the GPS terminal With some terminals however a manual entry is required This menu is for information purposes only See the operating manual for your GPS terminal 4 6 11 Fertilizer charts In this menu you can create and manage your own fertilizer charts Selecting a fertilizer chart has an effect on the fertilizer settings the machine control unit and the min...

Страница 56: ...ess the option Open and back to fertiliser settings u Press the Enter key The Fertiliser settings menu is displayed and the selected element is loaded into the fertilizer settings as the active fertilizer chart u Select the Fertiliser name menu item u Enter a name for the Fertiliser chart We recommend naming the fertilizer chart after the fertilizer Specific fertilizers can thus be assigned to fer...

Страница 57: ... will move the actuators of the drop point to the value stored in the fertilizer chart Copying an existing fertilizer chart u Select the desired fertilizer chart The display shows the selection window u Select the option Copy element A copy of the fertilizer chart is now in the first free position on the list Deleting an existing fertilizer chart u Select the desired fertilizer chart The display s...

Страница 58: ...settings Communication of the values to the GPS terminal For machines with VariSpread pro the values from the VariSpread table are automatically communicated to the GPS terminal For machines with VariSpread V8 this depends on the GPS terminal 4 7 Machine settings In this menu you can enter settings for the tractor and the machine u Access the menu Machine settings Fig 30 Machine settings menu exam...

Страница 59: ...ons 4 7 5 Easy Toggle Appl corr L Appl corr R Correction of the deviations between the entered application rate and the actual application rate Correction in percent on the right and or left side 4 7 1 Forward speed calibration The speed calibration is the basic requirement for a precise spreading result Factors such as tire size a different tractor all wheel drive slippage between tires and groun...

Страница 60: ...lay of the number of pulses over 100 m 4 Tractor calibration sub menu 5 Icons for memory locations of profiles 1 to 4 Accessing a tractor profile u Access the menu Machine settings Tractor km h The displayed values for name origin and number of pulses refer to the profile highlighted in red u Press the function key F1 F4 under the memory location icon Recalibrating the speed signal You can either ...

Страница 61: ...e of the profile The name is restricted to 16 characters We recommend using the name of the tractor for ease of understanding See 4 14 1 Entering text u Select the pulse transducer for the forward speed signal For radar pulses press the F1 function key 5 For wheel pulses press the F2 function key 6 The display shows the pulse transducer The number of pulses of the speed signal must still be specif...

Страница 62: ...ence distance u Press the F1 3 function key The display shows the number of received pulses u Press the Enter key The new pulse count is saved The calibration menu is displayed again 4 7 2 AUTO MAN mode The machine control unit automatically adjusts the dosing quantity according to the speed signal This adjustment is influenced by the application rate working width and flow factor By default the u...

Страница 63: ...u Access the menu Machine settings AUTO MAN mode u Select the desired menu item from the list u Press OK u Follow the instructions on the screen We recommend having the flow factor displayed in the working screen By doing so you can observe the mass flow control during spreading See 4 10 2 Display configuration Important information on the use of operating modes for spreading operations is provide...

Страница 64: ...u Fill the hopper with fertilizer u Carry out a calibration to determine the flow factor or Determine the flow factor from the provided fertilizer chart u Press the Start Stop key The spreading starts MAN km h Manual mode u Switch on the QUANTRON A control unit u Access the menu Machine settings AUTO MAN mode u Select the MAN km h menu item u Press the Enter key The display shows the input window ...

Страница 65: ...the metering slide opening and forward speed values provided in the fertilizer chart The MAN scale operating mode enables manual adjustment of the metering slide opening during the spreading operation Requirement The metering slides are open activation with the Start Stop key In the MAN scale operating screen the icons for the sections are filled in red Fig 34 Operating screen MAN scale 1 Display ...

Страница 66: ...lect the Idle measurement signal menu item u Activate the option by pressing the Enter key A check mark is displayed The signal sounds when an automatic idle measurement starts u Deactivate the option by pressing the Enter key again The check mark disappears 4 7 5 Easy Toggle Here the toggle function of the L R key can be limited to 2 conditions of the F1 to F4 function keys By doing so you can av...

Страница 67: ... to quickly empty any residual material you can select the Fast emptying menu For this purpose before storing the machine we recommend completely opening the metering slides with the fast emptying function and switching off the control unit in this state This prevents the accumulation of humidity in the hopper Before starting the fast emptying process care must be taken to ensure that all requirem...

Страница 68: ... of the machine Fig 35 Fast emptying menu 1 Metering slide opening display 2 Icon for fast emptying here left side selected not started 3 Fast emptying of right section here not selected 4 Fast emptying of the left section here selected u Press the function key to select the section for which the fast emptying function is to be carried out The selected section is shown as an icon in the display u ...

Страница 69: ... filled field data 3 Display of active field data 4 Name of field data 5 F3 function key Delete field data 6 F2 function key Delete all field data 7 Display of memory location 4 9 1 Selecting a field data file Already saved field data files can be selected and processed again The data already saved in the field data is not overwritten instead the new values are added Press the left right arrow key...

Страница 70: ...u Select the required field data u Press the Enter key The first page of the current field data is displayed 4 9 2 Start the recording 4 Operation 70 5902662 QUANTRON A AXIS MDS ...

Страница 71: ... Stop 10 Display of memory location In this menu you can create and manage up to 200 field data files u Press the F1 function key under the start icon The recording starts The Field data menu displays the recording icon for the current field data file The operating screen displays the recording icon If a different field data file is opened the current field data file is stopped The active field da...

Страница 72: ...e field data file u Press the F2 function key below the stop icon Recording is finished 4 9 4 Deleting field data The QUANTRON A control unit allows deleting of recorded field data Only the content of the field data will be deleted the field data name will still be displayed in the name field 4 Operation 72 5902662 QUANTRON A AXIS MDS ...

Страница 73: ...a A message appears indicating that all data will be deleted see 6 1 Meaning of the alarm messages u Press the Start Stop key All field data is deleted 4 10 System Test In this menu the system and test settings for the machine control unit can be configured u Access the menu Main menu System Test Fig 39 System test menu Sub menu Meaning Description Brightness Display settings The settings can be a...

Страница 74: ... Setting the time Selection and modification of the setting with the arrow keys Confirmation with Enter key Data transmission Menu for data exchange and serial protocols 4 10 5 Data transmission Total data counter Display list spread quantity in kg spread area in ha spread time in h distance traveled in km 4 10 6 Total data counter Unit Display of values in the selected unit system metric English ...

Страница 75: ...ious windows u Press the Enter key The selection is confirmed The QUANTRON A control unit restarts automatically The menus are displayed in the selected language 4 10 2 Display configuration The three display fields in the operating screen can be individually adjusted and assigned the following values as desired Forward speed Flow factor FF ha trip kg trip m trip kg left m left ha left Idle time T...

Страница 76: ...operating screen is displayed The respective display field displays the new value 4 10 3 Setting the mode In the QUANTRON A control unit 2 different modes are available Easy Expert In the M EMC function the mode is automatically set to expert In the Easy mode only the parameters of the fertilizer settings required for spreading can be accessed It is not possible to create or manage fertilizer char...

Страница 77: ...the danger zone of the machine Sub menu Meaning Description Test points slider Test for approaching the various position points of the metering slides Calibration check Metering slider Moving the left and right metering slides Example metering slides Voltage Checking the operating voltage Level sensor Checking the level sensors Weigh cell Checking the sensors EMC sensors Checking the EMC sensors T...

Страница 78: ...ss the menu System Test Test diagnosis u Select the menu Metering slider u Press the Enter key The status of the motors sensors is displayed Fig 42 Test diagnosis example Metering slide 1 Position display 2 Signal display 3 Function keys for right actuator 4 Function keys for left actuator The Signal display shows the status of the electrical signals for the left and right side separately You can ...

Страница 79: ... Start self test 3 Connected equipment LIN bus device status notification The devices indicate various conditions 0 OK no equipment error 2 blockage 4 overload Example GSE sensor CAUTION Risk of injury due to moving machine parts During the tests machine parts may move automatically Before carrying out the tests ensure that nobody is present in the danger zone of the machine 4 Operation QUANTRON A...

Страница 80: ...t reached its end position 4 10 5 Data transmission Data transmission is carried out using various data protocols Sub menu Meaning ASD Automatic field documentation transmission of field data to a PDA and or Pocket PC via Bluetooth LH5000 Serial communication e g spreading using application maps GPS Control Protocol for automatic section control using an external terminal GPS Control VRA VRA Varia...

Страница 81: ...ader s counter readings are displayed spread quantity in kg spread area in ha spread time in h distance traveled in km This menu is for information purposes only 4 10 7 Service An input code is required to configure the settings in the Service menu These settings can only be modified by authorized service personnel 4 10 8 Changing the system of units Your system of units has been preset at the fac...

Страница 82: ... ha Mounting height in 1 x 2 54 cm 4 11 Info The Info menu provides information on the machine control unit This menu provides information on the configuration of the machine The information list depends on the equipment of the machine 4 12 Operating lights SpreadLight Only for AXIS special equipment In this menu you can activate the SpreadLight function to monitor the spreading pattern even in ni...

Страница 83: ... metering sliders open u Enter the Turn off delay s 1 in seconds The operating lights will switch off at the end of the entered time if the metering slides are closed Range from 0 to 100 seconds u Remove the check mark in the menu item SpreadLight AUTO 3 The automatic mode is deactivated Manual mode In the manual mode the operating lights can be switched on and off u Access the menu Main menu Spre...

Страница 84: ... at the end of the field you can open and close the hopper cover using the control unit and an electrical drive The menu is only used for operating the actuators which open or close the hopper cover The machine control unit does not detect the exact position of the hopper cover Observe the movements of the hopper cover Fig 46 Hopper cover menu 1 Opening process display 2 F4 function key Close hopp...

Страница 85: ...opper cover u Press the F1 function key During the movement an arrow appears which indicates the OPEN direction The hopper cover will open fully u Pour in fertilizer u Press the F4 function key During the movement an arrow appears which indicates the CLOSE direction The hopper cover will be closed If required you can stop the movement of the hopper cover by pressing the F2 function key The hopper ...

Страница 86: ...er to be written first in the input field u Use the arrow keys to select the character to be written in the character field u Press the Enter key The highlighted character appears in the input field The cursor jumps to the next position u Continue until the entire text is entered u Press the F4 OK function key The input is confirmed The control unit saves the text The display shows the previous me...

Страница 87: ...xt The display shows the previous menu It is not possible to delete individual characters Individual characters can only be replaced with a blank space underline at the end of the first 2 character lines The complete input can be deleted Deleting an input u Press the C 100 key The complete input is deleted u Enter new text if necessary u Press the F4 OK function key 4 14 2 Entering values In some ...

Страница 88: ...up Value increases Arrow down Value decreases Arrow left right Cursor moves to the left right u Press the Enter key Deleting an input u Press the C 100 key The complete input is deleted 4 14 3 Creating screenshots With every software update data will be overwritten We recommend always storing your settings as screenshots on a USB stick before implementing a software update Use a USB stick with an ...

Страница 89: ...tings pages as screenshots u Access the menu Main menu Machine settings The first page of the machine configuration is displayed u Press the T key and the L R key simultaneously The status indicator of the USB stick flashes The control unit beeps twice An image is stored as bitmap on the USB stick u Save both pages of the Machine settings menu as screenshots u Store all screenshots on your PC u Af...

Страница 90: ...y TELIMAT with hydraulic remote control The TELIMAT unit is hydraulically moved to its working or idle position You can activate and deactivate the TELIMAT unit by pressing the Limited border spreading key Depending on the position the display shows or hides the TELIMAT icon TELIMAT with hydraulic remote control and TELIMAT sensors If TELIMAT sensors are connected and activated the TELIMAT icon is...

Страница 91: ... alarm message 94 will be displayed see 6 1 Meaning of the alarm messages 5 3 Working with sections 5 3 1 Spreading with reduced sections You can spread fertilizer to sections on one or both sides to adapt the full spreading width to the field requirements Each spreading side can be adjusted in 4 preset sections VariSpread 8 or infinitely variable sections VariSpread pro See 2 1 Overview of suppor...

Страница 92: ...ead 5 3 2 Spreading operation with one section and in boundary spreading mode AXIS M V8 MDS V8 During spreading operation the sections can be changed gradually and border spreading can be activated The figure below shows the operating screen with boundary spreading activated and a section activated Fig 51 Operating screen with one section on the left boundary spreading on the right 1 Display of ap...

Страница 93: ...nd a section activated Fig 52 Operating screen with one section on the left boundary spreading on the right 1 Display of application rate change in boundary spreading mode 2 The right spreading side is in boundary spreading mode 3 The right spreading side is activated 4 Reduce or increase left section 5 Infinitely variable adjustment of left section VariSpread pro The application rate on the left ...

Страница 94: ... the specified application rate The M EMC function requires the following machine data for mass flow control PTO speed Disc type A PTO speed between 360 and 390 rpm is possible The desired speed should remain constant during spreading 10 rpm This gives you a higher quality of control Idle measurement is only possible if the actual PTO speed deviates by no more than 10 rpm from the input in the PTO...

Страница 95: ... Wait until the progress bar has been completed The idle measurement has been completed The idling time is reset to 20 min u Press the Start Stop key The spreading starts As long as the PTO is still running a new idle measurement is started at the latest every 20 minutes once the idling time has expired Under certain circumstances an idle measurement is required in order to record the new referenc...

Страница 96: ...he Enter key The Idle measurement screen is displayed The idle measurement is started u Adjust PTO speed if necessary The bar displays the progress 5 5 Spreading with the AUTO km h operating mode In AUTO km h operating mode the control unit automatically controls the actuator depending on the speed signal u Fertilizer configuration w Appl rate kg ha w Working width m u Fill the hopper with fertili...

Страница 97: ... out a calibration to determine the flow factor or Take the flow factor from the fertilizer chart and manually enter the flow factor u Press Start Stop The spreading starts Always observe the set forward speed during spreading 5 7 Spreading in the MAN scale operating mode The MAN scale operating mode you can manually adjust the metering slide opening during the spreading operation The manual mode ...

Страница 98: ... metering slide opening or F3 MAN to reduce the metering slide opening In order to achieve an optimum spreading result in manual mode as well we recommend using the metering slide opening and forward speed values provided in the fertilizer chart 5 8 GPS control The QUANTRON A control unit can be combined with a GPS compatible device Various data is exchanged between both devices to automate contro...

Страница 99: ... In the menu System Test Data transmission activate the sub menu item GPS Control VRA The target quantity from the application map on the GPS terminal is then automatically processed in the QUANTRON A control unit The A symbol next to the spreading wedges indicates that the automatic function is enabled The control unit opens and closes the individual sections depending on the position in the fiel...

Страница 100: ...epresents the ideal switch on distance for optimized fertilizer distribution Fig 56 Distance on measured from field border A Turn on distance C Field border If you want to change the switch on position in the field you need to adjust the Turn on dist m value A lower value for this distance means that the switch on position is closer to the field border A greater value means that the switch on posi...

Страница 101: ...lower value means that the switch off position is closer to the field border A greater value means that the switch off position is closer to the center of the field If you want to turn through the headland track enter a greater distance in Turn off dist m Here the adjustment must be as low as possible so that the metering slides close as soon as the tractor enters the headland track An adjustment ...

Страница 102: ... outside limits The flow factor must lie within a range between 0 40 and 1 90 The newly calculated or entered flow factor is outside this range 4 Hopper left empty The filling level sensor on the left reports empty The left hopper is empty 5 Hopper right empty The filling level sensor on the right reports empty The right hopper is empty 7 Data will be deleted Delete START Cancel ESC Safety alarm t...

Страница 103: ...message is displayed if the TELIMAT status is not detected for more than 5 seconds 15 Memory full Delete one private fertiliser chart A maximum of 30 fertilizer types are stored in the memory for the fertilizer charts 16 Approach drop point Yes Start Safety request before the drop point is automatically approached Drop point setting in the menu Fertiliser settings Fast emptying 17 Error by setting...

Страница 104: ...control unit is activated components may move unexpectedly Follow the displayed instructions only if all risks have been eliminated 36 Weighing quantity impossible Machine must stop Alarm message during weighing The Weigh quantity function can only be carried out if the machine is at a standstill and in a horizontal position 45 Error at M EMC sensors EMC control deactivated The sensor has stopped ...

Страница 105: ...ed by GPS Control 72 Error at SpreadLight Power supply is too high the operating lights will be switched off 73 Error at SpreadLight Overload 74 Defect at SpreadLight Connection error Defective cable Loose plug connector 93 This disc type requires a modification on the TELIMAT device Please follow the mounting instructions Spreading disc S1 is installed and the machine is equipped with TELIMAT Spr...

Страница 106: ...l Fig 58 Example of an alarm message Acknowledging an alarm message u Rectify the cause of the alarm message Please observe the operator s manual of the machine and section 6 1 Meaning of the alarm messages u Press the C 100 key 6 Alarm messages and possible causes 106 5902662 QUANTRON A AXIS MDS ...

Страница 107: ...ial equipment Illustration Designation Level sensor Forward speed sensor Y cable RS232 for data exchange e g GPS N sensor etc System tractor cable set 12 m 7 Special equipment QUANTRON A AXIS MDS 5902662 107 ...

Страница 108: ...Illustration Designation GSP cable and receiver TELIMAT sensor Universal bracket WiFi module 7 Special equipment 108 5902662 QUANTRON A AXIS MDS ...

Страница 109: ...ny representatives of the parent company if you have any questions or doubts Warranty claims must be submitted to the company within 30 days at the latest after the damage has occurred The date of purchase and the machine number must be indicated If repairs under the warranty are required they must be carried out by the authorized workshop only after consultation with RAUCH or the company s appoin...

Страница 110: ......

Отзывы: