


GB English
Programming at the timer
Auto
Auto is the normal operating mode
Press the
AUTO
key to return to normal
operation. During watering, the display shows
a blinking sprinkler symbol, the active
ZONE
number and watering
RUN TIME
remaining
for that zone.
Rain Delay — Up to 14 Days Press and hold
the
+
button. The number of days along with
the stop icon will be displayed.
• Press + or – to increase or decrease the rain delay.
• After rain delay has elapsed, watering will automatically resume.
Date/Time Set current date and time
• Press the
DATE/TIME
key.
• Press + or – to adjust the current selection.
• Press
NEXT (or BACK)
to select the value you
wish to change.
Zone Schedule Create irrigation schedules
Press the zone
SCHEDULE
key, then follow steps 1 through 4.
1
Select Zone: Press
+
or
–
to select
desired
ZONE
number; then press
NEXT
.
2
Set Watering Run Time: Press
+
or
–
to set desired
RUN TIME
;
then press
NEXT
.
3
Set Watering Start Times: Press
+
or
–
to set first
START TIME
; then press
NEXT
.
REPEAT
as desired to set additional START TIMES for that zone.
NOTE:
Pressing
NEXT
with -:- (OFF) is blinking on the display will
advance to Step 4.
NOTE:
Watering START TIMES automatically stack.
4
Set Watering Start Days: Press
+
or
–
to select one of four available
options:
4-a
Custom Days
• Press
+
or
–
to select
then press
NEXT
.
• Press
ON
(to enable) or
OFF
(to disable) the blinking
SELECTION DAY
.
Cursor will then advance to the next
SELECTION DAY
.
REPEAT
for each day of the week as desired.
4-b
Odd Days
Press + or - to select
then press
NEXT
.
4-c
Even Days
Press
+
or
–
to select
then press
NEXT
.
4-d
Cyclic Days
• Press
+
or
–
to select
then press
NEXT
.
• Press
+
or
–
to set desired DAY CYCLE; then press
NEXT
.
• Press
+
or
–
to set desired START DATE; then press
NEXT
.
THEN
REPEAT
steps 1–4 for additional zones as desired.
Manual Watering Start watering immediately
• Press the
MANUAL
watering key.
• Press
+
or
–
to select
ALL
zones or any
SINGLE
zone; then press
NEXT
.
• Press
+
or
–
to set desired
RUN TIME
; then
press
NEXT
to begin watering.
NOTE:
Only stations with programmed RUN
TIMES and START TIMES will water manually.
NOTE:
To stop manual watering, press the
OFF
key to stop irrigation and
then press the
AUTO
key to return to normal operation.
NOTE:
If ALL zones are watering, pressing
NEXT
will advance watering
to next zone.
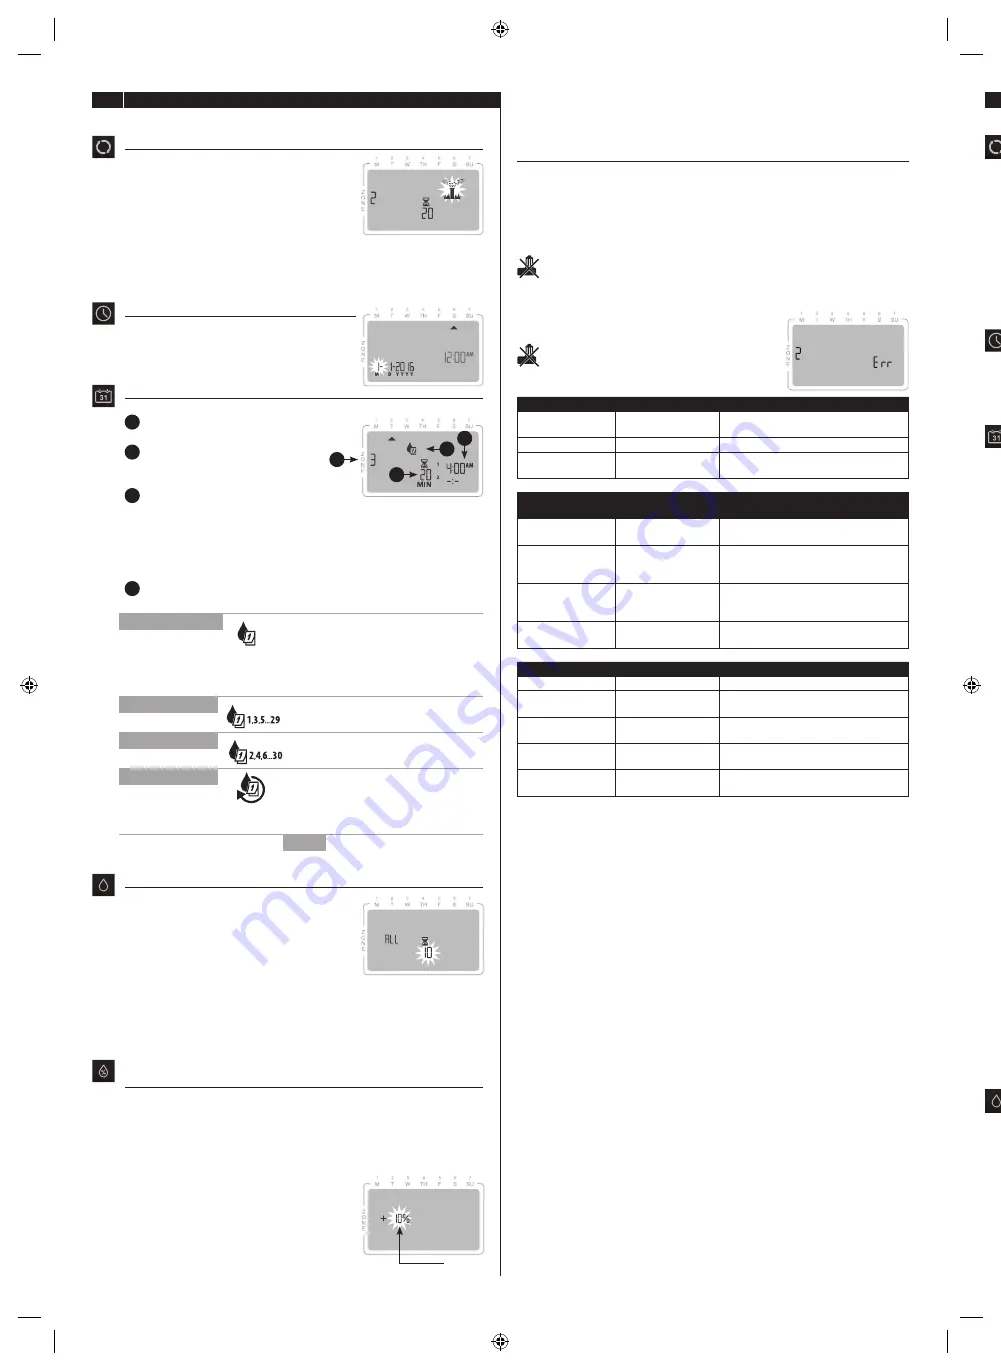
Seasonal Adjust Increase or decrease watering duration (Run Times)
for all Zones.
• Press the
SEASONAL ADJUST
button
• Press
+
or
–
to increase or decrease the SEASONAL ADJUST percentage
setting.
NOTE:
The SEASONAL ADJUST value can be adjusted from -90% to
+100%. For example, a +50% adjustment means a Run Time of 10
minutes will become 15 minutes.
NOTE:
If “Use Weather Correction Data”
is enabled in the app, then adjusting the
seasonal adjust at the timer will only make
a change for the day. The adjustment will
change back to the seasonal adjust setting
controlled by the app the next day.
NOTE:
SEASONAL ADJUST applies to ALL programmed irrigation
schedules.
Press
AUTO
to resume normal operation.
Rain Sensor Bypass
Set controller to OBEY or IGNORE a Rain Sensor.
Set Bypass for One Zone
• Press the
SCHEDULE
key.
• Press
+
or
–
to select the desired Zone number.
• Press and release both
BACK
and
NEXT
keys at the same time to toggle
between OBEY and IGNORE.
SYMBOL
is displayed when IGNORE is selected.
Set Bypass for All Zones
• Press the
AUTO
key.
• Press and release both
BACK
and
NEXT
keys at the
same time to toggle between OBEY and IGNORE.
SYMBOL
is displayed when IGNORE is selected.
Troubleshooting
Display Error
Cause
Solution
Err
Break or loose wire to
Master Valve if used.
Replace wiring. Press NEXT.
Blank
No power
Verify supply wires are connected.
Frozen
Possible electrical
surge
Unplug for 2 minutes. Press RESET.
WiFi Module
Blinking
Cause
Solution
Green
Timer not connected
to mobile device
Reconnect using App.
Red and Green
Mobile device not
detecting timer wifi
signal
Connect using App Setup Wizard.
Red
WiFi module needs to
be reset
Press WiFi module button until LED blinks
red and green. Follow the app Setup
Wizard to reset.
Not blinking
No power
Check AC outlet and seating of the
module in port.
Watering Issues
Cause
Solution
No watering
Water supply problem Check main and supply water lines.
Loose wires
Check wires at timer, valve and master
valve.
Corroded or damaged
wires
Replace if needed
Rain sensor may be
activated
Let sensor dry out or disconnect it and
add jumper wire to SENS terminals.
Jumper wire missing
or damaged
Replace if needed
FR Français
Programmation par minuteur
Auto
AUTO est le mode de fonctionnement par défaut
Appuyer sur la touche
AUTO
pour revenir
au fonctionnement par défaut. Pendant
l’arrosage, l’écran affiche un symbole
d’arroseur clignotant, le numéro de la
ZONE
active et le
TEMPS DE FONCTIONNEMENT
qui reste pour cette zone.
Report pour pluie – Jusqu’à 14 jours
Appuyer et maintenir enfoncé le . Le nombre de jours ainsi
que l’icône d’arrêt s’afficheront.
• A ou - pour prolonger ou diminuer le report pour pluie.
• À la fin du report pour pluie, l’arrosage recommencera
automatiquement.
Date / Heure Définir la date et l’heure actuelles
• Appuyer sur la touche
DATE / HEURE
.
• A ou - pour modifier cette sélection.
• Appuyer sur
SUIVANT (ou RETOUR)
pour
sélectionner la valeur à modifier.
Horaire de zone Créer des horaires d’arrosage
Appuyer sur la touche
HORAIRE
propre à la zone, puis suivre les étapes
1 à 4.
1
Sélectionner la zone : Appuyer sur
+ ou - pour sélectionner le numéro
de la
ZONE
désirée, puis appuyer sur
SUIVANT
.
2
Définir le temps de fonctionnement
de l’arrosage : Appuyer sur + ou - pour
définir le
TEMPS DE FONCTIONNEMENT
désiré, puis appuyer sur
SUIVANT
.
3
Définir les heures de début d’arrosage : Appuyer sur + ou - pour
définir
l’HEURE DE DÉBUT
désirée, puis appuyer sur
SUIVANT
.
RÉPÉTER
cette étape au choix pour définir d’autres
HEURES DE DÉBUT
pour cette zone.
REMARQUE :
Le fait d’appuyer sur
SUIVANT
lorsque -:- (ARRÊT) clignote
à l’écran fera passer l’affichage à l’étape 4.
REMARQUE :
Les HEURES DE DÉBUT de l’arrosage se chevauchent
automatiquement.
4
Définir les jours de début de l’arrosage : Appuyer sur + ou - pour
sélectionner l’une des quatre option disponibles :
4-a
Jours au choix
• Appuyer sur + ou - pour sélectionner
puis appuyer sur
SUIVANT
.
• Appuyer sur
MARCHE
pour activer ou sur
ARRÊT
pour désactiver le
JOUR SÉLECTIONNÉ
clignotant. Le curseur passera par la suite au
prochain
JOUR SÉLECTIONNÉ
.
RÉPÉTER
cette étape pour chaque jour de la semaine au choix.
4-b
Jours impairs
Appuyer sur + ou - pour sélectionner
puis appuyer sur
SUIVANT
.
4-c
Jours pairs
Appuyer sur + ou - pour sélectionner
puis appuyer sur
SUIVANT
.
4-d
Jours définis dans
le cadre d’un cycle
• Appuyer sur + ou - pour sélectionner
puis appuyer sur
SUIVANT
.
• Appuyer sur + ou - pour définir le CYCLE désiré, puis appuyer sur
SUIVANT
.
• Appuyer sur + ou - pour définir la DATE DE DÉBUT désirée, puis
appuyer sur
SUIVANT
.
ENSUITE
RÉPÉTER
les étapes 1 à 4 pour les autres zones au choix.
Arrosage manuel Commencer l’arrosage immédiatement
• Appuyer sur la touche
MANUEL
pour
l’arrosage manuel.
• Appuyer sur + ou - pour sélectionner
TOUTES
les zones ou une
SEULE
zone, puis
appuyer sur
SUIVANT
.
• Appuyer sur + ou - pour définir le
TEMPS DE
FONCTIONNEMENT
désiré, puis appuyer
sur
SUIVANT
.
REMARQUE :
Seules les stations ayant des TEMPS DE
FONCTIONNEMENT et des HEURES DE DÉBUT programmés permettent
l’arrosage manuel.
REMARQUE :
Pour arrêter l’arrosage manuel, appuyer sur la touche
MIN
MIN
4
3
2
1
Setting
183943-01,09JL20,MANUAL,ST8I-INTL,ManualOperation.indd 4
7/9/20 11:33 AM