Rain Bird MDC2 Скачать руководство пользователя страница 75

Using the Controller with a PC, 

continued

69

Note:

 Start times must be separated by a minimum 

of two minutes.

Note: 

A drop-down box appears when you select 

the 

Decoder

 columns. Use the drop-down boxes 

to make your selections from the 

decoders

 you 

already programmed into the controller.

  4.  Select 

OK

 to save the irrigation 

Schedule

 changes. 

Note:

 Please see 

Creating Irrigation Schedules


on page 41.

Note:

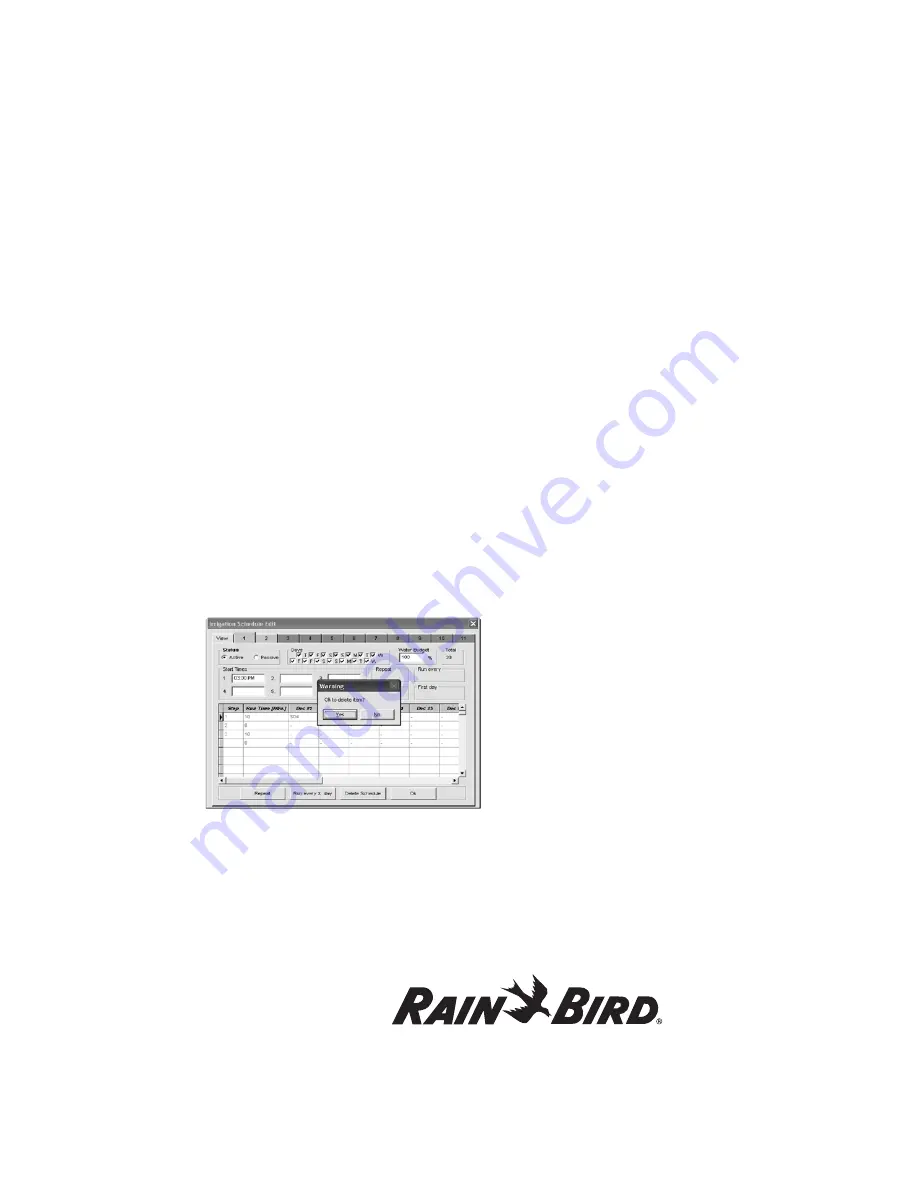
 To insert or delete a line in a schedule, click 

on the column immediately to the left of the step 
number. An arrow pointing to the right will appear. 
Then press the insert or delete key on the computer 
keyboard. Pressing the insert key will immediately 
insert a blank line above the step selected. Pressing 
the delete key will cause a warning box to appear. 
To confirm deletion of that line, click on “Yes”. Using 
this method will ensure that the database is properly 
updated.

Deleting a Schedule

When you delete a schedule, all irrigation 
programming information is erased from that 
schedule. You can return to the schedule at a 
later time and create a new program under the 
same irrigation schedule number. The 

Irrigation 

Schedule Edit

 screen employs color coding to 

indicate the status of irrigation schedules. The tab of 
each Schedule will be one of these colors:

Green

 - indicates the Schedule is Active

Red

 - indicates the Schedule is Passive 

Gray

 - indicates the schedule has no information in it.

To erase all data for a particular schedule:
  1.  On the 

Irrigation Schedule Edit

 window, click 

on the tab of the Schedule you want to view.

  2.  Click 

Delete Schedule

. You will be asked to 

confirm the deletion of the schedule (

MDC 

Notice

).

  3.  Click 

OK

. Note that the color of the tab of the 

deleted schedule changes to gray.

Erasing all irrigation schedules

You can erase 

ALL IRRIGATION SCHEDULES 

and 

IRRIGATION SCHEDULE CONTENTS

 stored on the 

PC.

  1.  From the 

Rain Bird Remote Access

 window, 

select 

Edit data

.

  2.  Select 

Edit irrigation data

 and 

Erase all

 from 

the pull-down menus to reach the 

Erase 

Irrigation Schedules

 window.

  3.  Select 

Yes

 to erase the information. Select 

No

 to 

cancel the action. 

Editing the global water budget

Editing global water budget lets you adjust all the 
Schedules quickly and easily. If you design individual 
Schedules with a nominal run time for each decoder 
and valve, and set the water budget at 100%, you can 
easily adjust to changes in weather conditions.

  1.  From the 

Rain Bird Remote Access

 window,  

select 

Edit data

.

Содержание MDC2

Страница 1: ...MDC Controller Unit MDC2...

Страница 2: ...5 Subpart J Safety Information and Icons Used in This Manual To quickly help you find identify and understand important information this manual uses the following icons and notations This icon indicat...

Страница 3: ...nding the Controller 11 Connecting to the Main Power Source 11 Connecting an Optional Sensor 13 Installing Program and Expansion Modules 14 Replacing the Battery 15 Programming and Operation 17 Famili...

Страница 4: ...g the Days 44 Selecting a Start Time 45 Setting the Water Budget WB 46 Setting the Programs for Active or Passive A P 46 Scheduling to Run on Specific Days and Dates 47 Repeating and pausing programs...

Страница 5: ...budget 69 Sending Data to the Controller 69 Manual Operations 70 Starting a Decoder Manually 70 Starting a Schedule Manually 71 Retrieving Monitoring Information 72 Failed Decoder List 72 Creating a...

Страница 6: ...Municipal Water Supply with a Master Valve NC or NO 100 Appendix IV 101 Sensors and Alarms 101 Sensor Unit of Measures 101 Alarm Triggers 101 Alarm Action Type 102 Alarm Action ID 102 Appendix V 103 F...

Страница 7: ...from one central location MDC Controllers use Schedules to control the days times and length of time each valve operates Once you program and store irrigation Schedules and other instructions the MDC...

Страница 8: ...m runs on a 14 day Schedule 4 Input terminal connections for rain or alarm sensor 4 Output terminals for 3 communications cables 4 Communications cables to support flow and auxiliary sensors 4 Slots p...

Страница 9: ...ist If any item is missing or damaged contact your Rain Bird distributor 1 Pre assembled Controller in a Plastic Wall Cabinet 2 Keys 1 Installation and Operating Instructions Manual 1 Mounting Templat...

Страница 10: ......

Страница 11: ...2 Controller cabinet is water resistant so you can mount it inside or outside 4 Select an area protected from vandalism where the user can easily reach the controller Rain Bird recommends placing the...

Страница 12: ...Installation Floor Field Wiring in Conduit 9 1 2 24 2 cm minimum 9 1 2 24 1 cm Cabinet is 4 3 8 11 1 cm Deep 120 Volt AC Wiring in Conduit To Fuse Box Wall 10 1 4 26 cm Locate for easy access and for...

Страница 13: ...hillips Head Screwdriver 4 Thin Blade Screwdriver 4 Lineman s Pliers 4 DBY Connectors 4 Hammer 4 Grounding Strap 4 Two wire MAXI Cable 14 AWG wire 4 Two wire MAXI Cable 18 AWG wire 4 8 AWG or 10 AWG B...

Страница 14: ...kout place the cabinet on a firm surface with the groove facing you Work your way around the groove with a slotted screwdriver firmly tapping out the knockout A hole on the underside of the cabinet fi...

Страница 15: ...ole in the center of the stud 2 Drill the holes and use the appropriate plugs or fasteners 3 Screw in the appropriate mounting screws leaving about 3 8 between the screw heads and wall Note The mounti...

Страница 16: ...he knockout holes make sure you seal the unused bottom holes If you run the wires through the bottom holes you will need to install conduits Slip the conduit through the hole and secure it with a male...

Страница 17: ...wire into the terminal Tighten the screw to secure the wire 2 Feed the ground wire through the same conduit you used for the communications cable and connect it to ground Connecting to the Main Power...

Страница 18: ...he back of the cabinet You also need to cut out the scored hole in the high voltage compartment s fiberboard liner To connect to the Main power source 1 Strip about 1 2 of the insulation off the ends...

Страница 19: ...the controller 1 Remove about 6 of the cable s outer sheathing and strip about 5 8 of the insulation from the ends of the two wires 2 Using wire nuts connect the two wire cable to the sensor wires ins...

Страница 20: ...y module To add or replace a program or expansion module 1 Use a Phillips head screwdriver to remove the two screws and lock washers holding the guide rail Be careful not to lose the lock washers 2 To...

Страница 21: ...ry 1 Remove the controller cabinet door from its hinges by opening the door then pushing the metal pin up and out of the hinge Set the door and pin aside 2 Unscrew and remove the faceplate Set the fac...

Страница 22: ...e Do not recharge disassemble or dispose of in fire To reassemble the controller 1 Reconnect the three ribbon cables by firmly pushing each connector into their slots on the board A small tab on the s...

Страница 23: ...p the MDC2 Controller to operate automatically You can also run the controller manually without changing the Programs you have set This chapter shows you how to use the controller s buttons and gives...

Страница 24: ...e buttons under each label As the labels change from one screen to the next so does the function of the buttons Labels with tabs contain submenus A backlight lights the display while you operate the b...

Страница 25: ...th the current date and time 24 hour military time Please see Appendix I Conversion Chart from Standard to Military Time on page 91 The message prompts you to Press OK the button pointing to the OK la...

Страница 26: ...n time for each decoder and valve 5 MTWTFSSMTWTFSS shows a 14 day display Schedule of the programmed days starting with the current day this example assumes the current day is Monday 6 Start Time Indi...

Страница 27: ...rrigation Schedule and manually start the decoders 18 Label use the button associated with the Manual label to enter a menu where you can manually start irrigation programs or decoders and Pause a run...

Страница 28: ...ou can choose between English UK British spelling and m3 h cubic meters per hour setting English US American spelling and GPM gallons per minute setting German m3 h Spanish m3 h or French m3 h 1 From...

Страница 29: ...Menu Setting the Date Time Formats 1 From the Main Menu navigate to 2 Date Time Formats and select OK You will be taken to the Date Time Formats menu 2 Select OK again The first active field is the Ti...

Страница 30: ...s Holding in the button pointing to the double arrows lets you scroll through the numbers quickly 3 OK moves the blinking markers to the month Scroll to the correct month and select OK to move the mar...

Страница 31: ...ires solenoids the recommended settings are 59F370 Please move to the next section Naming the Field Decoders Note If your system operates solenoids that are not Rain Bird do not change the default swi...

Страница 32: ...ssing the button pointing to the double arrow label one time increases or decreases the characters by five numbers or letters To switch the direction of the double arrow press the button pointing to t...

Страница 33: ...ntroller returns you to the beginning of the field 11 Select OK to select the Address and move the markers to the Booster Pump field Note If the solenoids connected to the decoder use Booster pumps to...

Страница 34: ...the valves to run again Entering the Pump Master Valve Information The MDC2 Controller supports master valves master pumps and up to nine booster valves or pumps Rain Bird recommends you use one Rela...

Страница 35: ...the decoder This prevents the MV Booster from stopping between two steps To enter additional Booster pump Addresses move the markers to the OK field and select OK to return to the Pumps screen 7 Move...

Страница 36: ...mmunications cable Note Please refer to Appendix IV for detailed information about the terms and units of measure mentioned in this section Programming a Sensor Decoder 1 From the Main Menu select 1 S...

Страница 37: ...he up and down arrows to set the value and select OK to save it 9 Move the markers to the Value field and activate Use the up and down arrows to set the value and select OK to save it 10 Move the mark...

Страница 38: ...Setting Up Sum Flow Alarms 1 From the Main Menu choose Set up Data and select OK You will be taken to the Set up Data Menu 2 Navigate to 6 Sensor Decoders and select OK The Sensor Decoders list appea...

Страница 39: ...d alarm condition and select OK 22 Select to return to the Main Menu Setting up an auxiliary sensor An auxiliary sensor works with rain or alarm sensors If the rain sensor is installed far from the co...

Страница 40: ...Window appears 3 Select OK to activate non watering starting time The active field is the hour which is indicated by alternating blinking arrow markers 4 Use the up and down arrows to change the hour...

Страница 41: ...st character position shows the field is active The current controller Software Firmware Versions also appear on the display screen 4 Use the up and down arrows to select either the Full or 1234567890...

Страница 42: ...ting arrow to 4 Return to return to the Set up Data menu Note If you press the button pointing to the minus label after you change the Switch Settings a screen appears asking if it is OK to Restart Sy...

Страница 43: ...r will not test any decoder that is listed before the one you select to start the test 4 Select OK to start the test After a few seconds the screen displays the test results in three current measureme...

Страница 44: ...troller to automatically activate and test each decoder in sequence please see Setting Up an Automatic Test Program on page 48 Testing the Sensor Decoders Once you install and program the sensor decod...

Страница 45: ...OK to reach the Short Finding screen In Short Finding Mode the MDC changes the frequency of the line voltage from 1 to 50 Hertz Hz 4 Check that the Clamp Amperemeter reads the current supplied by the...

Страница 46: ...a The Log Data shows you a complete list of the controller s activity The memory holds a 1500 line log Adding a new line after you reach the maximum erases the first line in the log 1 From the Main Me...

Страница 47: ...at specific times It is a watering plan that includes the days to water times to begin and end watering the various decoders you wish to operate and how long you want them to operate You can set up 10...

Страница 48: ...e Note You may include the same decoder in as many Steps as you want Note If you want to stop irrigation between Steps you can set up a Step without naming a decoder To do this simply program in a Run...

Страница 49: ...e same way You can program up to 100 Steps 11 Once you finish setting each Step press the button pointing to the highlighted Step label to return to the Schedule Set up Screen Inserting a step between...

Страница 50: ...ing repeats itself after 14 days 1 From the Main Operating Screen scroll to the Program you want 2 Select Sched then Day to activate the 14 day Schedule The blinking markers and box show the field is...

Страница 51: ...roll up or down to the first Start Time indicator 1 and select OK 4 Use the up and down arrows to set the first Start Time 5 Select OK to enter the Start Time into the Schedule 6 Scroll to the second...

Страница 52: ...ting the Programs for Active or Passive A P You can set each Program to be active A or passive P Active means the Program 1 11 responds to all automatic starts and stops if the controller is in the Ac...

Страница 53: ...ule change each time you press the button Note An arrow label next to Every shows the direction you are scrolling Pressing the button pointing to the arrow label changes the direction you are scrollin...

Страница 54: ...to automatically activate and test all decoders from the first one you installed to the last one by one You can adjust the Decoder Activation Time between 10 and 240 seconds 240 seconds is especially...

Страница 55: ...nytime by selecting Prog Operating the Irrigation Programs You can operate the MDC2 Controller completely automatically completely manually or by a combination of both Starting automatic irrigation pr...

Страница 56: ...set in Automatic 0 active Decoders shows until the first Schedule starts The Dec and Auto labels are highlighted and the sprinkler icon sprinkles when a Schedule starts 2 Selecting Pause temporarily s...

Страница 57: ...ntered but all prior to the stacked auto schedules Unlike in the Manual mode you do not need to switch the controller s operating mode To start a schedule manually when the controller is in Auto mode...

Страница 58: ...ould like to start the irrigation with 4 Use the up and down arrows to change the step number 5 Select OK Note The Manual Program starts at the first full minute The Program starts by displaying the f...

Страница 59: ...rn to the Manual Display Screen and continue with the scheduled irrigation Program Once the irrigation is over the screen again asks you to Select a Program or Decoder for manual activation To resume...

Страница 60: ...hows the number of Active Dec displaying only one at a time The sprinkler icon starts to sprinkle 5 Follow steps 2 4 to manually activate more decoders 6 Use the up and down arrows to scroll through e...

Страница 61: ...ll appear again every time you select an Automatic or Manual function Following are key warning indications that will appear on the screen and in logs AL where is from 1 to 10 is alarm 1 occurs while...

Страница 62: ...e the short circuit and display this message Type of problem Short Circuit Date and time of problem In Date and time problem was corrected Out If it still exists there is no Out time Warning sign disp...

Страница 63: ...e downloaded to the controller The software can also be used to upload data and programs from the controller Additionally it can retrieve log data from the controller and manually run stations and pro...

Страница 64: ...d to the Optocoupler 3 Attach one end of the second serial cable to the Optocoupler and the other end to your PC serial communication port Note Rain Bird recommends using the OLK 400 Optocoupler to pr...

Страница 65: ...t manually Please see your PC Operations Manual to learn how to add new software to your PC It is recommended to back up the database rbt 1db before upgrading from previous versions of the MDC softwar...

Страница 66: ...are then asked to select the Com Port Communications Port you used to connect the PC to the controller 6 Select Finish Done exits you from Connection wizard and Back returns you to the previous windo...

Страница 67: ...PC time 4 If necessary adjust the date and time and select Send time to Controller 5 Select OK once the two times match Controller Status Observation You can get information about the current status...

Страница 68: ...Error message appears asking to make sure the Connection Information is correct Note When retrieving data from the controller the following steps should be followed 1 Back up data in the PC 2 Clear a...

Страница 69: ...any of these settings If your system operates solenoids that are not Rain Bird do not change the default Switch Codes before verifying if the solenoids open If the solenoids do not open you may need t...

Страница 70: ...number of pulses in 10 second intervals Choose mA if you are using an analog flow sensor To establish a conversion ratio the controller uses to calculate the flow you only need to program the Value fl...

Страница 71: ...ff Generic or Flow to set up the alarm condition for each sensor decoder Note Specific definitions for sensors units of measure and alarm triggers Actions are contained in Appendix IV Configuring On O...

Страница 72: ...remotely by your MDC system hardware designed with this feature Your MDC control system can continually check on the flow rate in the system and compare it to pre defined acceptable levels It can also...

Страница 73: ...w if set up to do so 3 When decoders are started again it will then look again for a transition from above the limit to below and an alarm will trigger 7 Click Next to define alarms for Main Pump Fail...

Страница 74: ...e Schedule 5 Monday between 6 10 am and 6 45 am click on the graph With the left mouse button pressed drag the cursor across the section of the Schedule you want to view Dragging the cursor forms a re...

Страница 75: ...ation Schedule Edit screen employs color coding to indicate the status of irrigation schedules The tab of each Schedule will be one of these colors Green indicates the Schedule is Active Red indicates...

Страница 76: ...anged the Global Water Budget Send the water budget data to the controller Note While the PC is sending data from the PC to the controller a Communications Status pop up window appears visually showin...

Страница 77: ...ng schedules will be paused and the remaining steps of the schedule will be stacked to run after the manually started schedule s finish Your MDC2 PC Software allows you to start up to three schedules...

Страница 78: ...To set up a monitoring information data file stored in an ASCII file format you need to Create a Log File Failed Decoder List This is a list of valve decoders that have failed due to triggering SEUF S...

Страница 79: ...is an example of how the information appears in the Log File Each line represents an event We selected the event information to include the Date YYYYMMDD Time Device Device Type and Action 20010919 08...

Страница 80: ...a location to save it 4 Click on Open You will be presented with the message below confirming your successful saving of the backup file 5 Click OK Restoring Database 1 From the Rain Bird Remote Acces...

Страница 81: ...le 2 Select Print from the pull down menu 3 Select either Print set up data or Print irrigation schedules 4 Select OK at the Print pop up window for your PC Exiting the Remote Access Window 1 From the...

Страница 82: ...This page intentionally left blank...

Страница 83: ...he Cause This chapter of the manual is written for you the Service Technician in the field It is your responsibility to localize problems with the Rain Bird MDC2 Controller and Rain Bird Decoder Irrig...

Страница 84: ...esistance how to use the right tools and the actual installation First familiarize yourself with the installation of the complete system Review and study the as built irrigation drawings of the system...

Страница 85: ...when you turn on the controller the system is dead Solution The controller is either defective or there is no power reaching the controller High Voltage Check the Mains 120 Volt AC power line leading...

Страница 86: ...es L1 and L2 and measure again If the voltage is still too low the controller is defective and you will need to replace it If the voltage is within the acceptable range there is a problem with the fie...

Страница 87: ...ders are not responding Solution If several field decoders are not responding and they are located on the same branch the fault is probably with the cable Please see the problem Finding a break in the...

Страница 88: ...93 If the two wire communications cable was installed as a ring cable a break in the ring can cause a fault Because the controller sends the voltage in both directions on the ring field decoders can...

Страница 89: ...able Before testing you may want to depressurize any pressure controlled pumps and deactivate any pump decoders in your system Please see Entering the Pump Master Valve Information on page 28 This wil...

Страница 90: ...ts of the system work If the MDC Controller senses a short circuit on the lines it will automatically limit the current to a safe value by changing the line frequency from 1 to 50 Hz and display a Sho...

Страница 91: ...need to replace the controller To locate the short use the Clamp Ampmeter to follow the current from the controller to the decoders in the field The large current will run out from the controller on o...

Страница 92: ...the leakage current when you pass the fault Problem The clock shows an incorrect time after a power outage Solution When the power goes out a back up battery powers the controller s clock The battery...

Страница 93: ...m The Field Transmitter s display is dead Solution Check that there is line voltage on the connection sockets inside the Field Transmitter Connection Box Various connection boxes may be located in the...

Страница 94: ...on Select the correct language in the Field Transmitter s installation menu Please see the Field Transmitter User Manual on page 43 Troubleshooting the Controller s Internal Parts The MDC2 Controller...

Страница 95: ...ns set up and irrigation data that is stored in a chip soldered to the main board When you need to replace the controller the data will stay in the defective controller However you can use the PC prog...

Страница 96: ...oblem Connect both wires to the same terminal and trace leak Connect one cable at a time Is current OK YES NO Problem is in field Does the line current 50 Hz match decoders YES NO YES NO YES NO YES NO...

Страница 97: ...0 4 00 am 04 00 5 00 am 05 00 6 00 am 06 00 7 00 am 07 00 8 00 am 08 00 9 00 am 09 00 10 00 am 10 00 11 00 am 11 00 12 00 pm 12 00 Standard Time Military Time 1 00 pm 13 00 2 00 pm 14 00 3 00 pm 15 00...

Страница 98: ...This page intentionally left blank...

Страница 99: ...ing Electrical Codes for Solenoids If your system uses solenoids valves that do not open you may need to extend the switch code activation time To do this change the 4th digit of the code according to...

Страница 100: ...ethod Example Activation Time 40 ms milliseconds Arrows in chart show Holding Voltage 2 3 volts Switch Code 59F450 If the solenoid opens but will not stay open the holding voltage may be too low Here...

Страница 101: ...ter you are changing 5 Select OK to move to the next character The box is replaced with an arrow pointing to the character you can change Note Change only the numbers and letters you need to change No...

Страница 102: ...ch Code 49F350 Non Irrigation Valve Types Switch Code 3FFA20 Relay 100 Master Valves and Pumps Switch Code 4FFA20 Note Recommended default switch codes are provided for general guidance purposes under...

Страница 103: ...nstallation a field decoder attaches to a pump using a relay Rain Bird recommends you use Relay 100 Please see the illustration below When setting up the controller enter the field decoder Address in...

Страница 104: ...on page 100 With the above setup both the master valve and flow sensor monitor the flow rate Once the flow exceeds the maximum rate the controller sends a signal to the pump decoder shutting off the...

Страница 105: ...circuit from the pressure switch runs through the contacts on the Relay 100 With the above setup the pressure switch will provide power to the pump or if the flow exceeds the maximum rate the controll...

Страница 106: ...nitors the flow rate If during irrigation the flow exceeds its maximum rate the controller sends a signal shutting off a Normally closed master valve A Normally closed master valve is open when a Prog...

Страница 107: ...take one of the following actions in an alarm situation Pause Pauses the schedule specified by alarm action ID or all schedules The pause shall take effect immediately This feature works only if a sch...

Страница 108: ...or else it will be stacked Deactivate Deact Turns off a decoder pump or schedule depending on the specified Alarm Action Type and Alarm ID Deactivation can apply to all decoders pumps and schedules Th...

Страница 109: ...nctions like Turn On Turn Off Advance Pause Resume Customized schedule based functions The tables below list the commands and their actions that are understood by the MDC2 Freedom driver System Mode C...

Страница 110: ...2 1 10 Deactivate Schedule 2 4 1 73 1 10 0 Pause schedule or all if 0 2 4 1 74 1 10 0 Resume schedule or all if 0 2 4 1 Notes Entering any command other than those listed in tables above result in an...

Страница 111: ...tter to start valves regardless which state the MDC controller is in If the MDC is in Standby state usage of the Field Transmitter will make it change to Manual state When the Field Transmitter is plu...

Страница 112: ...et will set all values to factory default If more than one Field Transmitter is used each must be set to its own number Up to 10 Field Transmitters may be used simultaneously After a delay the menu on...

Страница 113: ...ke any changes if needed 5 On the controller change out the existing memory card with the new Version 2 0 card 6 Connect to the controller via serial cable or phone line 7 Under the Send data menu on...

Страница 114: ...This page intentionally left blank...

Страница 115: ...specialty needs zones This helps when programming the controller so that proper run times can be assigned to various irrigation zones 6 Column 6 Irrigation Types This column helps further refine the i...

Страница 116: ...1 2 3 4 5 A B C D E IV Pump Master Valve Address On Delay Off Delay Switch 1 3 and Master Valve 2 0 Booster 1 Booster 2 Booster 3 Booster 4 Booster 5 Booster 6 Booster 7 Booster 8 Booster 9 V Rain Al...

Страница 117: ...111 MDC Controllers ID Name Address Valve Type Booster Value 2 0 Only Description 1 2 3 4 5 6 7 8 9 10 11 12 13 14 15 16 17 18 19 20 21 22 23 24 25 26 27 28 29 30 31 32 33 34 35 36 37 38 39 40 41 42...

Страница 118: ...e Edit Irrigation Data Irrigation Schedule Status Active Passive Days M T W T F S S M T W T F S S Start Time 1 2 3 4 5 6 Step Run Time Min Dec 1 Dec 2 Dec 3 Dec 4 Dec 5 Dec 6 Dec 7 Dec 8 Dec 9 Dec 10...

Страница 119: ...ult setting the start up settings for the controller GPH used in USA gallons per hour hardwire communications cable used to transmit data between devices irrigation schedule the watering Schedule for...

Страница 120: ...tering solenoid a coil of copper wire that receives a 24 VAC electrical current from the controller causing a plunger to open a control port in a valve allowing the valve to open and operate the sprin...

Страница 121: ...enters contact Rain Bird at Rain Bird Corporation Contractor Division 970 W Sierra Madre Avenue Azusa CA 91702 Phone 626 812 3400 Rain Bird Corporation Commercial Division 6991 E Southpoint Rd Bldg 1...

Страница 122: ...This page intentionally left blank...

Страница 123: ...Trade Warranty For details see the Rain Bird Landscape Irrigation Products Catalog Pentium is a Registered Trademark of Intel Corporation Windows is a Registered Trademark of Microsoft Corporation Rad...

Страница 124: ...ne 520 741 6100 Fax 520 741 6522 Rain Bird Technical Services 800 RAINBIRD U S and Canada Rain Bird Corporation 970 West Sierra Madre Avenue Azusa CA 91702 Phone 626 812 3400 Fax 626 812 3411 Specific...

Отзывы: