background image

Enabling AT Commands for Managing the XT Codec Unit


You can manage the XT Codec Unit from a computer using AT messages over a TCP/IP
connection. The AT messages can be used for:

Initialization

Configuration

Call control and multipoint control

Control and indication

Diagnostics

The message exchange between the XT Codec Unit and the PC is based on ASCII characters.
Messages are sent over a TCP socket to port 55003 of the XT Codec Unit.
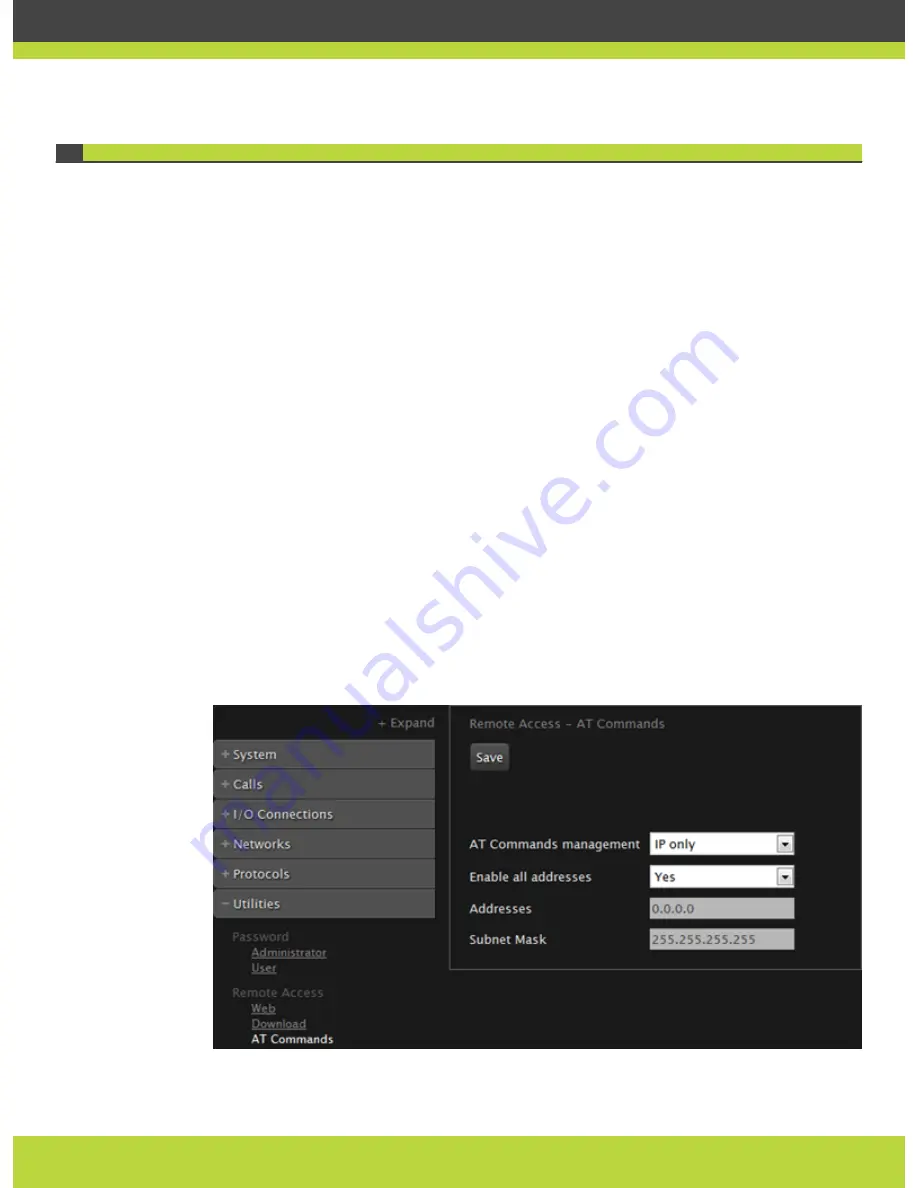
Before using this functionality, you must enable AT command management in the SCOPIA XT
Series. Ask customer support for information on how to use AT commands.

Before you begin

Ensure you have the IP addresses and the subnet mask of the computers which you want to
use for remote management of SCOPIA XT Series.

Procedure

Step 1

Access the SCOPIA XT Series web interface.

Step 2

In the Administrator settings tab, select Utilities > Remote access > AT Commands.

Figure 2-8

Configuring AT commands

RADVISION | Administrator Guide for SCOPIA XT5000 Series Version 3.0

Maintenance Tasks | 20

Содержание Scopia XT5000 Series

Страница 1: ...Administrator Guide Version 3 0 For Solution 7 7 SCOPIA XT5000 Series...

Страница 2: ...ON Ltd reserves the right to revise this publication and make changes without obligation to notify any person of such revisions or changes RADVISION Ltd may make improvements or changes in the product...

Страница 3: ...Remotely 11 Configuring Remote Management on the SCOPIA XT Series 12 Accessing SCOPIA XT Series Web Interface 13 Pairing a XT Remote Control Unit with a XT Codec Unit 14 Managing SCOPIA XT Series from...

Страница 4: ...mproving Call Video Resolution 29 Resolving Lip Sync Problem 31 Resolving Camera Issues 33 Resolving IP Address Problems 34 Resolving Problems with PC Presentations 35 Resolving XT Remote Control Unit...

Страница 5: ...dels SCOPIA XT1000 Piccolo Experience cost effective true HD 720p videoconferencing at 30 frames per second fps with the impressive price performance design of the SCOPIA XT1000 Piccolo The included w...

Страница 6: ...quality SCOPIA XT5000 Series The SCOPIA XT5000 Series is the latest product of the SCOPIA XT Series which sets the standard for an exceptional conferencing experience HD 1080p with 48 kHz sampling rat...

Страница 7: ...Scalable video coding No No No Yes Yes High Profile H 264 No No No Yes Yes 3 way Microphone Pods Yes Yes Yes No Yes Using SCOPIA XT5000 as Endpoints Figure 1 1 on page 4 illustrates a topology in whic...

Страница 8: ...end up to 488p depending on the selected CP layout Only the Active Speaker can send up to 448p We recommend enabling the High Bandwidth Option 12Mbps when using the embedded MCU If the High Bandwidth...

Страница 9: ...ess provided Configure the XT Codec Unit for HTTP or STUN autodiscovery Figure 1 2 Using an HTTP STUN Server for NAT and Firewall Traversal This approach works well in simple NAT and firewall traversa...

Страница 10: ...ure the traversal server as the XT Codec Unit gatekeeper and enable the H 460 option Configure the XT Codec Unit to the IP address of the traversal server SCOPIA PathFinder Using the XT Series for NAT...

Страница 11: ...and communicates with endpoints in the private and in the public network SCOPIA XT Series communicates with the private network endpoints using IP addresses or aliases under the control of the gateke...

Страница 12: ...anization needs to enable 5 endpoints with ISDN connectivity Assuming the requested ISDN connectivity speed is 256bps use only one ISDN PRI gateway as it can support 5 concurrent calls of 256bps each...

Страница 13: ...tware for SCOPIA XT Series page 16 Enabling AT Commands for Managing the XT Codec Unit page 20 Configuring the System for SNMP Management page 21 Enabling Backup and Restore of SCOPIA XT Series Config...

Страница 14: ...nect the computer audio to the XT Codec Unit Since audio input is not included in the DVI I port to XT Codec Unit connection establish a separate audio connection from the computer s audio output port...

Страница 15: ...0 60 SXGA 1280x1024 60 75 UVGA 1280x960 60 85 WXGA 1280x768 60 720P 1280x720 60 50 30 25 XGA 1024x768 60 70 75 85 SVGA 800x600 60 70 75 85 VGA 640x480 60 70 75 85 Configuring and Controlling Your SCOP...

Страница 16: ...e you access the SCOPIA XT Series remotely Specific operational information on how to configure and manage your SCOPIA XT Series remotely is provided in relevant sections Before you begin To configure...

Страница 17: ...the SubNet mask associated with the IP address User name Enter the web username The default username is Admin Password Enter the web password The default password is 1234 Step 4 Press Save Accessing...

Страница 18: ...edicate your XT Remote Control Unit to monitor one or more XT Codec Units of your choice by configuring the same numeric code in your XT Remote Control Unit and the system software An XT Remote Contro...

Страница 19: ...at the top of the screen Managing SCOPIA XT Series from iVIEW Management Suite iVIEW Management Suite can manage all endpoints in a video network including the SCOPIA XT Series Remote management is u...

Страница 20: ...n a XT Codec Unit in two different modes by means of the same software package In standard mode the XT Codec Unit is upgraded while operating in a regular way The standard system menus are visible All...

Страница 21: ...to the SCOPIA XT Series Step 3 Set the fields as required Table 2 3 Enabling remote upgrade Field Name Description Download management Enables disables downloading of firmware or patches to the XT Cod...

Страница 22: ...Verify that the network allows communication between the Codec Unit and the computer and that a firewall does not block TCP port 55099 Step 3 Download the XT5000_Vxxx exe from the RADVISION site to th...

Страница 23: ...it and copy onto the USB drive Procedure Step 1 Turn on the SCOPIA XT Series Wait for the menus to appear on the monitor Step 2 Insert the USB drive into one of the USB ports on the rear panel of the...

Страница 24: ...rt 55003 of the XT Codec Unit Before using this functionality you must enable AT command management in the SCOPIA XT Series Ask customer support for information on how to use AT commands Before you be...

Страница 25: ...features of SCOPIA XT Series endpoints using SNMP Simple Network Management Protocol and an AT command based protocol on TCP IP In particular these features have been introduced Monitoring SCOPIA iVIE...

Страница 26: ...Figure 2 9 Configuring SNMP settings Step 3 Set the fields as required RADVISION Administrator Guide for SCOPIA XT5000 Series Version 3 0 Maintenance Tasks 22...

Страница 27: ...ure Address and SubNet mask Address Limits editing reading of settings to one IP address on a specified network SubNet mask Enter the SubNet mask associated with the IP address Step 4 Select Save Enab...

Страница 28: ...ment Suite Step 4 Select Save Additional Documentation When configuring the system consult the documentation RADVISION puts at your disposal User Guide for SCOPIA XT5000 which explains how to operate...

Страница 29: ...ing XT Remote Control Unit Problems page 35 How to Retrieve SCOPIA XT Series Logs page 35 Reporting a Software Upgrade Failure page 38 Viewing System Information page 38 Contacting Support page 39 Res...

Страница 30: ...call cannot see or hear me Solution Make sure your Microphone Pod is correctly connected to the system Solution Make sure the Video Privacy and Mute functions are not enabled You can see this in the...

Страница 31: ...perform the audio tests to verify that the audio input and output are in order 1 Access the SCOPIA XT Series web interface 2 In the User Settings tab select Diagnostics Audio Tests Figure 3 2 Perform...

Страница 32: ...sing an echo To improve echo canceller performance you can use automatic or manual estimation of the audio delay by the XT Codec Unit You can also generate the audio delay manually Then you can train...

Страница 33: ...he monitor s power cord is connected properly at both ends Solution Check that the monitor power switch is set to ON Solution Verify the XT Codec Unit s LED is on If the LED is blinking press on the X...

Страница 34: ...e Moving setting is enabled 1 Access the SCOPIA XT Series web interface 2 In the Administrator settings tab select I O Connections Cameras General HD1 Figure 3 5 Enabling the Moving setting 3 Make sur...

Страница 35: ...Unit and is used to control the camera A common mistake is to connect this cable to VISCA OUT instead of VISCA IN This prevents the XT Codec Unit from setting the camera to the necessary resolution Re...

Страница 36: ...to the required value At minimum setting video frames freeze at the first occurring error At maximum setting video frames never freeze and errors are allowed to pass through Lip sync automatic Allows...

Страница 37: ...Solution Press on the XT Remote Control Unit repeatedly to switch between the different video sources Solution Ensure the camera is correctly connected to the system Solution Make sure the Moving set...

Страница 38: ...ddress 1 From the Main menu select Configure 2 Press Next several times until the Configure TCP IP screen appears Figure 3 9 Configuring IP address 3 Enter the IP address 4 Select Next 5 Select Done P...

Страница 39: ...Remote Control Unit s battery power is low an icon appears in the system menus letting you know that you should replace the battery Half charged Battery Low Battery Solution Configure the XT Remote Co...

Страница 40: ...er support only Retrieving Network Traffic Logs page 36 Retrieving Memory Dump Logs page 37 Retrieving Network Traffic Logs This procedure describes how to retrieve log files that provide information...

Страница 41: ...trieving the logs using this command CAP STOP Step 9 Export the retrieved logs onto the embedded web site of your SCOPIA XT Series PUB TO WEB Step 10 Access the embedded web page on the SCOPIA XT Seri...

Страница 42: ...oftware upgrade from the USB drive fails Solution 1 Remove the USB drive from the USB port of the SCOPIA XT Series 2 Connect the USB drive to a computer 3 Locate the upgrade log file 4 Send the log fi...

Страница 43: ...Control Unit Figure 3 12 The Main Menu Step 2 Select System Status The system information is displayed Contacting Support When you contact RADVISION for support you must provide this information Seria...

Страница 44: ...n video conferencing systems innovative converged mobile services and highly scalable video enabled desktop platforms on IP 3G and emerging next generation networks For more information about RADVISIO...

Отзывы: