background image

TECHNICAL CHARACTERISTCS


5

90

190

190

90

8

4

5

300

260

300

9

8

5

3

0

0

2

5

CWI

G

HR

HF

40

RCR

RCF

560

86

102

77

145

RCR

RCF

HR

G

HF

CWI

123

86

150

43

36

2.2 Dimensions   


LEGEND 


HR 

HEATING RETURN   

Ø 3/4” 

HF 

HEATING FLOW  

Ø 3/4” 

RCR 

REMOTE D.H.W.  CYLINDER 
RETURN 

Ø 3/4” 

RCF 

REMOTE D.H.W.  CYLINDER FLOW 

Ø 3/4” 

CWI 

COLD WATER INLET  

Ø 1/2” 

GAS   

Ø 3/4” 

SC 

CONDENSATE DRAIN 

Ø 25 

Содержание RK 34/B Ekobox

Страница 1: ...D ING MAN INST 1305 1 DIGITECH 2 CBD AUSTRALIA Technical specification RADIANT BRUCIATORI S p A Montelabbate Instruction Manual for model RK 34 B Ekobox Premix condensing boiler version for remote sto...

Страница 2: ......

Страница 3: ...ard 12 3 2 Installation requirements 12 3 3 Unpacking 13 3 4 Installing the boiler 14 3 5 Water connections 15 3 6 Gas connection 16 3 7 Electrical connections 17 3 8 Flue connections 19 4 Commissioni...

Страница 4: ...ral warnings pag 34 6 2 Boiler inspection 34 6 3 Accessing the boiler 35 6 4 Draining the central heating and domestic hot water system 36 6 5 Maintenance operations 37 6 6 Wiring diagrams 44 6 7 Trou...

Страница 5: ...In case of doubt do not attempt to use the product but refer to the supplier Packing materials cardboard box wooden crate nails staples plastic bags polystyrene etc must not be left within reach of ch...

Страница 6: ...ly safe when it has been connected to an efficient earth system installed in accordance with the requirements of current electrical safety standards This fundamental safety requirement must be checked...

Страница 7: ...ogeneous highly functional unit that is easy to install and simple to operate In its simplicity the wall mounted appliance is equipped with all the appropriate accessories required to make it a fully...

Страница 8: ...7 Max working pressure heating bar 3 Min working pressure heating bar 0 3 Domestic Hot Water circuit D H W temperature setting min max C 35 60 Max Hot water working pressure bar 6 Min Hot water worki...

Страница 9: ...I G HR HF 40 RCR RCF 560 86 102 77 145 RCR RCF HR G HF CWI 123 86 150 43 36 2 2 Dimensions LEGEND HR HEATING RETURN 3 4 HF HEATING FLOW 3 4 RCR REMOTE D H W CYLINDER RETURN 3 4 RCF REMOTE D H W CYLIND...

Страница 10: ...Hot water working pressure Max heating working pressure H6 H5 mm mm mm mm Lt h kW lt h mq Lt Storage cylinder capacity H4 H3 H2 H1 H Internal diameter Di Externa diameter De Hot water flow rate Dt 30...

Страница 11: ...REMIX BURNER UNIT GAS MANIFOLD BURNER 5 IGNITION ELECTRODE 6 HEATING SENSOR 7 HEATING SAFETY THERMOSTAT 8 FAN 9 CONDENSATE TRAP 10 PUMP WITH AIR VENT 11 3 BAR PRESSURE RELIEF VALVE HTG CIRCUIT 12 SYST...

Страница 12: ...UTOMATIC AIR VENT VALVE 12 HEATING SAFETY THERMOSTAT 13 HEATING SENSOR 14 PUMP WITH AIR VENT 15 WATER PRESSURE SWITCH 16 FLUE HOOD 17 SAFETY THERMO FUSE 18 EXPANSION VESSEL 19 ROOM SEAL CHAMBER BACK S...

Страница 13: ...RE SENSOR code 31368LA SUPPLIED WITH THE BOILER NOTE THERE IS A STRAINER ON THE HEATING CIRCUIT THE INSTALLATION OF AN ADDITIONAL STRAINER ON THE SECONDARY CIRCUIT IS RECOMMENDED RCF HR NON RETURN VAL...

Страница 14: ...TECHNICAL CHARACTERISTCS 10 2 5 Circulation pump head flow graph III II I Head kPa Flow l h III Pump head at maximum speed Pump head at second speed II I Pump head at minimum speed...

Страница 15: ...cy indicator Temperature display When the boiler is switched off at the switch on the control panel the word OFF appears on the display The D H W and central heating frost protection system neverthele...

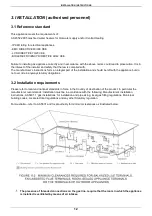
Страница 16: ...tallation and should be left with the appliance but do not over ride in anyway statutory obligations 3 2 Installation requirements Please refer to local and national standards in force in the Country...

Страница 17: ...esent a potential hazard A Place the packed appliance on the floor see fig 1 making sure that the up arrow is facing down Remove the staples and open out the four flaps of the box B Rotate the boiler...

Страница 18: ...of AS NZS 5601 1 2010 To install the boiler proceed as follows see fig 2 1 Use a spirit level to mark a horizontal line of 62 mm long on the wall where the boiler is to be fitted 2 Then mark the cent...

Страница 19: ...changer the mains water supply must not have a hardness rating of more than 17 5 Ck It is nevertheless advisable to check the properties of the water supply and install the appropriate treatment devic...

Страница 20: ...fied personnel in accordance with relevant standards When connecting the boiler to the gas supply pipe only use appropriate washers and gas fittings The use of hemp Teflon tape and similar materials i...

Страница 21: ...be protected by a 3 A fuse The connection to the mains electricity supply must be via a single pole switch with at least 3 millimetres gap between open contacts mounted upstream of the appliance Make...

Страница 22: ...connect the wires to the terminal board B as follows Connect the earth wire normally coloured green yellow to the terminal marked with the earth symbol Connect the neutral wire normally coloured blue...

Страница 23: ...ue and general price list by the insertion of the words in polypropylene It is recommended that o for the exhaust discharge duct the entire length of the flue slopes upwards towards the exterior in or...

Страница 24: ...the earth connection is sound Check the seals on the gas supply pipe from the mains and make sure that the meter does not register any flow of gas Turn the gas supply on and purge Test for gas soundn...

Страница 25: ...en the main domestic water supply valve Open the filling tap R fig 2 Unscrew the plug on the pump to remove any trapped air check that the pump is free then re tighten it when water starts to flow out...

Страница 26: ...that the DHW expansion vessel has been fitted in line with the instructions on page 14 of the manual b Open all hot water outlets c Turn on inlet group supply so water enters the boiler leave to fill...

Страница 27: ...alues The device comes into operation in the following cases The heating water temperature goes below 5 C the burner starts automatically until the water temperature reaches the 30 C The room temperat...

Страница 28: ...ately three minutes before re attempting to light the boiler To reset the boiler Switch off switch 1 see 2 7 Control Panel and switch it back on again and repeat the lighting procedure With the boiler...

Страница 29: ...ed 25 40 C P04 Heating output rising time 00 01 default 02 03 04 00 0sec 01 50 sec 02 100 sec 03 200 sec 04 400 sec P05 Water hammer prevention function 00 01 00 Off 01 On P06 D H W priority function...

Страница 30: ...g buttons and pressed Wait for P 00 to appear on the display 3 Release buttons and 4 Keep button S pressed and use button to select the parameter to modify 5 Release button S then re press and release...

Страница 31: ...ear on the display 8 Switch off the appliance and switch it back on again to render the new parameter operative PARAMETER P02 SELECTS THE TYPE OF GAS 6 Use buttons and to modify the value of the param...

Страница 32: ...rameter 00 off 01 on default 2 7 Press and release button S to confirm The parameter number P05 will appear on the display 8 Switch off the appliance and switch it back on again to render the new para...

Страница 33: ...eter within the prescribed limits 00 0 x 5 0 90 90 x 5 450 7 5 min The default value is 36 180 3 min 7 Press and release button S to confirm The parameter number P08 will appear on the display 8 Switc...

Страница 34: ...liance and switch it back on again to render the new parameter operative PARAMETER P12 MINIMUM FAN SPEED SETTING CENTRAL HEATING 6 Use buttons and to modify the value of the parameter between min 33 H...

Страница 35: ...again to render the new parameter operative PARAMETER P16 TELEPHONE CONTROL ACTIVATION 6 If a telephone interface is installed enable the board by setting parameter P16 at 01 7 Press and release butt...

Страница 36: ...iversal LPG Nominal Supply pressure kPa 1 13 2 75 Consumption MJ h 130 5 130 5 Heating Power kW Fan frequency Hz diagram L P G G30 G31 Natural gas G20 CO2 Values Gas type CO2 Natural gas 9 18 Universa...

Страница 37: ...ply pipe is suitable for the new fuel type Conversion is performed as follows Select the new gas type by changing parameter no P02 see Parameters table 5 2 Unscrew the aluminium plug and insert the an...

Страница 38: ...ion of the combustion chamber and flame When required check that the combustion is correctly regulated and if necessary proceed in line with section Commissioning the boiler Remove and clean any oxida...

Страница 39: ...and remove the panel back piece All maintenance operations require one or more of the boiler casing panels to be removed The side panels can only be removed after the front panel has been removed Fron...

Страница 40: ...he radiators starting with the highest and moving down the system to the lowest When the system has been drained close the radiator breather valves and the drain valve If only the boiler needs to be d...

Страница 41: ...to remove the ceramic fibre protection from the bottom of the heat exchanger Check that the burner is not affected by deposits scaling or excessive oxidation Check that all the holes in the burner ar...

Страница 42: ...e assemble the components following the above procedure in reverse order Switch on the power supply and restart the appliance If the boiler does not restart check the positions of the electrodes espec...

Страница 43: ...al heating circuit Then restart the appliance remembering to discharge any air that may be trapped in the system Gas valve see fig 2 Disconnect the joints and remove the gas pipe connecting the gas va...

Страница 44: ...the above procedure in reverse order Switch on the electricity water and gas supplies and check the soundness of the joint by measuring the CO2 levels Expansion vessel see fig 2 Close the shut off val...

Страница 45: ...s from the joints and bleed off any air from the circuit Restart the boiler Diverter valve see fig 2 Replacing the diverter valve body Close the shut off valves and drain the central heating circuit o...

Страница 46: ...re assemble the components following the above procedure in reverse order Switch on the electricity water and gas supplies and regulate the boiler see 5 3 Gas data The preset parameters of the printe...

Страница 47: ...turn pipes Remove the support brackets and pull out the heat exchanger Remove the regulation sensor from the old heat exchanger and refit it together with the two condensate drainpipes to the new one...

Страница 48: ...ight blue brown brown light blue black brown light blue EV2 B EV1 A EV1 B EV2 A red light blue brown light blue brown orange orange brown violet orange M10 M1 orange black black M2 M9 M5 M7 VG M11 bro...

Страница 49: ...When the wires have been connected place plate A back to position and then the front case panel Connecting the outside temperature sensor Option Connect the wires to the terminal board inside the ins...

Страница 50: ...ller wires When the wires have been connected place plate A back to position and then the front case panel Connecting the remote controller and the telephone control option Connect the wires to the te...

Страница 51: ...ary to access the main p c b for electrical connection see 6 3 Accessing the boiler and to activate the parameter P15 see 5 1 Parameters table Outside temperature sensor option Terminal block REMOTE O...

Страница 52: ...l zone valves and telephone control wirings Outside temperature sensor option Terminal block REMOTE OPEN THERM Telephone control Zone valve management option remote controller board cod 40 00018 cod 4...

Страница 53: ...governing the correction is reported in figure 1 The selection of the compensation curve is determined by the maximum delivery temperature Tm and the minimum outdoor temperature Te N B The y axis val...

Страница 54: ...MAINTENANCE INSTRUCTIONS 50 D H W sensor connection M2 FILLING LOOP MAX LENGHT 8 mt HOT WATER SENSOR LEAD REMOTE DHW CYLINDER FLOW REMOTE DHW CYLINDER RETURN PRINTED CIRCUIT BOARD SM30003...

Страница 55: ...LE DISCONNECTED i REPLACE PART j CHECK THE WIRING E03 102 C THERMO FUSE TRIPPED k THERMOFUSE BROKEN l THERMOFUSE CABLE DICONNECTED m THERMOFUSE LOCK OUT HIGH FLUE TEMPERATURE k REPLACE PART THEN INTER...

Страница 56: ...a temperature of 5 C The boiler operates at minimum gas pressure with the 3 way diverter valve in the winter position The function is deactivated when the temperature detected by the sensor reaches 30...

Страница 57: ...GAS VALVE 36072LA VENTURI 57kW 37032LA FAN 40 00016 PRINTED CIRCUIT BOARD DIGITECH 2 SM30003 59015LA WATER PRESSURE SWITCH 73516LA HTG CLIP SENSOR FOR PIPE 17 18 mm BLUE 73517LA THERMO FUSE 102 C RED...

Страница 58: ...THE COMPANY RESERVES THE RIGHT TO APPLY VARIATIONS WITHOUT PRIOR NOTIFICATION NEITHER WILL THE COMPANY BE HELD RESPONSIBLE FOR ANY INACCURACIES IN THIS HANDBOOK DERIVING FROM PRINTING OR TRANSLATION E...

Отзывы: