Chapter 3: Installation
3-16
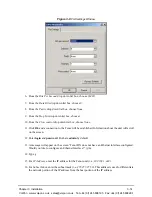
6. From the
Bits Per Second
drop down list box, choose
38400
.
7. From the
Data Bits
drop down list box, choose
8
.
8. From the
Parity
drop down list box, choose
None.
9. From the
Stop bits
drop down list box, choose
1
.
10.From the
Flow control
drop down list box, choose
None
.
11. Press the
Tenor AS
power switch to
On
. After the bootup sequence, the login prompt will appear.
12.Enter a login name. The default login name is
admin
.
13.Enter a password. The default password is
admin
. (Once you are up and running, changing the
password is a good idea for security purposes). Step through each of the following parameters
and enter the correct values for your installation: IP address, Subnet Mask and Default Gateway.
14.At the
Quintum
prompt, type
ei
to reach the Ethernet prompt and then type
config
to change to
the Configuration mode.
15.To set the IP address, type
set ipa
followed by the IP address.
16.To set the Subnet Mask, type
set subnetmask
, followed by the subnet mask.
17.Type
siprd
to change to the Static IP Route Directory.
18.To set the Default Gateway IP, type
change 1 g
followed by the IP address for the default gate-
way IP.
19.Type
submit
.
20.Type
maint
to reach the maintenance mode and then
mc
. Type
reset
. A confirmation message
will ask if you want to reset the unit. Type
yes
to reset the unit. The reboot enables the Tenor to
incorporate the new settings.
Load Software Upgrade
To upgrade the software, download the upgrade from the CD ROM you received with the unit, or
download the latest software/documentation from
www.quintum.com
.
VoIPon www.voipon.co.uk [email protected] Tel: +44 (0)1245 808195 Fax: +44 (0)1245 808299


