


Now you have a good start and the rest of the setup will become easier.
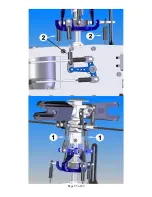
Step 2:
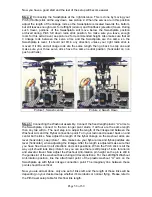
Connecting the Swashplate at the right distance. This is done by moving your
Pitch (throttle) stick all the way down, see picture 2. When the servos are in this position
adjust the length of the linkage rods so the Swashplate is located towards the bottom,
but still leaves enough room for left/right (aileron) and front/back (elevator) travel. During
such travel, portions of the Swashplate will move below the Swashplate position
archived during Pitch full down radio stick position. So make sure you leave enough
room for this extra travel, see picture 2 for recommended height. Also make sure that all
3 linkage rods between the servo arms and the Swashplate are the same, so the
Swashplate is level. It should not tilt in any direction; unless your right radio stick is
moved. If it lilts, and all linage rods are the same length, then go back to step one and
make sure your three servo arms have the same neutral position (horizontal on non
push pull helis).
Picture 1, Swash center
Picture 2, Swash Down
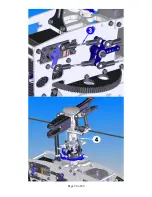
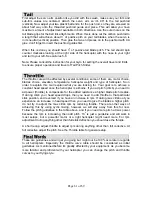
Step 3:
Connecting the Washout assembly. Connect the fixed length plastic “A” arms to
the Swashplate, connect to the two longer pivot studs, if all four are the same length
then any two will do. The next step is to adjust the length of the linkage rod between the
Washout Arm and the Flybar connection point. Turn your radio and receiver back on and
center both sticks. Now adjust the length of the flybar linkage so the washout arms are
level (horizontal), see picture 1. Also make sure your flybar arms and flybar-paddles are
level (horizontal), when adjusting the linkage. After the length is adjusted make sure that
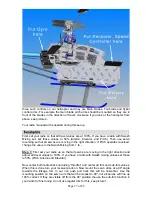
you have free travel in all directions and stick positions. When the Pitch stick is all the
way up it should look like picture 3. As you can see there is still plenty of room for aileron
and elevator travel. Now adjust the Washout Anti-rotation pin height so the pin is still in
the guide slot of the washout base during all travel positions. For the Left/Right Washout
Anti-rotation position, line the attachment point of the plastic washout “A” arm on the
Swashplate up with flybar linkage connection point. The imaginary line between these
points should be vertical.
Now you are almost done, only one set of links left, and the length of those links will be
depending on your desired setup whether it's Aerobatic or normal flying. Please refer to
the Pith travel setup table for this final link length.
Page 58 of 69
Содержание Little Sweetie 10 Pro
Страница 1: ...Page 1 of 69...
Страница 7: ...Page 7 of 69 REQUIRED TOOLS Dremel Tools and Sandpapers would be helpful for building...
Страница 8: ...HARDWARE OPTIONAL ACCESSORIES GLUES AND THREAD LOCK COMPOUNDS RADIO MOUNTING ACCESSORIES Page 8 of 69...
Страница 13: ...Page 13 of 69 ASSEMBLY SECTION 1 REAR FRAMES Bag 1...
Страница 17: ...Page 17 of 69 SECTION 2 MAIN FRAMES Bag 2...
Страница 25: ...Page 25 of 69...
Страница 27: ...Page 27 of 69...
Страница 28: ...Page 28 of 69...
Страница 37: ...Page 37 of 69...
Страница 42: ...SECTION 5 A ROTOR HEAD for Little Quickie 10 Bag 5 Page 42 of 69...
Страница 44: ...Page 44 of 69...
Страница 53: ...Page 53 of 69...
Страница 54: ...Page 54 of 69...
Страница 55: ...Page 55 of 69...
Страница 59: ...Picture 3 Swash Up Picture 4 Head Picture 5 Tail Center Picture 6 Tail Positive Thrust Page 59 of 69...