ENGLISH
25
Life RT Rev.J
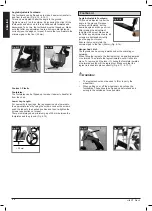
FIG. 6.18
1
2
FIG. 6.19
3
FIG. 6.20
Option Elevating legrest
(Fig. 6.18 - 6.20)
To remove, pull the lever (1), swing the footplate outwards and
then lift the legrest out.
Height adjustment:
The lower leg length can be adjusted infinitely by releasing the
screw (2). Adjust the suitable height and tighten the screw
again.
CAUTION!
The distance between the footplate and the ground must be at
least 40 mm.
Angle Adjustment:
Press the lever (3) downward with one hand while supporting
the legrest with the other hand to take the load off. When a
suitable angle is achieved, let go of the lever and the legr est
will lock into one of the preset positions.
WARNING!
•
Keep hands clear of the adjustment mechanism between,
the frame and the movable parts of the footrest while
elevating or lowering the footrest.
•
The footrests should not be used to lift or to carry the
wheelchair.
•
Risk of trapping fingers!
•
When moving the footrest up or down, do not put your
fingers in the adjusting mechanism between the moving
parts of the footrest.
Adjusting The Footrest
WARNING!
• Attendant: Do not stand on the footboard! Even if the
user is sitting in the chair, there is still a risk of tipping
over and injury.
• Driver: When transferring, do not stand on the
footboard, there is a risk of tipping over and injury.
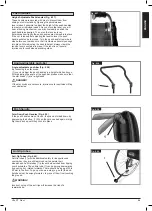
Releasing the screw (1) will allow you to adjust the footrest to
correspond to the length of your lower leg and re-attach the
footrest. The angle of the footrest may be individually adjusted
by loosening screws (2). The side protection (3) on the footrest
prevents the feet slipping off accidentally. Make sure that after
any adjustment work, all screws are tightened correctly (see the
page on torque) (Fig. 6.21 - 6.22).
Footplate Adjustment
2
3
Fig. 6.22
Fig. 6.21
1
Lightweight platform footrest
The footrest angle can be adjusted by loosening the screws (2).
Side protection panels can be fitted to the footrest using the
mounting holes (3). These prevent the feet slipping off
accidentally, (Fig. 6.23). Make sure that after any adjustment
work, all screws are tightened correctly (see the page on
torque).
Fig. 6.23
2
2
3
3


