R
October 24, 2011
Page 9
Castile & Santa Fe CE Pellet Stove
7068-112B
E. Before Your First Fire
1. First, make sure your appliance has been properly
installed and that all safety requirements have been met.
Pay particular attention to the fire protection, venting and
thermostat installation instructions.
2. Double check that the ash drawer and firebox are empty!
3. Close the front door.
IMPORTANT DETAIL: The tip of the thermocouple must
be in contact with the inside end of the thermocouple
cover or missed ignitions can occur.
G. Starting Your First Fire
1. A thermostat is required for proper operation of this
appliance. At this time, fill the hopper with pellets, set
the thermostat to its lowest setting. Plug the power cord
into nearby outlet.
2. The exhaust blower will stay on for approximately 18
minutes even though the thermostat is not calling for
heat. This is normal.
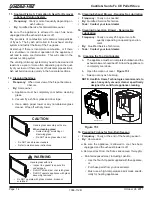
3. Locate the heat output control switch mounted on the
back of the appliance in the upper right corner.
Figure
9.1.
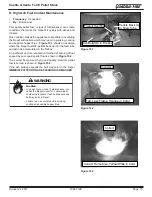
Turn it to the “high” setting by pushing the top of
the control switch in and then adjust the thermostat to its
highest setting. Remove the right side panel and the red
call light located to the left of the control box will be on.
Figure 10.1
. This indicates the thermostat is calling for
heat.
4. The fuel feed system and the igniter should now be on.
5. For your first fire it will be necessary to press the reset
button once approximately 2 minutes after start up and
again in 5 minutes. This will fill the feed system and allow
the appliance to begin dropping pellets. The appliance
will continue to run as long as the thermostat is calling
for heat.
D. General Operating Information
1. Thermostat Calls For Heat
The appliance is like most modern furnaces; when the
thermostat calls for heat, your appliance will
automatically
light and deliver heat. When the room is up to temperature
and the thermostat is satisfied, the red call light will go off
and the appliance will shut down.
2. Heat Output Controls
This appliance is equipped with a heat output control switch
that has three settings or burn rates; low, medium and high.
The appliance will turn on and off as the thermostat demands.
When the thermostat calls for heat, the appliance will start
up at the burn rate for which it is set. If the appliance is set
at one of the lower settings, it will run quieter but take longer
to heat up an area than if it were set at a higher burn rate.
Regardless of the burn rate, when the area is warm enough
to satisfy the thermostat, the appliance will shut off.
Figure 9.1
WARNING
Fire Hazard.
Keep combustible materials, gasoline
and other flammable vapors and liquids
clear of appliance.
• Do NOT store flammable materials in the appliance’s
vicinity.
• DO NOT USE GASOLINE, LANTERN FUEL,
KEROSENE, CHARCOAL LIGHTER FLUID OR
SIMILAR LIQUIDS TO START OR “FRESHEN UP” A
FIRE IN THIS HEATER.
• DO NOT BURN GARBAGE OR FLAMMABLE FLUIDS
SUCH AS GASOLINE, NAPHTHA OR ENGINE OIL.
• DO NOT USE CHEMICALS OF FLUIDS TO START
THE FIRE.
• Keep all such liquids well away from the heater while it
is in use.
• Combustible materials may ignite.
High
Med
Low
Heat Output Switch
Reset Button
Reset
Button
On/Off Switch
F. Filling the Hopper with Fuel
1. Open the hopper lid and pull the lid towards you. The lid
can now serve as a shelf to support the bag of fuel.
2. Do not over fill the hopper. The lid must be completely
closed to maintain proper vacuum and for the feed motor
to operate. An error message will appear on the wall
control if the lid is not properly closed.
3. Remove any sawdust or fuel from the lid gasket after
refilling hopper.
4. Do not leave any part of the fuel bag on the appliance
after refilling hopper.
5. Store fuel away from the appliance to maintain proper
safe air clearance to combustibles.


