


Page 10
October 24, 2011
Castile & Santa Fe CE Pellet Stove
R
7068-112B
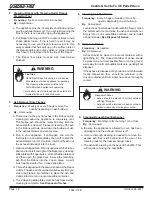
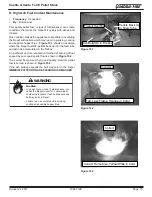
H. Fire Characteristics
A properly adjusted fire with the heat output control switch
set on “high” has a short active flame pattern that extends
out of the firepot approximately 102mm. If the fire has tall
flames with black tails and seems somewhat lazy, the feed
rate will need to be reduced. This is done by sliding the fuel
adjustment control rod down, which will reduce the feed. If
the fire is not 102mm tall, slide the fuel adjustment control
rod up to increase the feed. A medium and low setting will
give a shorter flame. The flame will rise and fall somewhat.
This is normal.
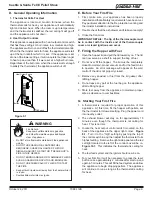
Figure 10.2
The feed adjustment control rod is factory set, and should
be adequate for most fuels. However, if the flame height is
too high or too low, you will need to adjust the feed rate. Wait
until the appliance has been burning for 15 minutes before
making your adjustments and allow 15 minutes for feed
adjustment to take effect.
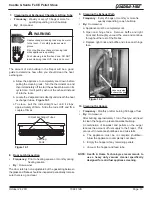
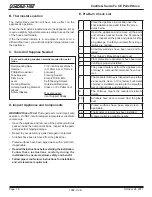
I. Feed Rate Adjustment Instructions
1. Loosen the set screw 1/4 to 1/2 turn during set-up
of appliance. This will allow movement of the feed
adjustment control rod. Do not re-tighten set screw.
2. Loosen the wing nut.
3. Adjust the feed adjustment control rod upward towards the
"+" symbol to increase the feed rate and flame height or
down towards the "-" symbol, to decrease the feed rate
and flame height.
Figure 10.2.
4. Re-tighten the wing nut.
Feed Adjustment Control Rod
Set Screw
Wing Nut
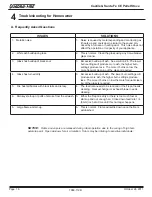
J. Iginition Cycles
1. At the beginning of each ignition cycle, it is normal to see
some smoke in the firebox. The smoke will stop once the
fire starts.
2. The convection blower will automatically turn on after your
appliance has been burning for approximately 10 minutes.
This blower transfers heat from your appliance into the
room, and will continue to run after the thermostat has
stopped calling for heat until the appliance has cooled
down.
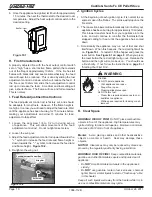
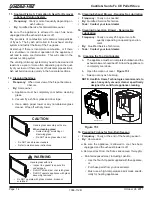
3. Occasionally the appliance may run out of fuel and shut
itself down. When this happens, the red call light will be
on.
Figure 10.1
. To restart it, fill the hopper and press the
reset button.
See Figure 9.1 on page 9
. When you press
the reset button the red call light will go out. Release the
button and the light will come back on. You should see
a fire shortly. If not, follow the instructions on
page 9
of
“Starting Your First Fire”.
WARNING
Fire Risk
Do NOT operate appliance:
• With appliance door open.
• Firepot floor open.
• Cleaning slide plates open.
Do NOT store fuel:
• Closer than required clearances to com
-
bustibles to appliance
• Within space required for loading or ash
removal.
6. Once the appliance has ignited, let it burn for approximately
15 minutes, then set the thermostat to the desired room
temperature. Adjust the heat output control switch to the
desired setting.
WARNING! RISK OF FIRE!
Keep combustible materials,
gasoline and other flammable vapors and liquids clear of
appliance.
• Do
NOT
store flammable materials in the appliance’s
vicinity.
• Do
NOT
use gasoline, lantern fuel, kerosene, charcoal
lighter fluid or similar liquids to start or “freshen up” a fire
in this heater.
Keep all such liquids well away from the heater while it is in
use as combustible materials may ignite.
K. Clear Space
WARNING! RISK OF FIRE!
Do NOT place combustible
objects in front of the appliance. High temperatures may
ignite clothing, furniture or draperies. Maintain a minimum
clearance of 914mm in front of appliance.
NOTICE:
Clearances may only be reduced by means ap
-
proved by the regulatory authority having jurisdiction.
Mantel:
Avoid placing candles and other heat-sensitive
objects on mantel or hearth. Heat may damage these
objects.
Figure 10.1
Red Call Light


