


Page 24
Owners Manual
S E T U P E Q U A L I Z E R
#
P I A N O V I O L I N M
–
I D I C D
•
•
•
•
•
•
•
•
•
•
•
•
•
•
•
•
S E T U P D E F A U L T S
#
C
A L I B R A T E M I D I
¢
P
L
A B
•
•
•
•
•
•
•
•
•
•
•
•
•
•
•
•
C 1 D 1 S E T U P
P R E S E T S
#
D
E F A U L T R E C O R D
–
S T R I P
•
•
•
•
•
•
•
•
•
•
•
•
•
•
•
•
E
QUALIZING
T
HE
D
IFFERENT
S
OUND
S
OURCES
S E T U P D E F A U L T S
#
A
U D I O M I D I P L A
–
B A C K
•
•
•
•
•
•
•
•
•
•
•
•
•
•
•
•
S E T U P A U D I O
#
E
Q U A L I Z E R C U R V
–
E S O F F S E T S
•
•
•
•
•
•
•
•
•
•
•
•
•
•
•
•
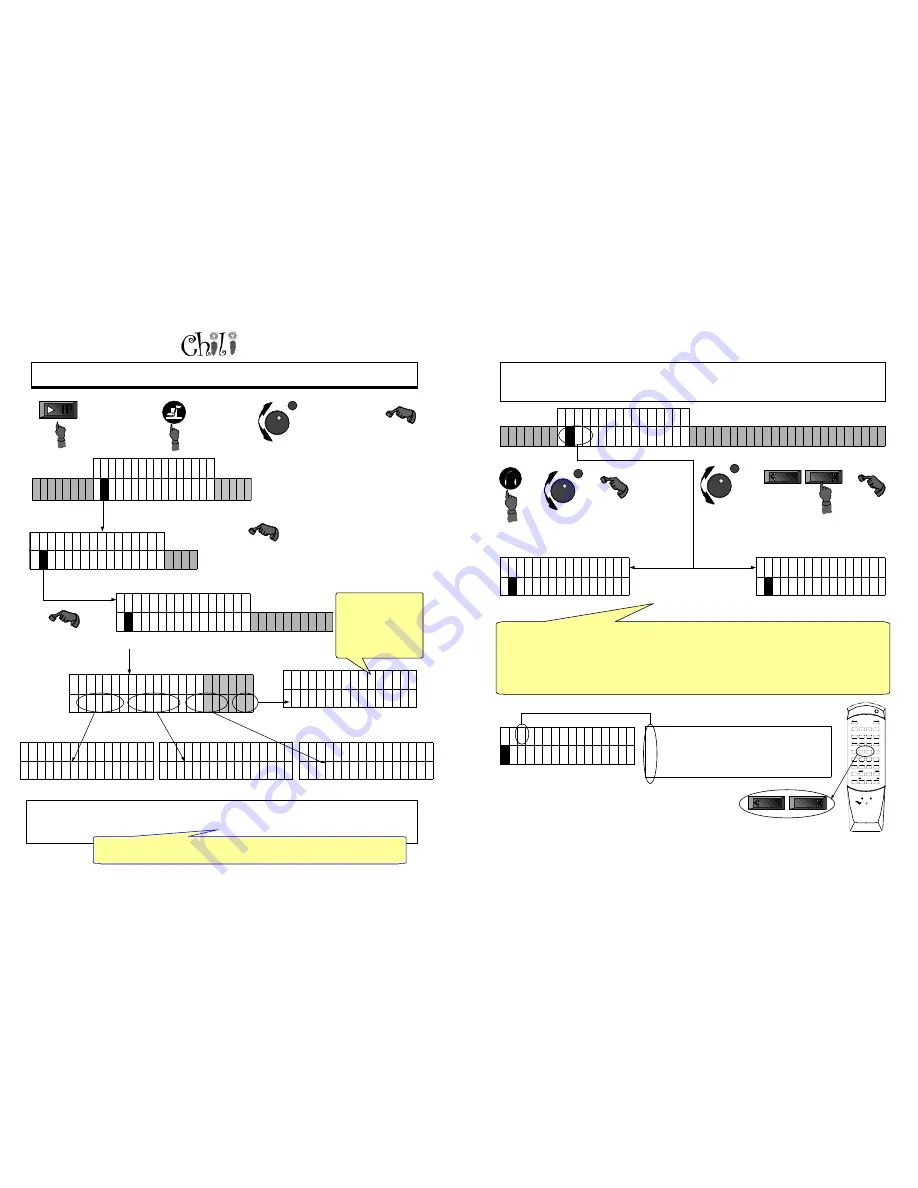
Enter
Select a CD,
Demo or Floppy
File with back-
ground music and
Press Play
Push Setup to
enter the
menu below.
Turn the data dial,
bringing the D in
default into the
second position and
press enter.
The A in Audio is
underlined,
press enter.
The E in equalizer
is highlighted,
press enter.
As you are listening to the music out of your Mixed outputs or headphones, adjust the different settings using the
Data Dial. For example, when you raise the piano number, the piano sound will be more pronounced than the
background music. Since we have three sources of music this equalizer enables you to balance the three so they
sound good
S E T U P E Q U A L I Z E R
#
P I A N O 1 0 0
•
•
•
•
•
•
•
•
•
•
•
•
•
•
•
•
S E T U P E Q U A L I Z E R
#
V I O L I N 1 0 0
•
•
•
•
•
•
•
•
•
•
•
•
•
•
•
•
S E T U P E Q U A L I Z E R
#
M I D I 1 0 0
•
•
•
•
•
•
•
•
•
•
•
•
•
•
•
•
S E T U P E Q U A L I Z E R
#
C D 1 0 0
•
•
•
•
•
•
•
•
•
•
•
•
•
•
•
•
If when changing from a CD to a Floppy you hear a volume jump in the background music.
This is the place to fix it.
This is a good place to
check that your rev. level
software update (4.x to 5.
x) was successful. If all
of the values are 100 the
update is good.
If not, reload the update.
For Technical Support Call 1-941-597-5888
Page 45
F 1 D 1 P R A C T I C E
#
E N A B L E
•
L
- R S P L I T P O I N T
–
M A R K H E A D P H O N E S S P E A K E R S
•
•
•
•
•
•
•
•
•
•
•
•
•
•
•
•
The third position indicates that the left and right buttons can be used to mute or un-mute the corresponding
hand. If L-R has been enabled the screen will display an E. If the left hand is muted the L will be displayed. To
mute a channel the MIDI file needs to be playing. If the file is stopped the Left and Right button will act as track
advance or reverse.
If a solo piano performance is playing, L-R has been enabled, and there is only one piano channel, the split point
will determine which keys are muted. If the MIDI file has piano on Channel 1 and Channel 2 it will assume
Channel 1 is the left hand and Channel 2 is the right hand.
R -Right hand muted
L- Left hand muted
B - Both hands muted
E - The capability to push left or right is enabled
D - Auto left and right hand capabilities disabled
C 1 E 1 S T O P
—
–
•
•
•
•
•
•
•
•
•
•
•
•
•
•
•
•
Right
Left
P R A C T I C E L - R
D
I S A B L E E N A B L E
•
•
•
•
•
•
•
•
•
•
•
•
•
•
•
•
To take advantage of the Left Hand/Right Hand features of Chili they must be enabled. This will change the
function of the Left and Right buttons on the front panel and track + and track– on the remote from advancing
tracks to muting the left hand vs. the right hand.
Enter
Press the practice button and turn the data dial
until the L in L/R is underlined and press enter.
The current status will be highlighted. To enable
turn the data dial to underline the E in enable
and press enter.
P R A C T I C E L / R
#
E
N A B L E D I S A B L E
•
•
•
•
•
•
•
•
•
•
•
•
•
•
•
•
Enter
MUTE
P O
WER
4
3
2
1
8
7
6
5
+20
+ 1 0
0
9
RPT
TRK+
TRK-
PGM
P
AUSE
PLA
Y
ST
OP
RND
TRANS
TEMPO
TREBLE
B
ASS
V
O L U M E U P
B
AL
F1
PIANOMASTER
A
UDIO
V
OLUME DOWN
O
R
S
R
PIANOMATION
Right
Left
or


