


Page 54
Owners Manual
Q
UICKLY
R
ECORD
, P
LAYBACK
& S
AVE
One Touch Record allows for quick and easy recording a new track and channel. If the scratch pad memory is
empty pressing the record button will immediately start the Metronome ticking and the unit will be waiting for input
(or the first note event).
R 1 D 1 P L A Y 0 0 0 5 M
?
•
•
•
•
•
•
•
•
•
•
•
•
•
•
•
•
R 1 D 1 R E C R D 0 0 0 0 M
-
•
•
•
•
•
•
•
•
•
•
•
•
•
•
•
•
R 1 D 1 S T O P
•
A D D N E W T R K A D D
D
R
–
•
•
•
•
•
•
•
•
•
•
•
•
•
•
•
•
•
R 1 D 1 R E C O R D
•
S
A V E A S S I G N
•
•
•
•
•
•
•
•
•
•
•
•
•
•
•
•
S E T S O N G N A M E :
A
. M I D
•
•
•
•
•
•
•
•
•
•
•
•
•
•
•
•
S E T S O N G N A M E :
A
B . M I D
•
•
•
•
•
•
•
•
•
•
•
•
•
•
•
•
Saving - After the performance is done
•
The Quick Record Home screen will
appear.
•
Insert a floppy disk, (DOS formatted High
Density (HD), unprotected) .
•
Select S by turning the Data Dial until the S
in Save is underlined.
•
Press Enter.
•
Name the song by turning the Data Dial to
the first letter of the songs name.
•
Press Right to go to the next space.
Note: you must enter a letter in the first
space in order to continue. When
saved unused spaces will be ignored.
•
Press Enter when you have finished
entering the name.
•
The file will then be written to the Floppy
Disk.
Enter
Right
Enter
Red Light will signify that it is being
saved.
Recording
•
Press the Record Button - The
metronome will begin to tick. The unit will
wait for the first note event before it begins
to record the first track.
•
If the Metronome is disabled under the
metronome screen, when the first note
event is received the metronome will stop
playing.
•
Play the piano.
•
When you are done press stop.
Playback
•
Press play to hear your performance.
Note: If channel 1 is assigned one of
the piano sounds 0 through 7 of the
General MIDI sound set then the piano
will play back. Any other assignment
will be heard from the speakers.
To record more than one sound at a time; go to
Setup - Layering - turn it on. Go to voice and
assign the channels to instruments. Now when you
push record you will hear what you are recording
and record each of the instruments on its own track.
For Technical Support Call 1-941-597-5888
Page 15
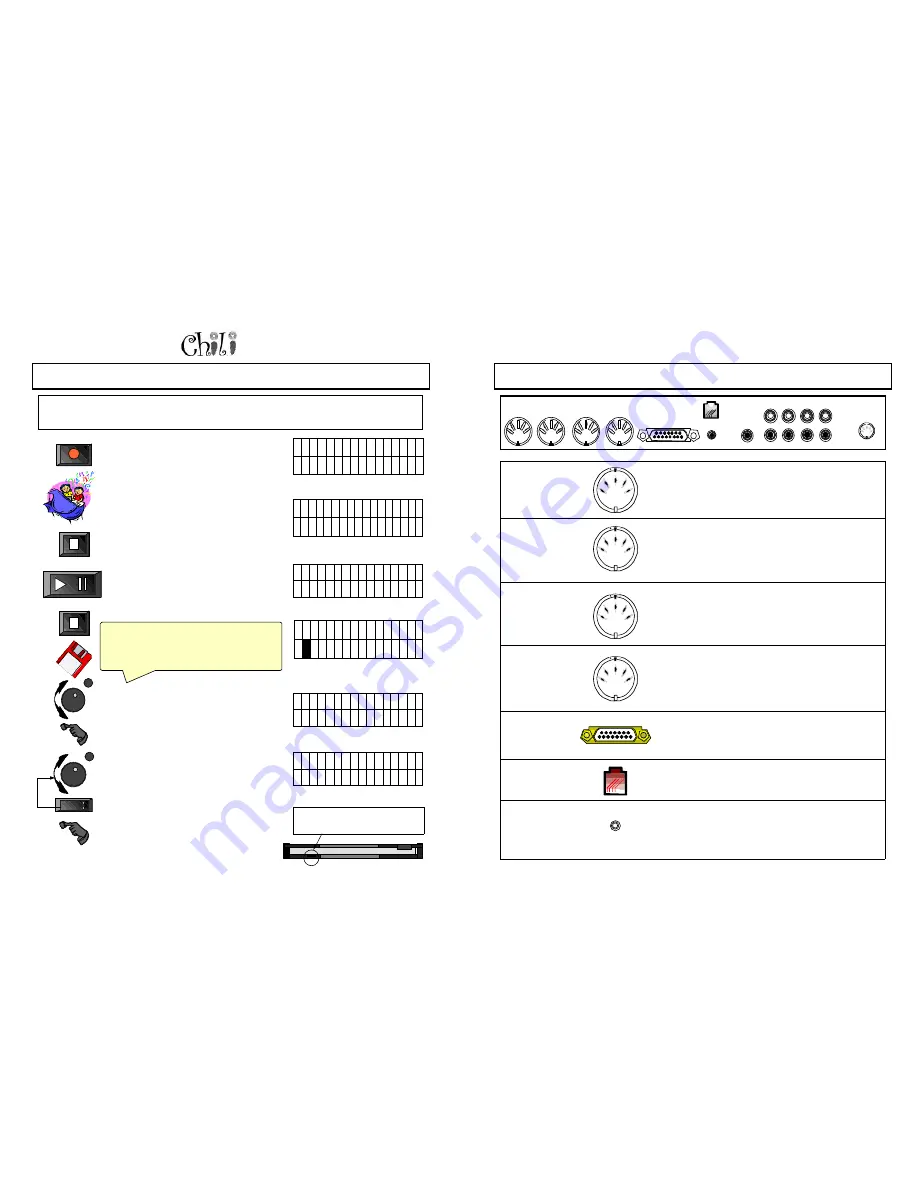
MIDI In
Used as an input for an external MIDI device (PC, record strips
etc.). This source will play the Pianomation system and/or the
built-in sounds.
MIDI Thru
Used to daisy chain other external MIDI devices. This is a
duplicate of the MIDI-In signal.
MIDI Out
Used to drive an external MIDI device from an internal source.
MIDI Out
Delayed
Allows you to sync an external MIDI controlled device with the
Pianomation MIDI playback system.
DB15
This port is for connecting the Chili to the processor of the
Pianomation MIDI system.
IR Port
External IR Sensor/External Remote connects to the optional
External IR Sensor. It is a standard headset phone jack.
Mic In
Used to mic your piano and mix it with the background music. If
you are using Chili as a stand-alone MIDI file player, you can use
the “MIC In” to merge your guitar with a MIDI file player or vocal
with a MIDI file.
B
ACK
P
ANEL
F
EATURES
Unmixed Out
Mixed Out
Aux In
CD In
AMI Out
PMM Reset
IR Port
Mic In
To Pianomation
MIDI Through
MIDI Out Delayed
MIDI Out
MIDI In
Power


