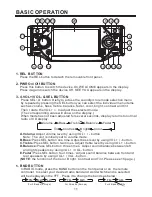
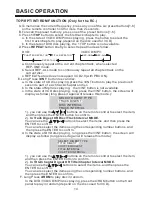
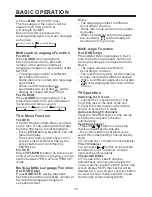
background image

BASIC OPERATION

11

2.PWR On/Off BUTTON

Press this button to switch the device On, WELCOME appears in the display.
Press it again to switch the device Off, SEE YOU appears in the display.

1.REL BUTTON

Press the REL button to detach the removable front panel.

3-4.VOL+/VOL- & SEL BUTTON

Press SEL 4 button briefly to across the sound/picture mode selection menu
by repeatedly pressing the SEL button you can select the individual menu items
such as volume, bass, treble, balance, fader, color, bright, contrast and tint .
Then rotate the VOL + / - to adjust the selected mode.
(The corresponding value will show on the display.)
When mode has not been adjusted for several seconds, display returns to normal
radio or CD display.

( )

Tint

Contrast

Bright

Color

Volume

Bass

Treble

Balance

Fader

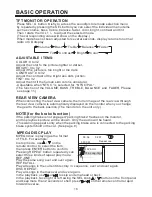
Adjust volume level by using VOL + / - button.

Note: The unit is initially set to volume mode.

Press SEL button one time. Adjust bass level by using VOL + / - button.

Press SEL button two times. Adjust treble level by using VOL + / -button.

Press SEL button three times. Adjust sound balance between left

and right speakers by using VOL + / VOL - button.

Press SEL button four times. Adjust sound balance between front and

rear speakers by using VOL + / VOL - button.

A.Volume:

B.Bass:
C.Treble:
D.Balance:

E.Fader:

(

: the function of the Color, Bright, Contrast and Tint. Please see 16 page.)
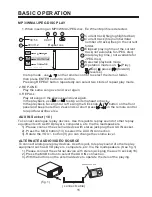
NOTE

In RADIO mode, press the BAND button on the front panel or on the remote
controller to select your desired radio band and word which band is selected
will be displayed in the TFT . Press it to change the bands as below :

5

. BND BUTTON

FM

MW

LW

For 3 Bands (Europe)

FM

MW

For 2 Bands (Europe)

FM

AM

For 2 Bands (USA)

1

9

3

14

18

2

7

19

8

5

4

12

6

13

11

20

15

10

17 16

VOL+

VOL-

SEL

Содержание Mobile Video System PLD41MUT

Страница 1: ...Mobile Video System www pyleaudio com Motorized Slide Down And Detachable Panel 4 Inch Wide Color Digital Screen TFT Car DVD VCD CD MP3 Player TV Tuner MPEG4 Player USB Connect AM FM Digital Pll Tuni...

Страница 2: ...T Monitor Operation Rear View Camera MPEG4 Player USB Operation On Screen Display Function Multi Audio Language Function Multi Subtitle Language Function Multi Angle Function Title Menu Function TV Op...

Страница 3: ...ND ANNOYING INTERFERENCE USE ONLY THE RECOMMENDED ACCESSORIES THIS DEVICE IS INTENDED FOR CONTINUOUS OPERATION This product incorporates copyright protection technology that is protected by method cla...

Страница 4: ...oward the outside edge Disc Cleaning Use a dry soft cloth to wipe the surface If the disc is quite dirty use a soft cloth slightly moistured with isopropyl rubbing alcohol Never use solvents such as b...

Страница 5: ...oes not get in the driver s way and cannot injure the passenger if there is a sudden stop like an emergency stop If installation angle exceeds 30 from horizontal the unit might not give its performanc...

Страница 6: ...ve the PLASTIC COVER of the both sides away then insert the two KEY PLATE into left and right side of chassis as above illustration DASH BOARD METAL MOUNTING STRAP HEX NUT SPRING WASHER PLAIN WASHER T...

Страница 7: ...ching The Front Panel Install The Front Panel Before detaching the control panel be sure to turn off the power 1 Press the release button and the left hand side of the front panel will release FIG 1 2...

Страница 8: ...er behind the control panel When you want to change the viewing angle of the operating unit to play you can press the angle button repeatedly to select the desired angle as follows CHANGING THE CONTRO...

Страница 9: ...COAXIAL OUT BROWN WHITE B 12V REAR CAMERA SWITCH GREEN YELLOW AUX optional RCA CABLE REAR CAMERA INPUT B PARKING BRAKE FRONT RCA WHITE L RCH RED LCH WHITE FRONT RCA RED R VIDEO OUT 1 YELLOW REAR RCA...

Страница 10: ...Cursor buttons in MENU mode Note For models without built in FM Modulator the buttons can be used for volume up down control In TV mode press to fine tune Press the to select channel upward and downwa...

Страница 11: ...f the front of the IR mark Preparing the Remote Control 1 First push to inside as the direction indicated by the arrow See And then Remove the battery holder as the direction indicated by the arrow Se...

Страница 12: ...Treble Balance Fader Adjust volume level by using VOL button Note The unit is initially set to volume mode Press SEL button one time Adjust bass level by using VOL button Press SEL button two times A...

Страница 13: ...the radio briefly plays all the preset stations of the frequency band The scan function ends automatically at the first storage location of frequency band FM1 swing the SEL knob briefly in the directi...

Страница 14: ...MENU BUTTON Press it to display the root menu of the DVD VCD Only when PBC not in use disc DVD VCD CD MP3 Normal Playback 2x 4x 8x 16x b In Radio Mode Move the SEL button in the direction of or in or...

Страница 15: ...vailable D Press button briefly to select repeat mode as follow 1 TOP REPEAT REPEAT ALL CHAPTER REPEAT ON TITLE REPEAT ON DVD REP ONE REP ALL VCD CD MP3 SELECT DIGEST TYPE TRACK DIGEST DISC INTERVAL T...

Страница 16: ...nfirm Pressing REPEAT button repeatedly can select two kinds of repeat play mode 00 56 04 07 003 112 Repeat one Mp3 Mp3 Mp3 K P woman 1 new ton 1 2 3 4 5 6 Current track file highlighted bar Elapsed p...

Страница 17: ...he playback use or to skip an item ahead or back In the playback face right or left swing the SEL knob button on the front panel and keep more than 2 seconds or short press on the remote control to ra...

Страница 18: ...t see number 19 of the unit properly See fig 1 when the USB appliance connect to the USB port of the connect line the system star playing track of the USB appliance automatically B IN USB playing you...

Страница 19: ...ti subtitle Language for DVD Only Function SUBTITLE 1 Connect the TV antenna to the TV IN from Ant jack on the back of the unit 2 Press the mode button on the remote control to select the TV mode Pres...

Страница 20: ...This setup page includes the item of TV display audio output feature The detail please refer to b SPEAKER SETUP This is to activate the audio output from DOLBY AC3 5 1 DOWNMIX to 2 channel mode Please...

Страница 21: ...IF OFF mode to SPDIF RAW mode to SPDIF PCM mode Set Angle Mark General setup page Angle Mark Last Memory TV Display Spdif Output OSD Lang Captions ON OFF General setup page Angle Mark Last Memory TV D...

Страница 22: ...e simple stereo mode DOLBY DIGITAL SETUP DYNAMIC RANGE CONTROL Select DRC and adjust the dynamic range of a Doby Digital encoded program There are 8 steps between full compression and off compression...

Страница 23: ...4 DISC MENU LANGUAGE SETUP Select the preferred DISC MENU language by using the cursor buttons Set TV standard Preference Page Audio Default TV Type Password Disc Menu Subtitle Parental AUTO NTSC PAL...

Страница 24: ...Parental Preference Page Set Parental Control 1KID SAF 2G 3PG 4PG13 5PGR 6R OFF 7NC 17 8 ADULT DOLBY Change Password Audio Default TV Type Password Disc Menu Subtitle Parental CHANGE Preference Page D...

Страница 25: ...sided Single layer 5 12 Cm Single sided Double layer 2 Compact Disc cd da Video Cd 5 12cm Disc AUDIO SIGNAL OUTPUT CHARACTERISTICS 2ch 4ch Line Out 1 Frequency Response 20 Hz 20 Khz 2 S n Ratio 90 Db...

Страница 26: ...ue to noise The antenna cable is not connected Insert the antenna cable firmly The signals are too weak Select a station manually SYMPTOM CAUSE SOLUTION Television video imageappears black white The c...

Отзывы: