background image

VTrak S3000 Quick Start Guide

36

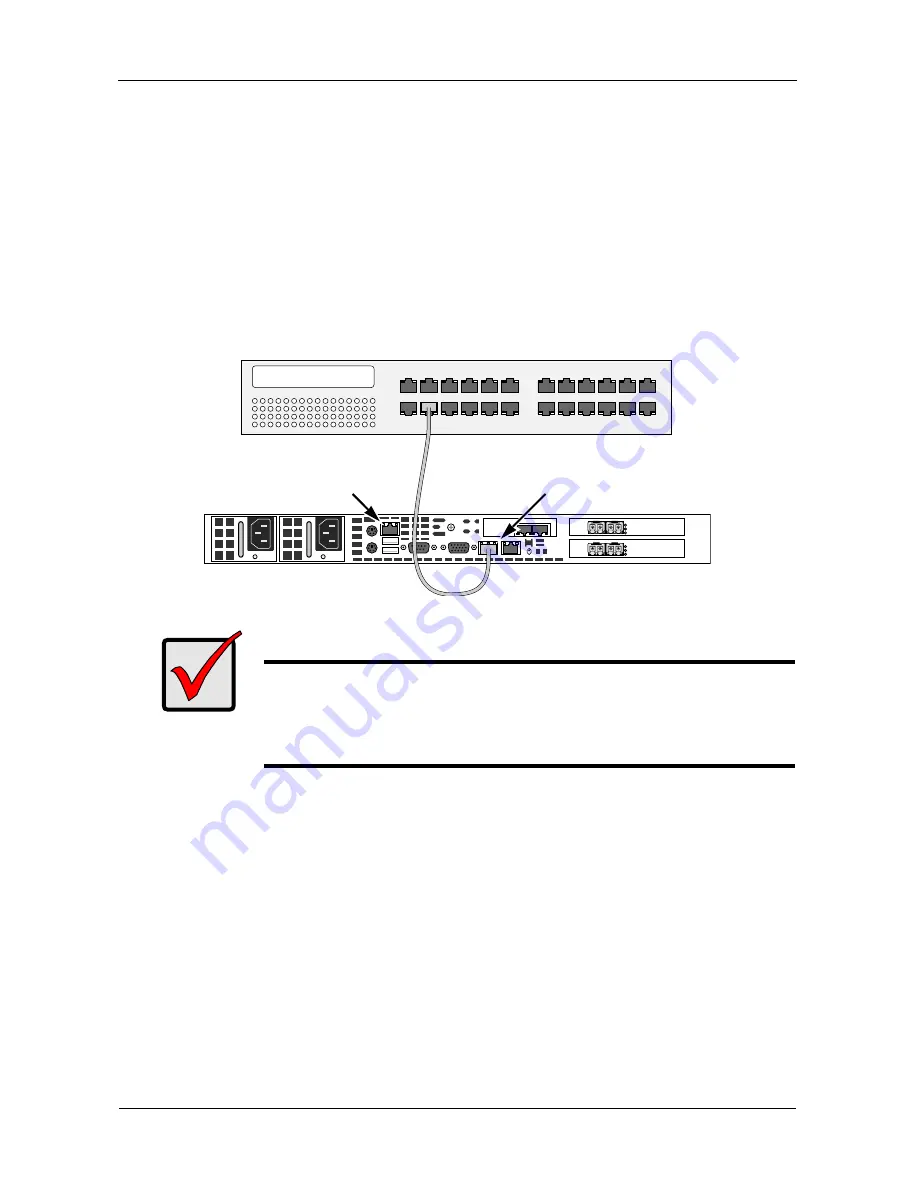
Connecting the VTrak Appliance

The network management connection is totally separate from the iSCSI data 
connection, described on page 32.

To connect the VTrak appliance:
1.

Connect one of the network ports on the VTrak appliance to the network 
switch.

2.

Optional. Connect the other network port on the VTrak appliance to the 
network switch.
See the diagram, below. 

Important

If you are using Intelligent Platform Management Interface (IPMI), 
connect to the dedicated IPMI port, rather than one of the network 
ports. For more information, see the 

Embedded BMC IPMI User 

Guide

 included with the VTrak appliance documentation.

TX     RX

TX     RX

8   4   2

TX     RX

TX     RX

8   4   2

VTrak appliance

Network switch

Management port

IPMI port

Содержание VTrak S3000

Страница 1: ...VTRAK S3000 Quick Start Guide Version 1 0 2010 PROMISE Technology Inc All Rights Reserved ...

Страница 2: ...Technical Support page 68 Thank you for your purchase of the VTrak S3000 storage solution This Quick Start Guide is designed to help you unpack install connect configure and run your VTrak S3000 system If you are adding VTrak RAID subsystems or JBOD enclosures to your VTrak S3000 system follow the Task List in this document The Task Lists in other Quick Start Guides do not cover VTrak S3000 For co...

Страница 3: ...ances and subsystems are sensitive to damage from Electro Static Discharge ESD Observe appropriate precautions at all times when handling the VTrak or its subassemblies Important To run the PROMISE Management Console your PC must have the latest version of Java Runtime Environment JRE ...

Страница 4: ...to the chassis at the factory Chassis rail extensions You attach them to the chassis rails Installing the Chassis Rail Extensions 1 Place the chassis rail extensions on the side of the chassis aligning the hooks on the chassis with the holes on the rail extensions The inner rail extension faces outward the same as the inner rail 2 Slide the rail extension toward the front of the chassis 3 Secure t...

Страница 5: ...e rack 2 Adjust the length of the two sections of the rack rail so that they fit snugly in the rack See Figure 3 The longer section of the rack rail attaches to the front rack post The shorter section of the rack rail attaches to the rear rack post Figure 3 Assembling the rack rails 3 Secure the rail brackets to the rack posts Use the M5 screws included with the rackmount kit See page 6 Figure 4 I...

Страница 6: ... chassis rails on the rear of the appliance with the front rack rails See page 7 Figure 5 6 Slide the appliance into the rack If needed press the locking tabs on the chassis rail to slide the appliance into position When you have pushed the appliance all the way into the rack the locking tabs make a click sound Rack front post Rack rear post M5 attaching screws ...

Страница 7: ...Task 2 Mounting the Appliance in a Rack 7 Figure 5 Appliance rack mount assembly diagram Rack rails Locking tab both sides Chassis rails ...

Страница 8: ...onitor Making Power and Network Connections To make power and network connections on the appliance 1 Plug the power cords into power supplies 2 Attach at least one active LAN cable to one of the network ports 3 Attach an active LAN cable to the IPMI port See Figure 6 for an example Figure 6 VTrak appliance setup connections Accessing the Power Button To access the power button and boot the VTrak a...

Страница 9: ...sword Logging into the Management Console The PROMISE Management Console is your interface with the software running on the VTrak appliance To run the Management Console your PC must have the latest version of JRE installed You make the initial connection to the Management Console through your network browser To log into the Management Console 1 Launch your network browser 2 In the browser s addre...

Страница 10: ... Open with option choose Java Web Start Launcher from the dropdown menu and click the OK button JRE launches on your PC If a Warning Security dialog box appears click the Run button to continue The Management Console splash screen appears The first time you log into the Management Console the End User License Agreement appears ...

Страница 11: ... only appears the first time you log in After the Management Console opens you can close your browser 5 Right click Servers at the top of the Tree and choose Add The VTrak User Login dialog box appears 6 In the dialog box enter the following information in the fields provided IP address The default is 192 168 253 10 User name The default is root Password The default is password1 ...

Страница 12: ...ick the OK button 8 The VTrak appliance is added to the Tree in the Management Console The first time you connect to a VTrak appliance the Configure VTrak dialog box appears 9 In the dialog box click the Next button to begin configuration ...

Страница 13: ...ered with a PROMISE approved license server automatically When you click the Next button in the Configure VTrak dialog box the License Information dialog box appears 1 In the dialog box click the Add button The Add License Keycode dialog box appears 2 In the dialog box enter or copy and paste the keycode for your configuration and click the OK button Caution Before you continue be sure that no RAI...

Страница 14: ...lso enables eight 8 Fibre Channel ports The term Storage Shelf means that the appliance is enabled to work with one VTrak RAID subsystem You can enable additional RAID subsystems or JBOD enclosures by adding shelf keys The keycode sample shown here is for demonstration purposes only It is not a valid keycode and cannot enable a license 3 Check the registration status of the license key If the icon...

Страница 15: ...log box click the Register button If you have multiple license keys click the Register All button The Register License wizard opens 2 Click the Next button to continue 3 Choose the registration option and click the Next button Online The wizard attempts to register your license automatically over the Internet If registration is successful you return to the License Information dialog box and the li...

Страница 16: ...sig file 7 In the Offline Registration dialog box click the button navigate to the signature file click the Open button then click the Send button The Send button applies the signature file to your license 8 Click the Finish button to exit the wizard and return to the License Information dialog box If the operation succeeded the icon left of the license keycode is green and it says Done under Regi...

Страница 17: ... See page 17 DNS server See page 18 Default gateway See page 18 NIC settings See page 18 Telnet See page 19 FTP See page 19 NTP See page 19 Finalize settings page 19 You can accept all default settings or make the required changes Adding a Domain Name A domain name is optional Appending the domain name is also optional To add a domain name 1 In the Network Configuration dialog box enter a domain n...

Страница 18: ... new DNS appears in the list Specifying a Gateway If your network has a gateway and you want VTrak to work with it enter the Gateway IP address in the Default gateway field Changing NIC Settings An FC appliance server has four network ports eth0 through eth3 An iSCSI appliance has up to eight network ports eth0 through eth7 On all appliances eth0 is the management port The default IP addresses are...

Страница 19: ...ed value 9000 a jumbo frame is the maximum value 5 When you are done making network settings click the OK button You return to the Network Configuration dialog box Making Telnet Settings Telnet is enabled by default In most cases Telnet is not appropriate for VTrak because the protocol is not secure and difficult to use The recommended setting is to uncheck the Telnet box to disable Telnet If you ...

Страница 20: ...w hostname for the VTrak appliance and click the OK button When you click the OK button the network server automatically restarts That action drops your connection Wait two to three minutes then try to log in If you cannot log in wait another minute and try again To see the new hostname as the Present hostname in the Set Hostname dialog box you must reboot the appliance When you log in the Configu...

Страница 21: ...s is 192 168 253 101 In the dialog box do any of the following actions Click the Cancel button to accept the default settings Click the Setting button to view the default settings Make new IPMI settings To make new IPMI settings 1 Enter all three settings even if your setting is the same as the default IP Address Subnet Mask Default Gateway IP address 2 Click the OK button The Configure VTrak dial...

Страница 22: ...ent Console see the VTrak S3000 User Manual on the software DVD If you have an unregistered license 1 Click the OK button to close the Console Login dialog box 2 In the Tree right click the VTrak appliance server and choose License from the popup menu The License Information dialog box appears 3 In the License Information highlight the unregistered license and click the Register button For more in...

Страница 23: ...dure should mount and install the VTrak unit Be sure all switches are OFF before installing the VTrak unit or exchanging components Mount the rails to the rack using the appropriate screws and flange nuts fully tightened at each end of the rail Do not load the rails unless they are installed with screws as instructed The rails that ship with the PROMISE VTrak unit are designed to safely support th...

Страница 24: ...om your rack system Be sure the front rail support is on the bottom facing inward The alignment pins fit into the rack holes above and below the attaching screws Use the attaching screws and flange nuts from your rack system Tighten the screws and flange nuts according to your rack system instructions 4 Place the VTrak subsystem onto the rails 5 Secure the VTrak subsystem to the rack One screw eac...

Страница 25: ... rack mount assembly diagram Inside of post Rack front post Rail attaching screws not included Alignment pins two on each flange Inside of post Rack rear post Front rail Rear rail Support for subsystem Note that only the front rail has a support for the subsystem ...

Страница 26: ...r of subsystem drives required for each RAID level Drive Slot Numbering The diagram below shows how VTrak s drive slots are numbered Slot numbering is reflected in the WebPAM PROe and CLU user interfaces Figure 11 VTrak subsystem drive slot numbering Install all of the drive carriers into the VTrak enclosure to ensure proper airflow even if you do not populate all the carriers with disk drives Lev...

Страница 27: ...system has SATA disk drives an AAMUX adapter is installed in the carrier with each drive Your VTrak subsystem has dual RAID controllers But SATA drives have only one data channel The AAMUX adapter provides a second data channel so both RAID controllers can access the SATA drive Replacement AAMUX adapters are available from PROMISE Technology SAS disk drives have two data channels and do not requir...

Страница 28: ...ne of the FC ports on the left RAID controller to one of the downstream FC ports on the HBA card in the VTrak appliance 2 Connect one of the FC ports on the right RAID controller to one of the downstream FC ports on the HBA card in the VTrak appliance See the diagram below Mgmt UPS 115200 8 N 1 FC 1 FC 2 4 2 1 Gb s 4 2 1 Gb s FC Port 1 FC Port 2 SAS Expansion Port Mgmt UPS 115200 8 N 1 FC 1 FC 2 4...

Страница 29: ...s on the left RAID controller to one of the downstream SAS ports on the HBA card in the VTrak appliance 2 Connect one of the SAS I O ports on the right RAID controller to one of the downstream SAS ports on the HBA card in the VTrak appliance See the diagram below Mgmt UPS 115200 8 N 1 SAS Expansion Port SAS I O Port SAS I O Port SAS I O Port SAS I O Port Mgmt UPS 115200 8 N 1 Mgmt UPS 115200 8 N 1...

Страница 30: ...Start Guide 30 Connecting the PC Workstation To connect the PC workstation Connect the FC HBA card in the PC workstation to the FC switch See the diagram below 2 4 8 TX RX TX RX 8 4 2 PC workstation FC switch FC HBA card ...

Страница 31: ...ce page 32 Fibre Channel Interface A Fibre Channel FC upstream configuration is commonly used in VMware Microsoft Exchange and Microsoft SQL environments To connect the VTrak appliance Connect one or both upstream FC ports on the VTrak appliance to the FC switch See the diagram below TX RX TX RX 8 4 2 TX RX TX RX 8 4 2 FC upstream card VTrak appliance FC switch ...

Страница 32: ... a higher bandwidth data connection For more information see Chapter 17 of the VTrak S3000 User Manual To connect the VTrak appliance Gigabit iSCSI Connect one or more upstream data ports in the VTrak appliance to your network switch Six 6 1 Gb s data ports are available See the diagram below 10 Gigabit iSCSI Connect one or both upstream data ports in the VTrak appliance to your network switch The...

Страница 33: ...e 2 Connect a SAS cable from the Expansion port on the right RAID controller to the SAS IN port on the right I O module See the diagram below To connect one VTrak JBOD enclosure to another VTrak JBOD enclosure 1 Connect a SAS cable from the SAS OUT port on left I O module to the SAS IN port on the left I O module 2 Connect a SAS cable from the SAS OUT port on right I O module to the SAS IN port on...

Страница 34: ...ller to your network switch 2 Connect the Management port on the right RAID controller to your network switch See the diagram below Note If you are adding a VTrak JBOD enclosure the JBOD is managed by the RAID controller on the RAID subsystem though the SAS connection There is no management connection to JBOD enclosures Mgmt UPS 115200 8 N 1 FC 1 FC 2 4 2 1 Gb s 4 2 1 Gb s Mgmt UPS 115200 8 N 1 FC...

Страница 35: ...ns 35 Connecting the PC Workstation To connect the PC workstation Connect the network port on the PC to your network switch See the diagram below 2 4 8 TX RX TX RX 8 4 2 2 4 8 TX RX TX RX 8 4 2 PC workstation Network switch Network port ...

Страница 36: ...network switch 2 Optional Connect the other network port on the VTrak appliance to the network switch See the diagram below Important If you are using Intelligent Platform Management Interface IPMI connect to the dedicated IPMI port rather than one of the network ports For more information see the Embedded BMC IPMI User Guide included with the VTrak appliance documentation TX RX TX RX 8 4 2 TX RX ...

Страница 37: ...ta cable to the RJ11 serial connector on one of the controllers 2 Attach the DB9 end of the serial data cable to a serial port on the Host PC or server Optional UPS Serial Connection If your deployment plan calls for one or more UPS units and management via serial communication connect the UPS control cable to the DB9 connector on the VTrak controller See Figure 12 When your subsystem is running s...

Страница 38: ...nd for five seconds goes dark for ten seconds then blinks green once per second for five seconds again Power FRU and Logical Drive LEDs display green continuously Controller LEDs flash green if there is activity on that controller There are two LEDs on each disk drive carrier They report the presence of power and a disk drive and the current condition of the drive Important Always power on the JBO...

Страница 39: ...few moments the Power Activity LED should display Green If there is no disk drive in the carrier the Power Activity LED remain dark The Power Activity LED flashes during drive activity The Disk Status LED displays Green when a drive is present and configured Disk Status Power Activity ...

Страница 40: ...k 8 Setting up Serial Cable Connections on page 37 1 Change your terminal emulation program settings to match the following specifications Bits per second 115200 Data bits 8 Parity None Stop bits 1 Flow control none 2 Start your PC s terminal VT100 or ANSI emulation program 3 Press Enter once to launch the CLI 4 At the Login prompt type administrator and press Enter 5 At the Password prompt type p...

Страница 41: ...t to 10 0 0 1 Use the virtual management port IP address to log into the VTrak over your network See Logging into WebPAM PROe on page 46 Physical Management Ports The default physical management port IP addresses are set to Controller 1 10 0 0 2 Controller 2 10 0 0 3 Use the physical management port IP address only when a controller is in maintenance mode See the VTrak E Class Product Manual on th...

Страница 42: ...ent of a problem with one of the controllers See the VTrak E Class Product Manual on the software DVD for more information 1 To make the Maintenance Mode Network settings manually type the following string and press Enter You must set each controller separately administrator cli net a mod t mgmt m c 1 s primaryip 192 168 10 101 primaryipmask 255 255 255 0 gateway 192 168 10 1 administrator cli net...

Страница 43: ... 168 10 1 DHCP Disabled This completes the Management port setup Go to Task 11 Configuring Storage on the Subsystem on page 46 To see the full set of CLI commands at the admin cli prompt type help and press Enter Setting up VTrak with the CLU 1 At the administrator cli prompt type menu and press Enter The CLU main menu appears Figure 15 CLU main menu 2 With Quick Setup highlighted press Enter The ...

Страница 44: ...o save your settings Making Management Virtual Port Settings Automatically To make Management Port settings automatically 1 Press the arrow keys to highlight DHCP 2 Press the spacebar to toggle to Enable 3 Press Ctrl A to save these settings Viewing Management Virtual Port Settings To view the current IP address and network settings when using DHCP 1 Press the arrow keys to highlight DHCP 2 Press ...

Страница 45: ...d press Enter 2 Highlight Maintenance Mode Network Configuration and press Enter 3 Highlight the controller you want and press Enter 4 Highlight DHCP and press the spacebar to toggle to Disabled 5 Highlight each of the following and press the backspace key to erase the current value then type the new value IP Address Subnet Mask Default Gateway IP Address DNS server IP Address 6 Press Ctrl A to sa...

Страница 46: ...bPAM PROe 1 Launch your Browser 2 In the Browser address field type in the virtual IP address of the VTrak subsystem Use the virtual IP address you set in the CLI page 41 or CLU page 43 Note that the IP address shown below is only an example The IP address you type into your browser will be different Regular Connection WebPAM PROe uses an HTTP connection http Enter the VTrak s IP address 192 168 1...

Страница 47: ...e and Password are case sensitive 4 Click the Login button Figure 16 WebPAM PROe log in screen After sign in the WebPAM PROe opening screen appears If there are any unconfigured physical drives in the enclosure an Array Configuration menu also appears See page 51 Figure 19 Note Make a Bookmark Firefox or set a Favorite Internet Explorer of the Login Screen so you can access it easily next time ...

Страница 48: ...in Tree View 2 Click the Settings tab in Management View 3 In the Redundancy Type dropdown menu choose Active Active 4 Check the Cache Mirroring box to enable 5 Click the Submit button 6 Restart the subsystem See Restarting the Subsystem below Restarting the Subsystem To restart the RAID subsystem 1 Click the Subsystem icon in Tree View 2 Click the Administrative Tools icon 3 Click the Shutdown li...

Страница 49: ... View 5 Make the following settings UNcheck the Enable LUN Affinity box to disable UNcheck the Enable SMART Log box to disable Check the Adaptive Writeback Cache box to enable UNcheck the Host Cache Flushing box to disable UNcheck the Forced Read Ahead cache box to disable Leave the other settings at their default values 6 Click the Submit button The changes take effect immediately Making Backgrou...

Страница 50: ...ke the recommended physical drive settings 1 Click the Subsystem icon in Tree View 2 Click the Enclosures icon 3 Click the Enclosure icon of the Head Unit 4 Click the Physical Drives icon 5 Click a Physical Drive icon 6 From the dropdown menu on the SMART Log tab choose Settings Management View 7 UNcheck the SMART box to disable 8 Click the Submit button 9 Repeat these steps for all of your physic...

Страница 51: ...ation menu 2 Choose the Advanced option and click the Next button The Step 1 Disk Array Creation screen displays Step 1 Disk Array Creation 1 Enter a name for the disk array in the field provided For recommended names see page 51 Figure 18 Maximum of 31 characters letters numbers space between characters and underline Important If you plan to set up High Availability HA create one logical drive of...

Страница 52: ... all logical drives choose RAID 5 RAID levels are based on the number of physical drives chosen for each disk array See page 51 Figure 18 3 Leave the logical drive size at the default maximum value 4 For the following items accept the default values in the dropdown menu Stripe size 64 KB is the default Sector size 512 B is the default Read cache Policy Read Ahead is the default Write cache Policy ...

Страница 53: ... double click drives to move them 7 Click the Update button Your choices are displayed under New Hot Spare Drives 8 Click the Submit button Logging out of WebPAM PROe There are two ways to log out of WebPAM PROe Close your browser window Click Logout on the WebPAM PROe banner Figure 20 Clicking Logout on the WebPAM PROe banner Clicking Logout brings you back to the Login Screen See page 47 After l...

Страница 54: ...at least one logical drive on the VTrak subsystem See Configuring your Logical Drives on page 50 Discovering the Storage To discover the storage In the Tree expand a SCSI adapter or Fibre Channel adapter to discover your LUN If the LUN does not appear right click the Physical Adapters icon and choose Rescan from the popup menu Virtualizing the Storage To virtualize the storage 1 In the Tree under ...

Страница 55: ... for more information about Thin Provisioning 5 In the dialog box enter the resource size in MB you want in Full Disk Size field The range of available disk sizes is shown Click the Next button to continue The Select Creation Method dialog box opens 6 In the dialog box choose a creation method Custom For advanced users Express Required for Thin Provisioning Batch For creating multiple SAN resource...

Страница 56: ...essage click Yes Assign SAN clients now No Assign SAN clients later Enabling a FC Target Mode You must enable FC target mode on the appliance server before you can create an FC SAN client To enable FC target mode 1 In the Tree right click the VTrak server icon and choose Options Enable FC Target Mode from the popup menu 2 In the Tree go to Server Physical Resources Physical Adapters 3 Right click ...

Страница 57: ...t name into the field provided Choose the Client Type from the dropdown menu Check Is Clustered box if you plan to assign the same storage to multiple clients If the Client PC is running click the Find button to discover it If the PC is found its IP address is input automatically If the Client PC is offline enter the IP address manually Click the Next button to continue The Fibre Channel Options d...

Страница 58: ...f the iSCSI targets you want to add Click the Next button to continue The Set Client s Initiator dialog box opens 5 In the dialog box check the box next to the Initiator Name of the iSCSI clients you want Choose any iSCSI initiator with a green icon A yellow icon means that initiator is already assigned to a different client Click the Next button to continue The Set iSCSI User Access dialog box op...

Страница 59: ...gn the same storage to multiple clients Uncheck the Persistent Reservation box if you do NOT plan to assign the same storage to multiple clients Click the Next button to continue The Verify Client Information dialog box appears 9 In the dialog box verify the information and click the Finish button The new client appears in the Tree under SAN Clients Assigning Storage to an FC Client To assign stor...

Страница 60: ...arting LUN from the menu The default LUN number is 0 zero Click the Next button to continue The Assign SAN Resource s to the SAN Client dialog box opens 7 In the dialog box verify the information and click the Finish button A success message displays 8 In the message click the OK button The new SAN resource appears in the Tree under the SAN client to which you assigned it Assigning Storage to an i...

Страница 61: ...ox opens 6 In the dialog box verify the information and click the Finish button A success message displays 7 In the message click the OK button The new SAN resource appears in the Tree under the SAN client to which you assigned it 8 On the client system in the Microsoft iSCSI Initiator target pane choose the target and log in 9 Under Computer Management click Disk Management and verify that the ta...

Страница 62: ...alizing the Quorum To virtualize the quorum 1 In the Tree under Physical Devices SCSI or Fibre Channel Devices right click the dedicated LUN and choose Properties from the popup menu The Disk Preparation dialog box opens 2 In the dialog box choose Reserve for Virtual Device from the dropdown menu and click the OK button The Warning data loss dialog box opens 3 In the dialog box type yes in the fie...

Страница 63: ...k Connections You must create an IP address alias for Health Monitoring Health Monitoring tells each primary appliance server about the other appliance s condition and when to assume a secondary function because its failover pair is offline You can use the same NIC network port chosen during setup See Changing NIC Settings on page 18 But you must create and use a separate IP address for Health Mon...

Страница 64: ...eam protocol is currently available for failover 2 In the dialog box click the OK button The Failover Setup wizard opens again Click the Next button to continue The Rescan Physical Devices dialog box opens 3 In the dialog box click the Yes button to perform the rescan The Select the secondary server dialog box opens 4 In the dialog box click the VTrak appliance you want Check the Mutual Failover b...

Страница 65: ... In the dialog box complete the IP addresses of your VTrak appliances Clients use these IP addresses to access the VTrak appliances Click the Next button to continue The Enter the Health Monitoring IP addresses of the servers dialog box opens 8 In the dialog box complete the Health Monitoring IP addresses of your VTrak appliances Enter the IP addresses from Configuring Network Connections on page ...

Страница 66: ...on The Confirm the Failover Configuration dialog box opens 12 In the dialog box check your settings and click the Finish button to configure your failover Saving the Server Configuration There are two methods to save VTrak appliance server configuration Manual Saves the config file to a place you choose Automatic Saves the config file to the Repository To save the server configuration manually 1 I...

Страница 67: ... resource you want to use and click the Next button The Select a Physical Device dialog box opens 3 In the dialog box highlight the device you want to use and click the Next button The Create the Configuration Repository dialog box opens 4 In the dialog box verify your choice and click the Finish button The Configuration Repository is created on the device you chose ...

Страница 68: ...rlands Fax Support 31 0 40 256 9463 Attn Technical Support Phone Support 31 0 40 235 2600 Germany Fax Support 49 0 2 31 56 76 48 29 Attn Technical Support Phone Support 49 0 2 31 56 76 48 10 Italy Fax Support 39 0 6 367 124 00 Attn Technical Support Phone Support 39 0 6 367 126 26 Taiwan Fax Support 886 3 578 2390 Attn Technical Support Phone Support 886 3 578 2395 ext 8822 or 8823 Bejing China Fa...

Отзывы: