PROKORD SMART HOME W411-E J300 Скачать руководство пользователя страница 7

12

13

1. Find and install the app “TuyaSmart” from Google Play

and Apple App store.

2. If you are a new user, register a new account. If you already

have an account, log into the app.

3. Before initiating the connection, ensure that the robot is

in standby mode. Press the “Home” button and the “On” button

on the robot simultaneously for more than 3 seconds,

until the robot starts blinking and a voice prompts “Wi-Fi lost,

please follow the app instructions for reconnection”.

Ensure your phone is connected to the same Wi-Fi network

you wish to connect your robot to.

Note:

• You must be connected to the 2.4 GHz band.

• If the app has been updated it may look slightly different

than in this manual. Please follow instructions in the app

in this case.

Connect to the app

Instructions

ON/OFF

Press and hold      for 3 seconds to turn the robot on. The 

indicator lights up. 

Press and hold      for 3 seconds when the robot is in standby 

mode to turn it off. The indicator light will go out. 

Note:

 The robot cannot be turned off while it is being charged.

CLEAN/PAUSE

After the robot is started, press the      button on the robot or 

remote or use the app to start cleaning. Press any button to 

pause the robot while it is cleaning.

The robot returns to the charging base automatically to charge 

after a cleaning session. 

To start charging manually, press      when the robot is turned off. 

When charging has been initiated by the app, the indicator blinks 

during charging and turns to a solid light when fully charged. 

Note:

 If the robot cannot find the charging base, it automatically 

returns to its starting position. Put the robot back to the charging 

base manually if this happens.

Charging

1-3

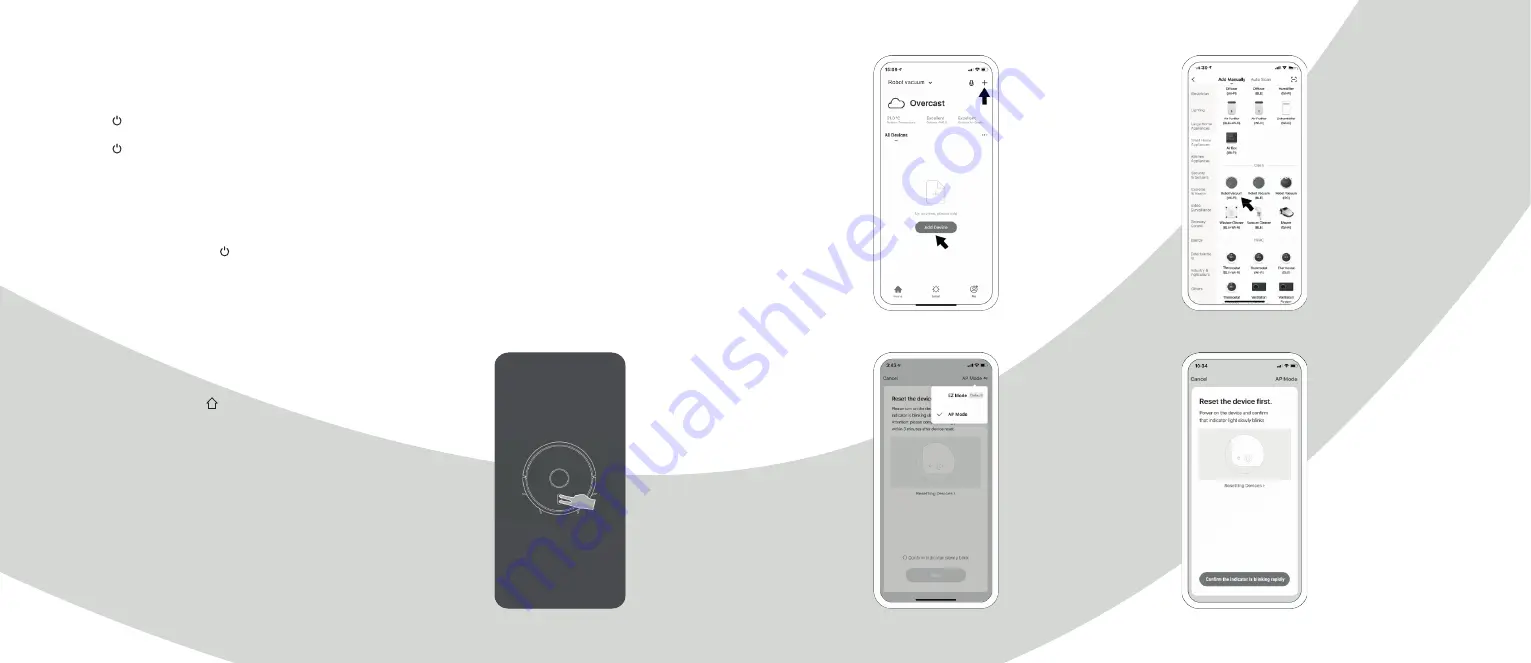
5. Select the "Robot vacuum"

as the type of device.

You will find the

“Robot Vacuum” in the

Small Home Appliances.

4. Open the app and press

"+" to add device, or use

the add device button.

7. Ensure the Wi-Fi light

on the robot is slowly blinking.

Press the button at the bottom

of the screen to confirm.

6. Select “AP Mode”

in the upper right corner.

Содержание SMART HOME W411-E J300

Страница 1: ...1 PROKORD SMART HOME W411 E...

Страница 2: ...ng mode of first vaccum and then mopp You can download the app to your smart phone to oversee the cleaning map and running status of the robot in real time as well as adjust the cleaning area and sche...

Страница 3: ...arging base Adapter HEPA filter sponge Duster cloth Left side brush x 2 Right side brush x 2 Parts List Included products parts 2 in 1 electric controll water tank Cleaning brush with knife Cleaning b...

Страница 4: ...professional use Dustbin button Robot Product Introduction Anti drop sensor Charging contact Universal wheel Side brush Battery cover Driving wheel Rolling brush Rolling brush cover buckle Sensor and...

Страница 5: ...right side brush R correspond to L and R on the bottom case by pressing L and R until you hear a clicking sound Place the charging base against the wall according to the illustration below Make sure t...

Страница 6: ...fill the tank with clean water Please remove the dustbin by hand before filling it with water Installation To install the mopping module into the robot push it horizontally along the rear part of the...

Страница 7: ...is in standby mode to turn it off The indicator light will go out Note The robot cannot be turned off while it is being charged CLEAN PAUSE After the robot is started press the button on the robot or...

Страница 8: ...arging base automatically after each cleaning Note Do not move the robot frequently when it is cleaning If it is necessary to move the robot please put it back near the position where you picked it up...

Страница 9: ...charging base or furniture are made Therefore try not to move or interfere with the robot during cleaning The permanent restricted area may be lost if the map is rebuilt Wi Fi reset If your mobile ph...

Страница 10: ...t and hairs and reassemble the brushes 3 Make sure the left side brush L and the right side brush R correspond respectively to the L and R markings on the bottom of the robot Press the side brushes on...

Страница 11: ...sensor Anti collision sensor for radar Anti collision sensor Infrared recharging sensor Signal emission area Charging base pins Battery The host is furnished with high performance lithium ion batteri...

Страница 12: ...start the robot Main brush side brush or wheel may be twined by foreign matters please shut down the robot and remove foreign matters The dust box is full please clear it The filter screen is blocked...

Страница 13: ...p radar is covered or placed in an open area there is no obstacle within an area of 6x6m2 After error 9 is issued user takes out the duck chamber and error 10 is triggered Error 10 Dust container has...

Страница 14: ...re fragile parts Turn off the robot and charging base during cleaning or maintenance Do not wipe any parts of the robot or charging base using a wet cloth or other liquids Use the product in accordanc...

Страница 15: ...28 For a smarter way of life...

Отзывы: