PROKORD SMART HOME W411-E J300 Скачать руководство пользователя страница 11

20

21

Mopping module

Clean the mopping module after every mopping session.

1. Remove the mopping cloth and pour out the water from the 

water tank.

2. Clean the water tank and the mopping cloth and let it dry.
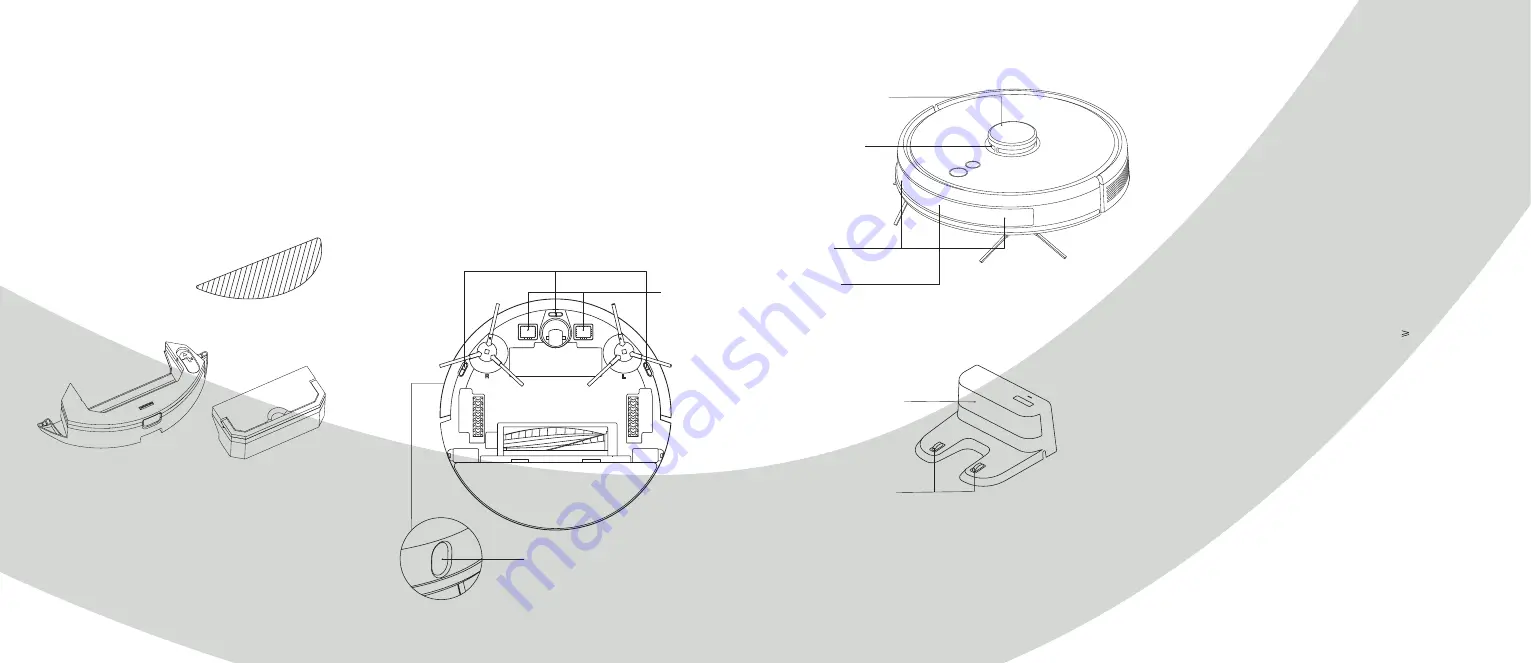
Sensors

Clean the sensors regularly with a soft cloth or with the

cleaning brush.

• Clean the wall sensors on the right-hand side of the robot 

• Clean the anti-collision sensor on the front of the robot gently

• Clean the anti-collision sensor on the top of the robot gently 

• Clean the three anti-dropping sensors at the bottom of the robot 

• Clean the signal emission on the charging base 

Anti-dropping sensor

Charging

contact

TOF sensor

Cleaning and maintenance

Cleaning and maintenance

LDS laser ranging

sensor

Anti-collision

sensor for radar

Anti-collision

sensor

Infrared

recharging sensor

Signal emission area

Charging base pins

Battery

The host is furnished with high-performance lithium-ion 

batteries. To maintain battery performance, please keep

the host charged in daily use.

If the machine is left unused long, please shut down and

keep it properly, charge it as lease every 3 moths to avoid

damaging batteries. 

Firmware upgrade

Upgrade the firmware using the app. Upgrade the robot 

according to the prompt if a new firmware is detected.

Place the robot on the charging base to charge

while updating. The battery level should be      50%. 

Reset

To reset the current map of the robot, take out the 

dustbin, remove the rubber plug and press the Reset 

button (refer to page 3). The map will be lost, but Wi-Fi 

and personalized settings will be saved.

Resetting of Wi-Fi and other personalized settings

are done in the app.

Содержание SMART HOME W411-E J300

Страница 1: ...1 PROKORD SMART HOME W411 E...

Страница 2: ...ng mode of first vaccum and then mopp You can download the app to your smart phone to oversee the cleaning map and running status of the robot in real time as well as adjust the cleaning area and sche...

Страница 3: ...arging base Adapter HEPA filter sponge Duster cloth Left side brush x 2 Right side brush x 2 Parts List Included products parts 2 in 1 electric controll water tank Cleaning brush with knife Cleaning b...

Страница 4: ...professional use Dustbin button Robot Product Introduction Anti drop sensor Charging contact Universal wheel Side brush Battery cover Driving wheel Rolling brush Rolling brush cover buckle Sensor and...

Страница 5: ...right side brush R correspond to L and R on the bottom case by pressing L and R until you hear a clicking sound Place the charging base against the wall according to the illustration below Make sure t...

Страница 6: ...fill the tank with clean water Please remove the dustbin by hand before filling it with water Installation To install the mopping module into the robot push it horizontally along the rear part of the...

Страница 7: ...is in standby mode to turn it off The indicator light will go out Note The robot cannot be turned off while it is being charged CLEAN PAUSE After the robot is started press the button on the robot or...

Страница 8: ...arging base automatically after each cleaning Note Do not move the robot frequently when it is cleaning If it is necessary to move the robot please put it back near the position where you picked it up...

Страница 9: ...charging base or furniture are made Therefore try not to move or interfere with the robot during cleaning The permanent restricted area may be lost if the map is rebuilt Wi Fi reset If your mobile ph...

Страница 10: ...t and hairs and reassemble the brushes 3 Make sure the left side brush L and the right side brush R correspond respectively to the L and R markings on the bottom of the robot Press the side brushes on...

Страница 11: ...sensor Anti collision sensor for radar Anti collision sensor Infrared recharging sensor Signal emission area Charging base pins Battery The host is furnished with high performance lithium ion batteri...

Страница 12: ...start the robot Main brush side brush or wheel may be twined by foreign matters please shut down the robot and remove foreign matters The dust box is full please clear it The filter screen is blocked...

Страница 13: ...p radar is covered or placed in an open area there is no obstacle within an area of 6x6m2 After error 9 is issued user takes out the duck chamber and error 10 is triggered Error 10 Dust container has...

Страница 14: ...re fragile parts Turn off the robot and charging base during cleaning or maintenance Do not wipe any parts of the robot or charging base using a wet cloth or other liquids Use the product in accordanc...

Страница 15: ...28 For a smarter way of life...

Отзывы: