background image

 16  Load Label Stock

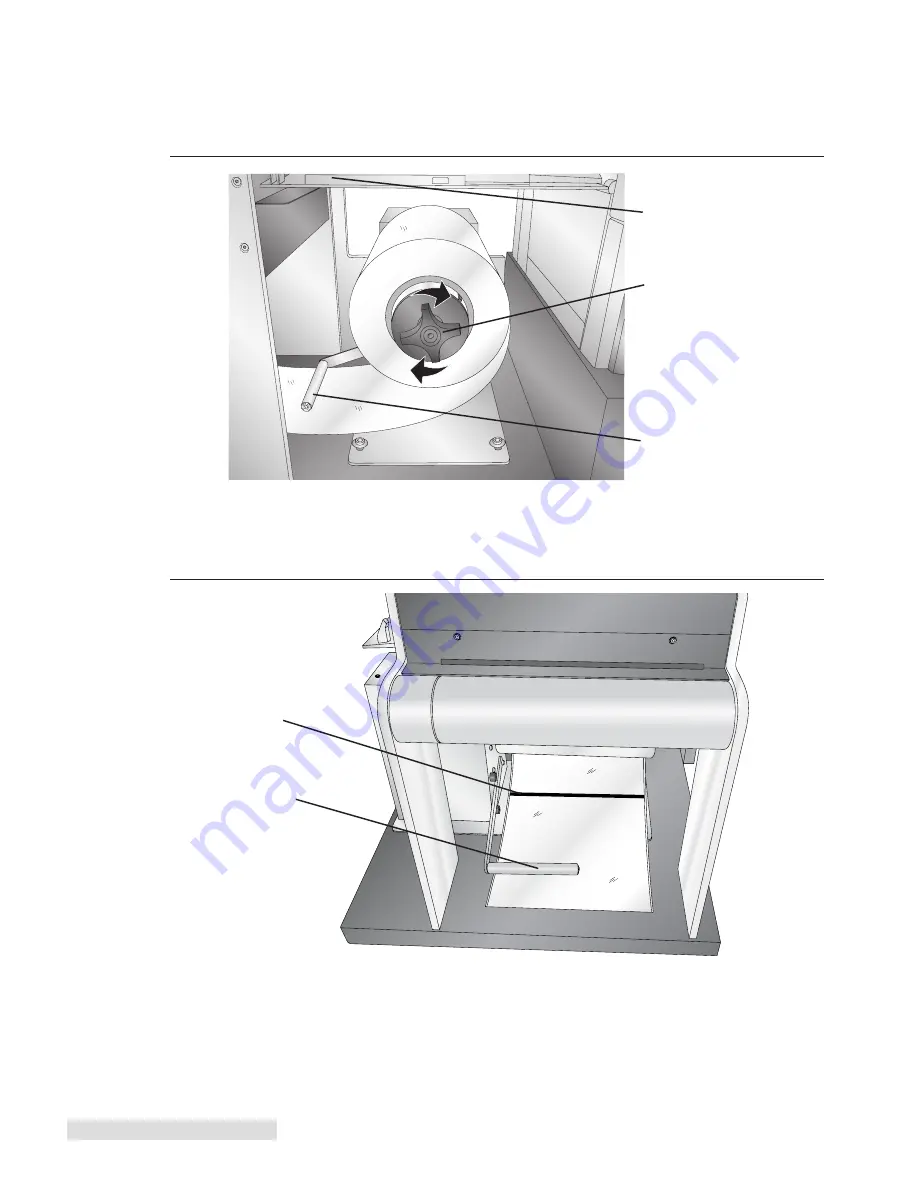
3.   The loose stock should fall on the right side of the roll.  Turn the tension knob clockwise to 

secure the roll to the chuck. Turn the knob as as tight as you can! Feed the stock under the 

dancer arm and through the cutter.

4.   Feed the stock under the dancer arm.

Figure 4-4.

Dancer Arm

Eyemark

facing up!

Figure 4-3.

Dancer Arm

Tension Knob

Note: 


To track supply roll 

usage, remember to enter the 

length of the roll using the 

instructions in Section 6.4.

MP Feeder Door on Printer

Содержание CX1000

Страница 1: ...ed Operator s Guide Introduction 1 Unpack and Assemble 2 Install Software 14 Load Label Stock 15 Printing 20 Toner Monitoring Supply Management 28 Media Recommendations 33 Maintenance and Troubleshooting 36 Specifications 47 ...

Страница 2: ... following measures Re orient or relocate the receiving antenna Increase the separation between the equipment and receiver Connect the equipment into an outlet on a circuit different from that to which the receiver is connected Consult the dealer or an experienced radio TV technician for help Use of shielded cables is required to comply with the Class A limits of Part 15 of the FCC Rules You are c...

Страница 3: ... 6 1 Estimating Cost Per Label Quote Tool 28 6 2 Printing a Proof Print 29 6 3 Managing Used Toner Cartridges 30 6 4 Enter Supply Roll Length 31 6 5 Low Supplies Warning 31 6 6 Other Functions of the Status Monitor 32 Section 7 Media Recommendations 33 Section 8 Replace Toner Cartridges 35 Section 9 Maintenance and Troubleshooting 36 9 1 Matching 36 9 2 Color Alignment Calibration 38 9 3 Print Hea...

Страница 4: ...iv CX1000 Color Label Printer ...

Страница 5: ...l be referred to as media This manual is one of many sources of information for this product If you have problems or questions please consult one of these resources Tech Support Phone 763 475 6979 Tech Support Email www primera com contactsupport Online Knowledgebase www primera com kb Important Note on Label Press Operating Environment It is strongly recommended that the CX1000 Color Label Press ...

Страница 6: ...npack and Assemble 2 3 1 e r a w t f o S l l a t s n I 4 1 k c o t S l e b a L d a o L 9 1 g n i t n i r P Toner Monitoring Supply Management 30 Media Recommendation s 35 Maintenance and Troubleshooting 38 9 4 s n o i t a c i f i c e p S Power Supplies Sample Stock Core Label Guide Discs 6 Pin Cables Install Disc Documentation Allen Wrench Ethernet Gray Loctite Rewinder Right Side Ethernet Yellow ...

Страница 7: ... place two drops on each set screw C Reset each screw until it is flush with the outside of the chuck D Attach the chuck to the unwinder left side drive shafts Line up the holes in the chuck with the flat edges on the drive shaft The holes must correspond with the flats or the set screws will not hold the chuck in place E Tighten the set screws using the 3mm allen wrench Once they are tight attemp...

Страница 8: ...nder right side chuck using two flat head bolts provided E Attach the chuck to the unwinder left side drive shafts Line up the holes in the chuck with the flat edges on the drive shaft The holes must correspond with the flats or the set screws will not hold the chuck in place F Tighten the set screws using the 3mm allen wrench Once they are tight attempt to rotate the chuck forward backward while ...

Страница 9: ...ter stand Align the hooks on the unwinder stand to the slots on the printer stand 8 Locate the unwinder It has the shorter dancer arm and two 6 pin ports on the back Attach it to the stand using the 2 Phillips screws and the washers found in the hardware bag Use the locator pegs on the stand and align them with the holes on the bottom of the unwinder Locator Pegs Figure 2 6 Figure 2 7 ...

Страница 10: ...he slots on the printer stand 10 Locate the rewinder The rewinder has a longer dancer arm and no 6 pin ports on the back Attach it to the stand using the 2 Phillips screws and the washers found in the hardware bag Use the locator pegs on the stand and align them with the holes on the bottom of the rewinder Figure 2 9 Locator Pegs Figure 2 8 ...

Страница 11: ...ter on top of the base Two people are required to lift the printer and one person to guide the printer onto the mounting pegs Align the pegs on the base with the holes in the bottom of the printer Use the locating label to align the right front edge of the printer with indicated mark on the label The right front edge of the printer will be 1 5 inches 38 mm from the front of the base 48 Kg 105 lbs ...

Страница 12: ...cover Remove the red toner cartridge stabilization clips Remove all the print cartridges a Pull up slightly on the cartridge handhold b Pull the cartridge straight out and use the handle to lift it off the guides c Place the cartridges on a clean flat surface out of direct light Figure 2 12 Note The CX1000 comes with 4 starter cartridges These cartridges can only be used with this printer Figure 2...

Страница 13: ...rtant Note Do not touch the exposed ITU 16 Before replacing the toner cartridges remove the red plastic protection plate from the bottom of each toner cartridge Put cartridges back in to the printer On each cartridge there are pegs that correspond to slide rails inside the printer Note Before replacing each cartridge shake it side to side and front to back to redistribute the toner evenly Figure 2...

Страница 14: ... until you hear a click from both sides of the door 18 Pull down to open the feeder door on the left side of the printer When the door is open pull both latches toward the unwinder to release the latches on both side of the door to open it all the way 19 Now connect one of the 6 pin round cables to the connector on the door Figure 2 19 Figure 2 17 Figure 2 18 2 1 3 ...

Страница 15: ...s cable to the connector port on the right side or farthest away from the printer 21 Connect the remaining 6 pin round cable to the back of the cutter mechanism and to the remaining port on the unwinder closest to the printer Figure 2 20 Cable Figure 2 21 ...

Страница 16: ...cate the power converters and the printer power cord Connect power to the printer and switch on the power Connect the power to the back of the rewinder and unwinder Switch on the power Figure 2 22 ON OFF Unwinder Rewinder Printer ...

Страница 17: ...er and printer The grounding straps are not all the same Refer to the diagram below to determine the correct location of the straps Congratulations Your CX1000 is setup Figure 2 23 Important Note Match the location of your 6 pin round cables to what is shown in this diagram Notice how the cables are crossed To test for proper configuration press the Stop Cut button If you hear it cut everything is...

Страница 18: ... level tracking Status Monitor This installs automatically along with PTPrint This allows you to estimate ink costs for a particular label and accurately track toner and label stock supplies 1 To install the software place the CD in your CD Rom Drive The Installer application should automatically launch in a few moments If it does not automatically launch follow these steps Double click the My Com...

Страница 19: ...ck until it touches the stop disc Note You must use only 8 5 inch wide label stock in the CX1000 Failure to use specified label stock will result in damage to your printer and excessive build up of toner and adhesive inside the printer Caution You must use Primera approved label stock to avoid damage to your printer Damage due to use of unapproved material will not be covered by the warranty Secti...

Страница 20: ...Turn the knob as as tight as you can Feed the stock under the dancer arm and through the cutter 4 Feed the stock under the dancer arm Figure 4 4 Dancer Arm Eyemark facing up Figure 4 3 Dancer Arm Tension Knob Note To track supply roll usage remember to enter the length of the roll using the instructions in Section 6 4 MP Feeder Door on Printer ...

Страница 21: ...nue feeding the stock into the printer feeder tray Feed the stock under the sensor guard under the green guides and under the paper feed roller Stop feeding when the leading edge of the stock has covered the red stop block printed just outside the feeder door entrance Figure 4 5 Feed Roller Green Guides Red Stop Block Figure 4 6 Sensor Guard ...

Страница 22: ...e chuck Note Some cores may be shorter than the the stock width If so make sure the distance between the label guide discs is slightly larger than the stock width 9 Print your label according to Section 5 of the manual Note Depending on when the printer was last used the fuser will need to heat up or cool down before the printer will print This can take from 2 seconds to 2 minutes Figure 4 7 Impor...

Страница 23: ...inder it is very important that you lower the dancer arm immediately after the label stock is taped to the core The taping process occurs very quickly so you may not get the label stock attached correctly the first time you try it It is important to attach the label stock centered on the core If the attached label stock is too far to the right or left the paper may fold over itself and cause an un...

Страница 24: ...ill need several measurements from you label stock that you will use in the setup process Take the following measurements from your label stock 1 Page Size Measure from the end of one target to the end of the next target 2 Margin The same value will be used for left and right margins 3 Horizontal Spacing 4 Vertical Spacing 5 Label Size 6 Layout The example below has three rows and two columns Note...

Страница 25: ...Now click Print server properties If print server properties does not appear make sure Color Label Press is selected 4 Click on the forms tab 5 Check the Create a new form box 6 Name your form something descriptive 7 Enter the Print Width as 8 5 This value never changes 8 Enter the Height The height is the Page Size Target to Target measurement from Section 5 1 minus 185 For example if your measur...

Страница 26: ...lect Color Label Press as the Printer Click Next 4 Select Specify Custom Settings for stock selection Click Next 5 Select Multiple columns and or rows of items per page on the Items Per Page screen 6 Enter the number of rows and columns on each page A page is considered the area between the target marks Three Rows Two Columns ...

Страница 27: ... Use the Margin measurement from Section 5 1 Click Next 8 Select the custom page size that you created in Section 5 2 If you do not see your custom page size go back to step 3 and make sure you have selected Color Label Press Click Next ...

Страница 28: ...adius is 125 If your corner radius is different choose this option anyway You can change it later in the File Page Setup menu after the setup wizard is complete c Ellipse should be chosen for circle or oval labels 10 Set the label template size and the space between the labels Use the Horizontal Spacing Vertical Spacing and Label Size measurements from Section 5 1 11 Click Next on the Printing Ord...

Страница 29: ...ource to Embedded Picture b Click the File button to browse to your image A 300 dpi JPG file is recommended c Optional Set your size method If your image is not the same size as your label choose Stretch to expand it to fill the space d Set the bleed by entering an Overhang Template value Primera recommends at least a 1 16 inch 0625 overbleed ...

Страница 30: ...t the label If you would like to add other components such as barcodes or text to your label see the next section Note The number of copies on the print screen refers to the total number of labels printed and NOT the number of pages that will be printed ...

Страница 31: ...pen up text settings to change font size and other settings Add Graphic Click the Image button Now click anywhere on your label An Image Icon will appear Double click it to open up image settings and browse to the image graphic that you would like to insert Add Barcode Click the barcode button Now click anywhere on your label A barcode settings window will appear Here you can chose any type of bar...

Страница 32: ...r click on the menu items on the left 6 1 Estimating Cost Per Label Quote Tool Using the quote tool inside the status monitor software it is possible to estimate the cost per label before actually running job Use the following procedure to estimate cost per label 1 Setup the label using the instructions in Section 5 of this manual 2 Print one page of the label job you intend to print This is extre...

Страница 33: ... capture as a JPG to keep with the original PTPrint file Simply click the Print button or the Save button 6 2 Printing a Proof Print Immediately before you print any job you can print one page of that job Proof Print If you print a proof print you can estimate cost per label enable analysis of available toner in cartridges vs required toner to finish the job Even if you have previously printed a o...

Страница 34: ...rinting a proof print before a job allows you to check if you will have enough toner to finish your job See Section 6 2 In many cases a job will use only part of the toner in a cartridge For example if a particular job uses 75 of the toner in a cartridge that leaves you with 25 remaining If the next job requires 50 of that particular color you can not use that cartridge The 25 cartridge will have ...

Страница 35: ...es sheet on the cartridge you can still identify it by referencing the old cartridge tab and finding the Serial Number of the cartridge you want to use A unique serial number is printed on each cartridge Note Old cartridges with no toner remaining can be deleted from the list by selecting the entry and clicking delete 6 4 Enter Supply Roll Length Each time you load a new roll of label stock enter ...

Страница 36: ...00 labels and the magenta toner only had sufficient toner for 1495 labels you might decide to ignore the warning Cancel Choose this option if you want to replace the toner or supply label stock with a new used cartridge or roll that had sufficient toner or paper length Before removing the label stock or toner cartridge print a Supplies Sheet using the instructions in Section 6 5 Put the appropriat...

Страница 37: ...t this temperature facestock or liner material could melt or burn Adhesive that does not have low ooze properties will cause adhesive build up on the ITU and fuser causing irreparable damage to both of these components Do NOT attempt to print onto non laser approved materials Damage to your printer may result which will not be covered under your limited warranty POLYPROPYLENE AND SOME OTHER SYNTHE...

Страница 38: ... Heat Tolerance wrinkling bubbling burning breaking curling 7 Water Tolerance 8 Scratch Tolerance 9 Effect of Adhesive in Printer Requires minimum of 500 feet of test paper Note 1 Test at least 500 feet of continuous material before determining compatibility Some plastic stocks will initially appear to be compatible However over time the material absorbs too much heat so that not enough is left ov...

Страница 39: ...ht Before replacing the toner cartridges shake the cartridges side to side and back to front to redistribute toner Next remove the protective sheet from the bottom of each toner cartridge Put cartridge s back into the printer being sure to match the color label on the cartridge with the one on the printer On each cartridge there are pegs that correspond to slide rails inside the printer Section 8 ...

Страница 40: ...roduct name or software publisher to help you locate the particular file you are seeking These files allow you to match CMYK values to Pantone values through the software program This is an automatic method of doing exactly the same manual matching procedure described in 1 and 2 above Refer to your specific design program manual for instructions on importing these palettes Note The white brightnes...

Страница 41: ...colors for a particular design You can print the swatches on the various substrates that you will be using with the CX1000 See instructions below for printing these swatches CMYK color values are printed along with the swatches so if you like a particular color you can get that exact color by using the CMYK value associated with it in your design Matching Another Printer Using the CMYK color incre...

Страница 42: ...0 pages when a new cartridge or ITU is installed if power saver has been on for more than 8 hours and at other points if one of several internal parameters has exceeded a threshold You will see the Calibrating notice on the printers control panel when the calibration is taking place This calibration is used for color accuracy and pixel print head alignment See Section 9 3 for more information on P...

Страница 43: ...it 5 Select the Alignment Menu Select the Color you want to Align Select Quick Test 6 A two page test pattern worksheet will print 7 The test pattern is divided into 4 areas Skew Top Margin Left Margin and Right Margin Use the lines and Boxes in areas A B C and D to calculate each value Write down the value that corresponds with Black to Color line which is the straightest When you are finished go...

Страница 44: ...worksheet 11 Reprint the Quick Test to verify the values entered have affected the printer alignment 12 When you are finished restart the printer and set the default source back to MP Feeder Press Menu Select Paper Menu Select Default Source Select MP Feeder 9 4 Cut Alignment Stretch Factor If printed output is longer or stretched so that the size does not match the size of the file on screen cuts...

Страница 45: ... length by 01 inch 6 Click Set In most cases performing this calibration once will be sufficient However it may be necessary to run the calibration again if the fuser is replaced A B C D E F G H I Measure the lines to the left Circle the letter below the line which measures closest to 10 00 inches Each line differs in length by 01 inch Stretch Factor Calibration Print J K L M N O Tip Use a clear a...

Страница 46: ...to select Cancel Finally reset the printer by turning it off and on again using the power switch 9 6 Error Messages Rip Software Service 900 This error can appear on the printer LCD Control Panel panel after the system is stopped in the middle of job using the Stop Cut button Turn off the printer and turn it back on again to clear the error The printer takes a long time to start printing Engine wa...

Страница 47: ...were changed via the printer control panel or through the print settings window before printing The message is a warning that the settings do not match defaults If you do not change the settings back to their original values unexpected errors may occur Contact tech support if you have trouble restoring the defaults 9 7 Replacing the Fuser 1 Pull the tensioner forward until you are able to flip the...

Страница 48: ...he printer off Open the front cover 2 Remove all the print cartridges a Pull up slightly on the cartridge handhold b Pull the cartridge straight out and use the handle to lift it off the guides c Place the cartridges on a clean flat surface out of direct light Figure 9 4 Figure 9 5 ...

Страница 49: ...aise the lever to unlock the image transfer unit b Pull down on the handle c Slide the image transfer unit out and place it on a clean flat surface Caution Do not touch the transfer belt Touching the belt will damage the image transfer unit Figure 9 6 Figure 9 7 Figure 9 8 ...

Страница 50: ...lace c Lower the lever to lock the image transfer unit into place 5 Close the printer door 6 Turn the printer on The printer returns to a Ready state 9 9 Technical Support If you have difficulties operating your CX1000 the following additional resources are available Primera Knowledge Base www primera com kb Email Support www primera com contactsupport Phone Support 763 475 6979 Mon Fri 8 a m 5 p ...

Страница 51: ...e graphical user interface Primera Color System Pantone Input System Input roll maximum diameter 8 204mm Core inside diameter 3 76 2mm Automatic paper feed Output System Output roll maximum diameter 8 204mm Core inside diameter 3 76 2mm Maximum output roll weight 45 lbs 20 4 kg Operating System Windows XP Vista 7 32 bit and 64 bit Power Rewinder External Switching 100 240 VAC 50 60Hz Output 60 wat...

Страница 52: ...g Operating Environment Temperature 20 to 23 C 68 to 74 F Humidity 40 to 55 relative humidity Altitude 0 2000 meters 6 560 feet Certifications CSA ICES Class A FCC Class A UL 60950 1 IEC 60320 1 CE Class A CB IEC 60950 1 IEC 60825 1 GS TÜV C tick mark Class A Warranty One year parts and labor Options Extended warranty ...

Страница 53: ...acing 43 Header 42 ICC Profile 43 Image Transfer Unit ITU 9 44 Label Guide Discs 2 Leader 42 Manually Array Image 29 Mil 33 Pantone 36 Polyester 33 Polypropylene 33 Proof Print 29 PTPrint 14 20 Quote Print 29 Quote Save 29 Quote Tool 28 Rewinder Dancer Arm 19 Rip Software 42 Step and Repeat 14 Stop Cut 42 Stretch Factor 40 Tech Support Report 32 Trailer 42 Used Toner 28 30 Index ...

Страница 54: ...P N 511301 010314 ...

Отзывы: