


C844 Upright Cycle
Page 31
5.
If you are going to re-install the display enclosure without replacing the upper PCA
. . .
THEN . . .
OTHERWISE . . .
Skip to Step 9.
Continue with the next step.
6.
Carefully disconnect the keypad ribbon cable from the upper PCA.
7.
Remove the screws that secure the upper PCA to the display enclosure. Set aside the
defective upper PCA for eventual shipment to Precor Customer Support.
Note:
When you package the upper PCA, document the problem as described in Documenting
Software Problems.
8.
Position the upper PCA at its mounting location on the display enclosure. Install the screws
that secure the upper PCA to the display enclosure.
9.
Line up the blank place on the end of the keypad ribbon cable with the blank pin position on
the keypad connector. Place a full twist in the end of the keypad ribbon cable, then carefully
connect it to the upper PCA.
10. Connect the ribbon cable to the upper PCA.
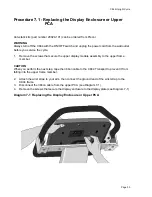
11. Position the upper display module on the upper frame member. Install the screws that
secure the display module to the upper frame member.
12. Remove the ground lead of the wrist strap from the C844 frame, then remove the wrist strap
from your arm.
13. Position the display plate on the display enclosure. Install the screws that secure the display
enclosure to the display plate.
14. Check the operation of the C844 as described in Section Four.
Содержание C844
Страница 15: ...C844 Upright Cycle Page 15 Diagram 5 1 Adjusting the gap between the flywheel and magnet assembly ...
Страница 17: ...C844 Upright Cycle Page 17 Diagram 5 2 C844 Magnet Wiring ...
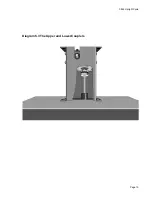
Страница 19: ...C844 Upright Cycle Page 19 Diagram 5 3 The Upper and Lower Couplers ...
Страница 36: ...C844 Upright Cycle Page 36 Diagram 7 3 C844 Wiring Diagram 120Vac Units ...