background image

PD8-6300 Pulse Input Rate/Totalizer, Counter & Tachometer 

Instruction Manual 


39 

Time Base 

The time base is the amount of time over which the 
rate parameter should accrue. For example, if the rate 
was ten and the time base was in minutes, then the 
total would increase by ten every one minute. 
 

Total & Grand Total Conversion 
Factor 

The total & grand total conversion factor is the 
amount by which the rate is multiplied before it is 
added to the total or grand total. For example, if the 
rate was 1000 gallons per minute and the total 
conversion factor was 0.001, the total would increase 
by 1 every minute. This is useful, for instance, if you 
want to show rate in gallons and total in thousands of 
gallons. 
 

Total & Grand Total Reset 

The totals can be programmed for automatic or 
manual reset. In the automatic reset mode, a 
programmable time delay is available to reset the total 
or grand total after the assigned preset is reached. 
The totals can also be reset via the front panel button, 
via a switch across the F4 terminal, digital inputs, or 
via a Modbus command. 
 

Non-Resettable Totalizer 

The total and grand total can be password-protected 
to prevent unauthorized resets. The grand total can 
be programmed as a non-resettable total, see 

Total 

Reset Password & Non-Resettable Total

 on pag

49


for details. 

Calibrating the Meter with External 
Source (

Cal

To scale the meter without a signal source, refer to 

K-Factor Calibration

 on page 

37

 o

Scaling the 

Meter

 on pag

38

. 

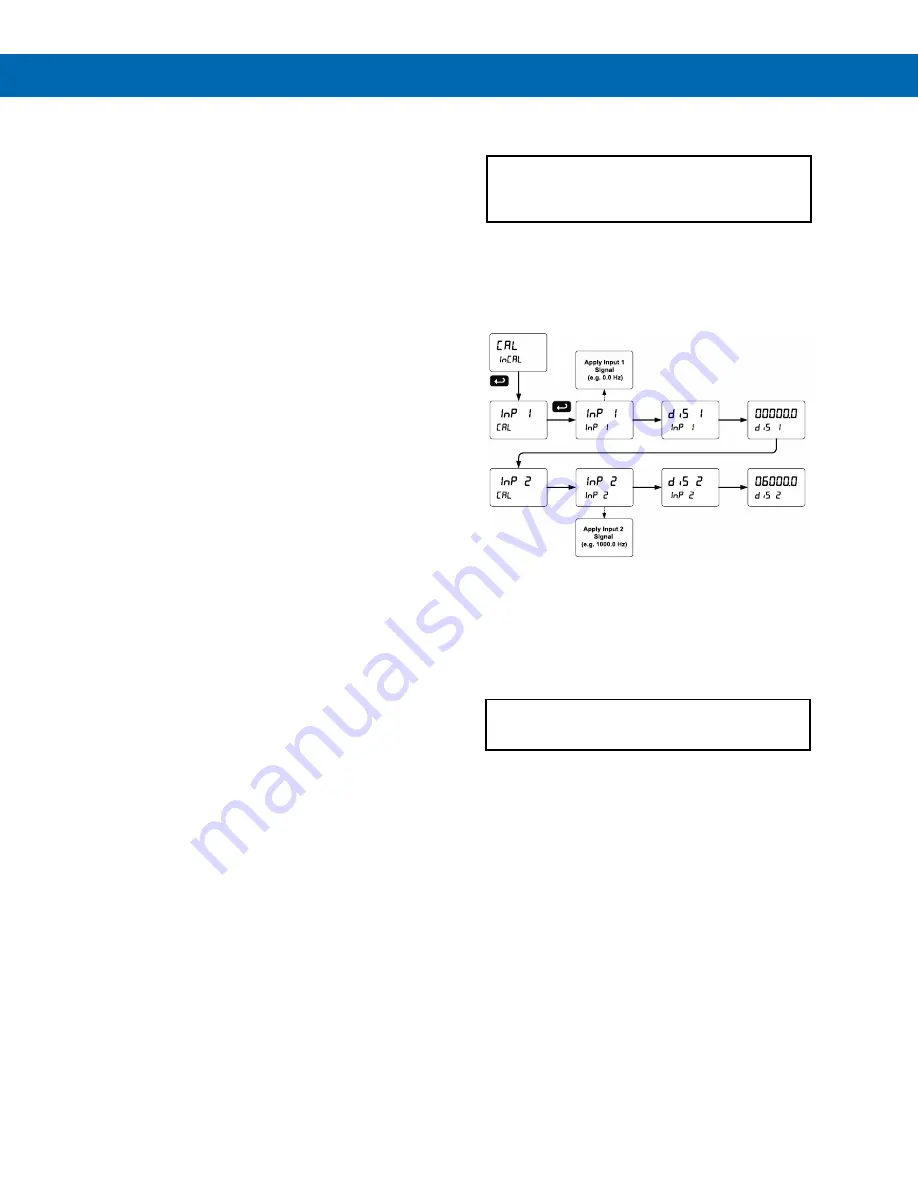
The meter can be calibrated to display the process 
variable in engineering units by applying the 
appropriate input signal and following the calibration 
procedure. 
The use of a calibrated signal source is strongly 
recommended to calibrate the meter. 


Notes:


1. 

The display values (

DiS 1

 and 

DiS 2

) need to be 

in units of measure per second. 

2. 

Inputs for the above example are:  
Input 1: 0.0 Hz; Display 1: 0.0 gallons/second 
Input 2: 1000.0 Hz; Display 2: 6000.0 gallons/second 

3. 

After calibration in gallons per second, you can 
change the time base to display the rate in gallons 
per minute, per hour, or per day. 

There is no need to warm up the meter before 

performing the calibration procedure. 


Содержание ProtEX-MAX PD8-6300

Страница 1: ...e in Units per Second Minute Hour or Day Total Grand Total or Non Resettable Grand Total Front Panel or Remote Total Reset Password Protection for Total Reset Total Stored in Non Volatile Memory Assign Any Relay or 4 20 mA Output for Rate or Total K Factor Internal Scaling or External Calibration 4 20 mA Output Option Converts the Pulse Input to an Isolated 4 20 mA Output Operating Temperature Ran...

Страница 2: ...2 ...

Страница 3: ... repair or replacement of the defective unit See Warranty Information and Terms Conditions on www predig com for complete details Registered Trademarks All trademarks mentioned in this document are the property of their respective owners 2022 Precision Digital Corporation All rights reserved FREE MeterView Pro Programming Software The meter can be powered from the USB connection When using the USB...

Страница 4: ...tion P P 24 Connections 24 Required Factory Wired Connection 24 PROVU Electronics Module Layout 25 USB Connection 25 Power Connections 26 Signal Connections 27 Relay Connections 28 Interlock Relay Feature 28 Switching Inductive Loads 28 RS 485 Connections 29 RS 485 Multi Drop Connection 29 Digital I O Connections 29 F4 Digital Input Connections 29 4 20 mA Output Connections 30 Analog Output Power ...

Страница 5: ...e Interlock Relay Force On Feature 47 Scaling the 4 20 mA Analog Output Aout 48 Reset Menu reset 48 Manual Control Menu Contrl 48 Setting Up the Password pass 49 Protecting or Locking the Meter 49 Total Reset Password Non Resettable Total 49 Making Changes to a Password Protected Meter 49 Disabling Password Protection 49 Advanced Features Menu 50 Advanced Features Menu Display Messages 50 Rounding...

Страница 6: ...igure 9 Flowmeter Powered by External Supply 27 Figure 10 Self Powered Magnetic Pickup Coil Flowmeter 27 Figure 11 NPN open Collector Input 27 Figure 12 PNP Sensor Powered by Internal Supply 27 Figure 13 Switch Input Connections 27 Figure 14 Relay Connections 28 Figure 15 Interlock Connections 28 Figure 16 AC and DC Loads Protection 28 Figure 17 Low Voltage DC Loads Protection 28 Figure 18 RS 485 ...

Страница 7: ...digital I O features make the ProtEX MAX an excellent addition to any system One of the most useful applications for the PD8 6300 is to convert the pulse input from the flowmeter into an isolated 4 20 mA output all the while displaying flow rate and total on a big bright display as the following graphic illustrates Ordering Information 85 265 VAC Models Model Standard Features Options Installed PD...

Страница 8: ...lete line of ProtEX MAX products predig com videos ProtEXMAX_Overview MeterView Pro Programming Software Learn how easy it is to program the ProVu ProtEX MAX process meter using MeterView Pro software predig com videos MVPro_SW MeterView Pro Software Demonstration Learn how easy it is to program Precision Digital s ProVu ProtEX MAX process meter for a level application using MeterView Pro PC based...

Страница 9: ...m This feature not only saves the cost of an external power supply but also greatly simplifies wiring In addition there is a second 25 mA power supply provided with the 4 20 mA output option The first thing you notice about the PD8 6300 is its modern looking rugged die cast aluminum housing with convenient mounting flanges Housed inside this enclosure is a dual line 6 digit display with high inten...

Страница 10: ...MAX using your PC You can also generate and save programming files for later use Advanced Display Features Display Flow Rate Total or Grand Total The main display can be programmed to display flow rate total or grand total and the second display can be programmed to display flow rate total grand total engineering units custom legends or can be turned off Both displays could also display relay set ...

Страница 11: ...en and stayed constant for one minute and the time base was in minutes then the total would increase by ten every one minute Convert Pulse Input to Isolated 4 20 mA Output One of the most useful applications for the PD8 6300 is to convert the pulse input from the flowmeter into an isolated 4 20 mA output all the while displaying flow rate and total on a big bright display as the following graphic ...

Страница 12: ... described above the PD8 6300 also includes four digital inputs that can be used to reset the total or grand total However if a digital input is used to reset the total or for some other purpose the corresponding through glass SafeTouch button will function as a programming key Total Reset via Preset Value The total and grand total can be programmed for automatic reset based on a preset value dete...

Страница 13: ...ogrammed and operated without removing the cover and exposing the electronics in a hazardous area These buttons can be disabled for security by selecting the DISABLE setting on the NO CONTACT BUTTONS switch located on the back of the electronics module inside the enclosure Rugged Heavy Duty Enclosure The ProtEX MAX is housed in a rugged NEMA 4X 7 9 IP68 die cast aluminum enclosure designed to with...

Страница 14: ...tag comes with a stainless steel wire and lead seal for easy mounting wherever you need it Removable Screw Terminals Industrial applications require screw terminal connections for easy field wiring and the ProtEX MAX goes one step further in convenience by also making them removable Note The above photograph is representative of the back of the PD8 6300 in every regard except for the signal input ...

Страница 15: ...d all programmed settings are stored in non volatile memory for a minimum of ten years if power is lost Power Options 85 265VAC50 60Hz 90 265VDC 20Wmax 12 24 VDC 12 24 VAC 15 W max Powered over USB for configuration only Fuse Required external fuse UL Recognized 5 A max slow blow up to 6 meters may share one 5 A fuse Isolation 4 kV input output to power line 500 V input to output or output to P su...

Страница 16: ...tal units alternate grand total units display Hi display Lo display Hi Lo display Modbus display units line 2 and display off line 2 Rate Display Indication 99999 to 999999 lead zero blanking R LED illuminates while displaying rate or frequency Total Display Total Overflow 0 to 999 999 automatic lead zero blanking T LED is illuminated while displaying total or grand total Up to 999 999 999 with to...

Страница 17: ... time delays Programmable and independent for each relay Fail Safe Operation Programmable and independent for each relay Note Relay coil is energized in non alarm condition In case of power failure relay will go to alarm state Auto Initialization When power is applied to the meter relays will reflect the state of the input to the meter USB Connection Function Programming only Compatibility USB 2 0...

Страница 18: ... VDC Logic Low 0 to 1 25 VDC Digital Inputs Outputs Function Terminals provided for remote operation of all four programming operation buttons Other uses include acknowledge reset relays and reset max min values See Function Keys Digital I O Available Settings on page 54 for a complete list of capabilities Channels 4 digital inputs 4 digital outputs Digital Input Logic High 3 to 5 VDC Digital Inpu...

Страница 19: ... T5 T6 Zone 21 AEx tb IIIC T90 C Ta 40 C to 65 C T6 Ta 40 C to 60 C T5 Ta 40 C to 65 C Certificate Number 3047283 CSA Class I Division 1 Groups B C D Class II Division 1 Groups E F G Class III Division 1 Class I Zone 1 Ex d IIC Zone 21 Ex tb IIIC T90 C 40 C Tamb 60 C Temperature Code T6 40 C Tamb 65 C Temperature Code T5 Enclosure Type 4X IP68 Certificate Number 2531731 ATEX II 2 G D Ex d IIC T Gb...

Страница 20: ...d by opening the enclosure To access electrical connectors remove the 2 captive screws and then remove the electronics module Connectors are on the rear of the electronics module Unpacking Remove the meter from box Inspect the packaging and contents for damage Report damages if any to the carrier If any part is missing or the meter malfunctions please contact your supplier or the factory for assis...

Страница 21: ... holes located in the cast in flanges In addition the internal electronic assembly can be rotated to allow the enclosure to be mounted in any position To mount the meter to a wall follow these instructions Prepare a section of wall approximately 7 x 8 5 178 mm x 216 mm for meter mounting by marking with a pencil the mounting holes shown in Figure 1 on the wall Select the appropriate mounting screw...

Страница 22: ...his kit includes two U bolts the necessary hardware and is available in zinc plated steel PDA6848 and 316 stainless steel PDA6848 SS To mount the meter using a U Bolt kit follow these instructions Orient the groove on the back of the instrument with the pipe and secure it to the pipe with the two U bolts and hardware provided Vertical Pipe Mounting Horizontal Pipe Mounting ...

Страница 23: ...erviewpro MeterView Pro Installation 1 Connect one end of the provided USB cable to the meter and the other end to the computer The computer will automatically install the driver software it needs to talk to the meter Follow the on screen instructions and allow sufficient time for the process to complete This can take a few minutes If the process is interrupted then it could leave the system in an...

Страница 24: ... local codes to prevent damage to the meter and ensure personnel safety Static electricity can damage sensitive components Observe safe handling precautions for static sensitive components Use proper grounding procedures codes If the instrument is installed in a high voltage environment and a fault or installation error occurs high voltage may be present on any lead or terminal Follow all fusing a...

Страница 25: ... PD8 6300 6H0 and PD8 6300 7H0 the upper set of connectors RELAYs MA OUT are not present Figure 5 PROVU Electronics Module Layout USB Connection Figure 6 USB Connection DO NOT disconnect the RJ45 M LINK connector cable Otherwise the instrument will not function properly The meter should only be connected to a computer while it is located in a safe area ...

Страница 26: ...nnector labeled POWER The meter will operate regardless of DC polarity connection The and symbols are only a suggested wiring convention There are separate models for low voltage and high voltage power See Ordering Information on page 7 for details Figure 7 Power Connections AC or DC POWER Required External Fuse 5 A max 250 V Slow Blow POWER ...

Страница 27: ...ickup Coil Flowmeter Figure 11 NPN open Collector Input Figure 12 PNP Sensor Powered by Internal Supply Figure 13 Switch Input Connections Flowmeter Pulse Output P COM P S S 3 4 1 2 5 F4 6 mV PNP NPN SWITCH INPUT SIGNAL External Power Supply Flowmeter Pulse Output P COM P S S 3 4 1 2 5 F4 6 INPUT SIGNAL mV PNP NPN SWITCH Flowmeter Magnetic Pickup Coil P COM P S S 3 4 1 2 5 F4 6 INPUT SIGNAL mV PNP...

Страница 28: ...preventing power from flowing to the Control Relay and the load Figure 15 Interlock Connections Switching Inductive Loads The use of snubbers to suppress electrical noise is strongly recommended when switching inductive loads to prevent disrupting the microprocessor s operation The snubbers also prolong the life of the relay contacts Suppression can be obtained with resistor capacitor RC networks ...

Страница 29: ...re the five pins for use as a three wire half duplex RS 485 connection it is necessary to create a jumper connection between DI to DO and DI to DO as shown below Figure 19 Three Wire RS 485 Connection Digital I O Connections The ProtEX MAX has a 10 position terminal block for connecting digital inputs and outputs Figure 20 Digital Input and Output Connections The onboard digital inputs 1 4 are con...

Страница 30: ...vices if the analog output is not used The I terminal is the 24 V and the R terminal is the return Figure 23 Analog Output Supply Powering Other Devices Remote Programming The meter can be operated via the programming buttons or a remote control station with required approvals to be located in a hazardous area using the digital inputs and outputs 4 20 mA Input Remote Display PLC Chart Recorder Etc...

Страница 31: ...the connector is used to select the excitation voltage 24 V 10 V or 5 V which is supplied to the P and P wiring terminals Setup and programming is done using MeterView Pro or through the programming buttons After power and input signal connections have been completed and verified apply power to the meter Default setting LED Status Indicators LED State Indication 1 4 Steady Alarm condition based on...

Страница 32: ... area These buttons can be disabled for security by selecting DISABLE on the switch labeled NO CONTACT BUTTONS located on the connector board To actuate a button press one finger to the glass directly over the marked button area Then retract finger more than three inches from the glass before pressing the next button When the cover is removed the four mechanical buttons located next to the sensors...

Страница 33: ... Total reset Program total reset mode auto or manual GT tb Grand total time base Program grand total time base GT CF Grand total conversion factor Program grand total conversion factor Display Functions Messages Display Parameter Action Setting Description GT rst Grand total reset Program grand total reset mode auto or manual Auto Automatic Press Enter to set automatic total reset T dly Time delay...

Страница 34: ...Press Enter to access the Reset menu Rst Hi Reset high Press Enter to reset max display Rst Lo Reset low Press Enter to reset min display Rst HL Reset high low Press Enter to reset max min displays Rst t Reset total Press Enter to reset total Rst Gt Reset grand total Press Enter to reset grand total Contrl Control Enter Control menu Auto Automatic Press Enter to set meter for automatic operation n...

Страница 35: ...settings are saved to memory only after pressing Enter The display moves to the next menu every time a setting is accepted by pressing Enter Setting Numeric Values The numeric values are set using the Right and Up arrow buttons Press Right arrow to select next digit and Up arrow to increment digit value The digit being changed is displayed brighter than the rest Press and hold Up to auto increment...

Страница 36: ...put connector which must be configured according to the input level and type For location of this switch see Signal Connections on page 27 Jumper J4 located inside the meter behind the input signal connector is used to select the excitation voltage 24 V Default setting 10 V or 5 V which is supplied to the P and P wiring terminals For location of this switch see Flowmeter Supply Voltage Selection P...

Страница 37: ...rogramming the meter Pressing the right arrow moves the decimal point one place to the right until no decimal point is displayed then it moves to the leftmost position Pressing the up arrow moves the decimal point to the left Programming the Rate Totalizer prog The meter may either be scaled SCALE without applying an input calibrated Cal by applying an input or you may use the K Factor menu to mat...

Страница 38: ...lows InP 1 0 0 DiS 1 0 00 InP 2 1000 0 DiS 2 0 22 Set the time base to minutes see Time Base Total Conversion Factor Total Reset and the meter will display 13 20 gal min at 1000 Hz For instructions on how to program numeric values see Setting Numeric Values on page 35 Error Message Error An error message indicates that the calibration or scaling process was not successful After the error message i...

Страница 39: ...l button via a switch across the F4 terminal digital inputs or via a Modbus command Non Resettable Totalizer The total and grand total can be password protected to prevent unauthorized resets The grand total can be programmed as a non resettable total see Total Reset Password Non Resettable Total on page 49 for details Calibrating the Meter with External Source Cal To scale the meter without a sig...

Страница 40: ...p the rest of the setup menu Press the Menu button again and the Up arrow to reach the Program menu and complete the scaling or calibration of the meter Display Flow Rate Total or Grand Total Line 1 can be programmed to display flow rate total or grand total and line 2 can be programmed to display flow rate total grand total engineering units custom legends or be turned off Both lines can also dis...

Страница 41: ...Set and reset points 4 Fail safe operation a On enabled b Off disabled 5 Time delay a On delay 0 999 9 seconds b Off delay 0 999 9 seconds Relay Assignment Assign The relays can be assigned to any of the following parameters 1 Rate for low or high alarm indication 2 Total for alarm indication 3 Grand total for alarm indication 4 Modbus input Setting the Relay Action Operation of the relays is prog...

Страница 42: ...il the reset point has been accepted Setting Fail Safe Operation In fail safe mode of operation the relay coil is energized when the process variable is within safe limits and the relay coil is de energized when the alarm condition exists The fail safe operation is set independently for each relay Select on to enable or select off to disable fail safe operation Programming Time Delay The On and Of...

Страница 43: ... must go below the set point and then go above it Low Alarm Operation Set Reset For Manual reset mode ACK can be pressed anytime to turn off relay To detect a new alarm condition the signal must go below the set point and then go above it High Alarm with Fail Safe Operation Set Reset Note Relay coil is energized in non alarm condition In case of power failure relay will go to alarm state Low Alarm...

Страница 44: ...psed the On time delay timer resets and the relay does not change state The same principle applies to the Off time delay Note If Automatic or Manual A nmAn reset mode is selected the LED follows the reset point and not the relay state when the relay is acknowledged Total Relay Sampling Operation When the total reaches the preset the relay trips and the sample time starts After the sample time has ...

Страница 45: ...status LEDs on the front panel are available on all meters even those without relays installed and provide status indication for the following LED Status 1 Alarm 1 2 Alarm 2 3 Alarm 3 4 Alarm 4 The meter is supplied with four alarm points that include front panel LEDs to indicate alarm conditions This standard feature is particularly useful for alarm applications that require visual only indicatio...

Страница 46: ...condition is still present resets the relay and turns off the LED Latching Relay with Clear Lt Clr In this application the meter is set up for manual reset only after the signal passes the reset point alarm condition has cleared Acknowledging the alarm while it is still present has no effect on either the LED or the relay When the alarm is acknowledged after it returns to the normal state the LED ...

Страница 47: ...n any of the internal relays 1 4 3 Connect a switch or dry contact between the 5V terminal and the corresponding digital input dI 1 to dI 4 terminal Interlock Relay Operation Example Relays 1 2 are configured to energize their front panel LEDs are steady on when SW1 SW2 switches above are closed If the contacts to these digital inputs are opened the corresponding front panel LEDs flash indicating ...

Страница 48: ...output based on display values For further details see Setting Numeric Values on page 35 Reset Menu reset The Reset menu is used to reset the totals maximum or minimum reading peak or valley reached by the process both may be reset at the same time by selecting reset high low rst HL Manual Control Menu Contrl The Manual Control menu is used to control the 4 20 mA analog output and the relays manua...

Страница 49: ...e the Grand Total has been programmed as non resettable the feature CANNOT be disabled Making Changes to a Password Protected Meter If the meter is password protected the meter will display the message Locd Locked when the Menu button is pressed Press the Enter button while the message is being displayed and enter the correct password to gain access the menu After exiting the programming mode the ...

Страница 50: ...ints Display Parameter Action Setting No PtS Number of points Set meter for 2 to 32 point linearization CutofF Cutoff Set low flow cutoff Count Count Set the totals to count up or down from a set value Tot C Total count Set the total to count up to or down from the programmed total value Gtot C Grand total count Set the grand total to count up or down from from the programmed grand total value Aou...

Страница 51: ...gs Slow Pulse Rate Low Gate sec High Gate sec Min Freq Hz 1 0 2 0 0 5000 1 0 10 0 0 1000 1 0 20 0 0 0500 1 0 100 0 0 0100 1 0 200 0 0 0050 1 0 400 0 0 0025 1 0 800 0 0 0012 1 0 999 9 0 0010 The low gate setting corresponds to the display update rate and is used to stabilize the display reading with a fluctuating signal The minimum frequency is dependent on high gate setting Contact De Bounce Filte...

Страница 52: ... ID may be programmed between 1 and 247 The transmit delay may be set between 0 and 199 ms The parity can be set to even odd or none with 1 or 2 stop bits Select Menu SElEct The Select menu is used to select the input signal conditioner applied to the input linear low flow cutoff and analog output programming The multi point linearization is part of the linear function selection Input Signal Condi...

Страница 53: ...it s recommended to use a milliamp meter with a resolution of at least 0 1 µA to measure the output current The values saved internally during this procedure are used for scaling the 4 20 mA output in the Setup menu Analog Output Calibration Procedure 1 Wire the PD8 6300 4 20 mA output to a current loop that includes a power supply internal or external 12 to 24 VDC and the mA input on the digital ...

Страница 54: ...ut momentarily while the function key or digital input is active The process value will continue to be calculated in the background Ln1 Hi Display maximum display value on line 1 Ln1 Lo Display minimum display value on line 1 Ln1 HL Display maximum minimum display values on line 1 Ln2 Hi Display maximum display value on line 2 Ln2 Lo Display minimum display value on line 2 Ln2 HL Display maximum m...

Страница 55: ...elays or other parameters function assigned through the User menu To learn more about SafeTouch buttons see this video predig com videos Safetouch_Buttons SafeTouch Buttons The ProtEX MAX is equipped with four sensors that operate as through glass buttons so that it can be programmed and operated without removing the cover and exposing the electronics in a hazardous area These buttons can be disab...

Страница 56: ...tion keys can be programmed to reset the total and grand total This makes it possible for the user to reset either the total or the grand total without opening the enclosure cover and without the need for external devices Of course if the total or grand total is password protected they will not reset when the function key is pressed Total Reset via F4 Terminal The PD8 6300 includes a digital input...

Страница 57: ...the Right arrow F1 button to access the Reset menu To display max reading using function key with factory defaults 1 Press Up arrow F2 button to display maximum reading since the last reset power up 2 To reset max min press Right arrow F1 button to access the Reset menu The max min displays are reset to actual values 3 Press Menu to exit max min display reading To display max min readings continuo...

Страница 58: ...s the Menu button to return to Run Mode Determining Software Version To determine the software version of a meter 1 Go to the Diagnostics menu diAG and press Enter button 2 Press Up arrow button and scroll to Information menu Info 3 Press Enter to access the software number SFT and version UER information Write down the information as it is displayed Continue pressing Enter until all the informati...

Страница 59: ...y 1 On 1 0 0 sec Off delay relay 1 Off 1 0 0 sec On delay relay 2 On 2 0 0 sec Off delay relay 2 Off 2 0 0 sec Factory Defaults User Settings Parameter Display Default Setting On delay relay 3 On 3 0 0 sec Off delay relay 3 Off 3 0 0 sec On delay relay 4 On 4 0 0 sec Off delay relay 4 Off 4 0 0 sec Display 1 analog out Dis 1 0 0 Output 1 value Out 1 4 000 mA Display 2 analog out Dis 2 1000 0 Outpu...

Страница 60: ...r displays 1 99999 2 9999 Check 1 Input selected in Setup menu 2 Corresponding signal at Signal connector Display is unstable Check 1 Input signal stability and value 2 Display scaling vs input signal 3 Filter and gate values Display response is too slow Check filter and gate values Display reading is not accurate Check scaling or calibration Display does not respond to input changes reading a fix...

Страница 61: ...ing the system to work with only one device to ease troubleshooting and then expand the system one device at a time Communications slow Increase the baud rate Random communication errors 1 Increase the TX delay time 2 Decrease the baud rate Other symptoms not described above Call Technical Support for assistance Note Certain sequences of events can cause unexpected results To solve these issues it...

Страница 62: ...PD8 6300 Pulse Input Rate Totalizer Counter Tachometer Instruction Manual 62 NOTES ...

Страница 63: ......

Страница 64: ...55 8990 www predig com LIM8 6300_F SFT039 Ver 4 010 up 05 22 Contact Precision Digital Technical Support Call 800 610 5239 or 508 655 7300 Fax 508 655 8990 Email support predig com Sales Support Call 800 343 1001 or 508 655 7300 Fax 508 655 8990 Email sales predig com Place Orders Email orders predig com For the latest version of this manual please visit www predig com ...

Отзывы: