background image

Powerex  •  150 Production Drive  •  Harrison, OH  45030  •  USA

P   1.888.769.7979  •  F   513.367.3125  •  www.powerexinc.com

IN599102AV  •  15 September 2020

Page 24 of 36

FirstCall™ Medical Gas Alarm

Operating & Maintenance Manual

High/Low settings can be changed one of two ways:

1.  Manually input.
2.  Automatically set to +/- 20% of current pressure 

using the button at the top right. This is the best 

way to ensure accurate NFPA 99 compliant high/

low settings. This feature is also available on the 

Settings Menu page.

Press the “SAVE” button at the bottom to save 

changes.

Press the “SETTINGS MENU” button to return to the 

settings screen or the “HOME” button to return to the 

home screen.

Master Alarm Settings

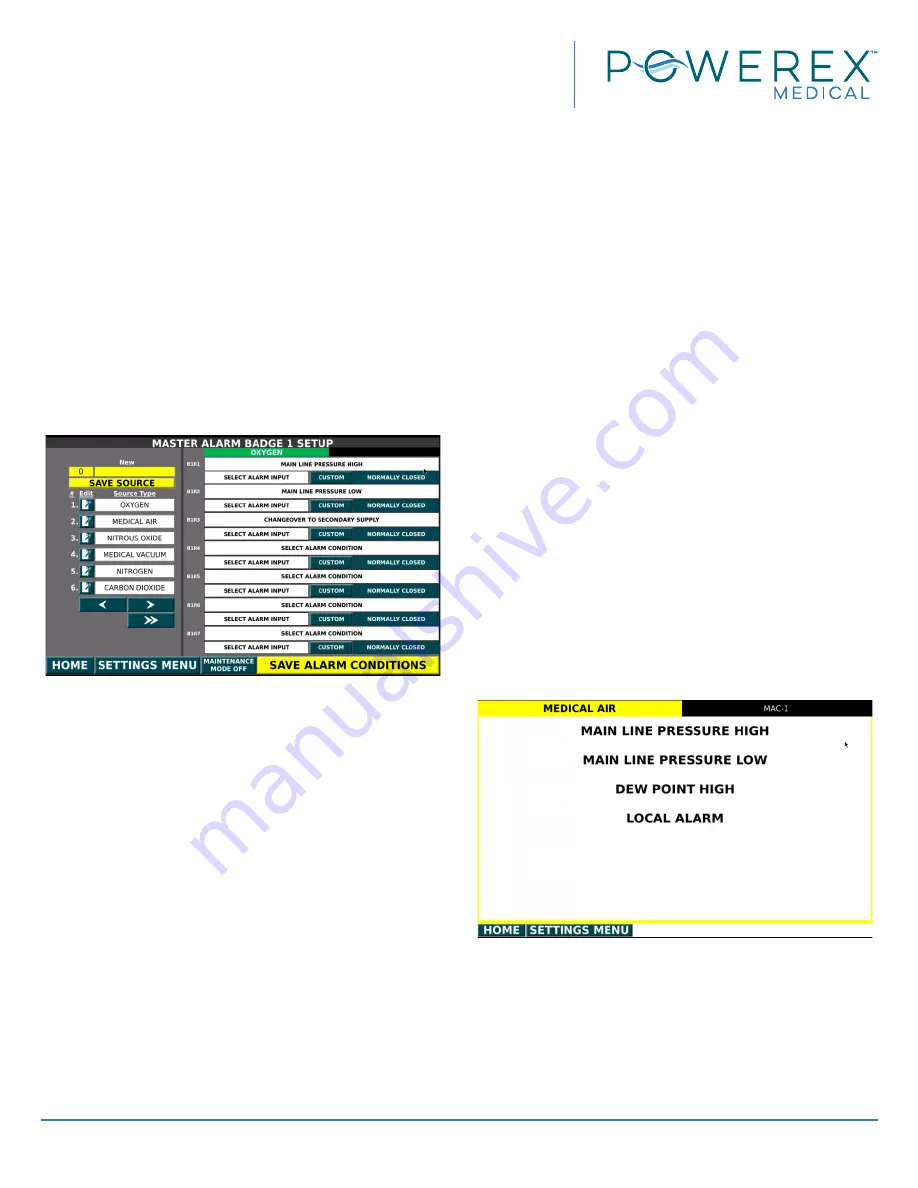
The Master Alarm Settings screen is where the source 

equipment gas is identified and alarm signal inputs are 

assigned. Up to 12 Source Badges are available, with 

up to 7 digital input signals available for each source 

badge. Please note that Powerex FirstCall™ Master 

Alarm panels are available in either 23, 39, and 55 

digital inputs. 

To create a new source badge, press the “Edit” icon 

near the row number on the left. The row number will 

appear in the yellow highlighted row at the top. Press 

the yellow box to the right to bring up a preloaded list 

of NFPA 99 medical gases and select one.

Press “SAVE SOURCE” underneath to add the new 

source badge to the list of Source Types.

The table to the right will then be populated with 

selectable boxes and a heading with the selected source 

gas. To add the digital alarm inputs, press “SELECT 

ALARM CONDITION”. A list of preloaded NFPA 99 alarm 

signals will come up to select from. There is also an 

option to manually add the alarm signal description by 

pressing “CUSTOM.”

To match the alarm condition with the correct location 

on the terminal blocks, press “SELECT ALARM INPUT” 

and select the corresponding terminal block number of 

the digital input wires.

The default circuit setting is “NORMALLY CLOSED”. To 

change it to “NORMALLY OPEN”, toggle the button that 

says “NORMALLY CLOSED” and it will switch.

To save all changes, press “SAVE ALARM CONDITIONS” 

at the bottom right of the screen.

Press the “SETTINGS MENU” button to return to the 

settings screen or the “HOME” button to return to the 

home screen.

Source Gas Description

Additional text can be added for each gas badge.  For 

example, if there are 2 Medical Air Compressors to be 

monitored, this space would be used to identify each 

one.

To add a description to the Master Alarm gas badge, 

press the gas badge on the home screen to view the 

individual alarm conditions.

Press the black box on the upper right corner of the 

screen to pull up a the keyboard

Enter description.  The description will be displayed 

in the black strip of the gas badge on the home screen.

Содержание AAP10-OAV

Страница 1: ...2AV 15 September 2020 Page 1 of 36 Please read and save these instructions Read carefully before attempting to assemble install operate or maintain the product described Protect yourself and others by...

Страница 2: ......

Страница 3: ...d 5 6 Gas Combo Alarm Panels 16 39 Digital Inputs and 1 4 Gas Combo Alarm Panels 17 39 Digital Inputs and 5 6 Gas Combo Alarm Panels 18 55 Digital Inputs and 1 4 Gas Combo Alarm Panels 19 55 Digital I...

Страница 4: ...onne n ayant pas d exp rience g n rale avec l installation d appareils de cette nature Product Line Overview The Powerex FirstCall medical gas alarm systems monitor the status of medical gases in Cate...

Страница 5: ...Preprogramed standard settings included with all medical gas inputs Alarm set points alarm messages and descriptions of sources are fully customizable Alarm and error history is recorded in Alarm Sum...

Страница 6: ...is labeled appropriate gas and has the corresponding DISS hex nut attached to the sensing end Transducers have a solid brass body with NPS threads on cord end for easy remote installation Medical Gas...

Страница 7: ...to the appropriate terminal block N Hot wire Strip the insulation and connect the hot lead to the appropriate terminal block 120V AC Sensor Installation Area Combo Alarms Only Local Installation Locat...

Страница 8: ...breaker is in the OFF position Attention Pour votre s curit personnelle et pour viter d endommager l alarme assurez vous que le disjoncteur est en position OFF Install the sensor wires into the appro...

Страница 9: ...from power supply into power slot on PLC For panels with 39 digital inputs and or 5 gas inputs Plug I O module expansion adapter cord into appropriate port Place unattached side of panel lanyards over...

Страница 10: ...3 I16 24 I17 25 I18 26 I19 27 I20 28 I21 29 I22 30 15 IN AI3 14 IN AI2 13 COM 1 12 AI1 11 AI0 10 IN 8 9 IN 7 8 IN 6 7 IN 5 6 IN 4 5 IN 3 4 IN 2 3 IN 1 2 IN 0 1 COM 0 Legend A3 A2 A1 A0 YELLOW BLUE BLU...

Страница 11: ...Maintenance Manual Powerex 150 Production Drive Harrison OH 45030 USA P 1 888 769 7979 F 513 367 3125 www powerexinc com IN599102AV 15 September 2020 Page 11 of 36 Area Alarm Panel Wiring Schematic 5...

Страница 12: ...030 USA P 1 888 769 7979 F 513 367 3125 www powerexinc com IN599102AV 15 September 2020 Page 12 of 36 FirstCall Medical Gas Alarm Operating Maintenance Manual Master Alarm Panel Wiring Schematic 23 Di...

Страница 13: ...enance Manual Powerex 150 Production Drive Harrison OH 45030 USA P 1 888 769 7979 F 513 367 3125 www powerexinc com IN599102AV 15 September 2020 Page 13 of 36 Master Alarm Panel Wiring Schematic 39 Di...

Страница 14: ...030 USA P 1 888 769 7979 F 513 367 3125 www powerexinc com IN599102AV 15 September 2020 Page 14 of 36 FirstCall Medical Gas Alarm Operating Maintenance Manual Master Alarm Panel Wiring Schematic 55 Di...

Страница 15: ...19 I18 I17 I16 I15 I14 I13 I12 I11 I10 I9 I8 I7 I6 I5 I4 I3 I2 I1 I0 YELLOW BLUE BLUE A3 A2 A1 A0 15 14 13 12 11 10 9 8 7 6 5 4 3 2 1 OUT 6 COM 4 OUT 0 COM 3 BLUE WHITE BLUE W BLUE 14X HORN BLUE W 2X...

Страница 16: ...E 14X BLUE WHITE COM 3 OUT 0 COM 4 OUT 6 1 2 3 4 5 6 7 8 9 10 11 12 13 14 15 A0 A1 A2 A3 BLUE BLUE YELLOW I0 I1 I2 I3 I4 I5 I6 I7 I8 I9 I10 I11 I12 I13 I14 I15 I16 I17 I18 I19 I20 I21 I22 FOR BUILDING...

Страница 17: ...1 4 GAS 39 IN BLUE WHITE BLUE WHITE BLUE WHITE BLUE BLUE BLUE BLUE BLUE BLUE WHITE CB N L 24V DC POWER SUPPLY 120V AC 24V DC xx WATTS BLACK RED FOR BUILDING MAIN POWER TIE IN GND LINE N I22 I21 I20 I1...

Страница 18: ...A0 15 14 13 12 11 10 9 8 7 6 5 4 3 2 1 OUT 6 COM 4 OUT 0 COM 3 BLUE WHITE BLUE BLUE W BLUE 14X HORN BLUE W 2X BLUE 9X BROWN 4X BLUE 14X BLUE 9X BROWN 4X PLC HMI OUTPUT BAR BLUE WHITE BLUE WHITE 2X 30...

Страница 19: ...I BLUE W 2X BROWN 4X PLC HMI INPUT BAR 2 GRAY BLUE WHITE BLUE W BLUE 9X BLUE 14X 1 2 3 4 5 6 7 12 13 14 15 16 17 18 8 9 10 11 19 20 21 22 1 2 3 4 5 6 7 12 13 14 15 16 17 18 8 9 10 11 19 20 21 22 BLUE...

Страница 20: ...3 12 I3I 11 CM 3 10 9 I2I 8 CM 2 7 6 5 I1I 4 CM 1 3 2 I0I 1 CM 0 I1I I0I BLUE W 2X BLUE WHITE 2X Transd 6 Transd 5 14 13 12 I3I 11 CM 3 10 9 I2I 8 CM 2 7 6 5 I1I 4 CM 1 3 2 I0I 1 CM 0 BLUE 8X GROUP 2...

Страница 21: ...CAPS lock as well as cut copy paste for when you want to use the same information in a different location To maximize the keyboard size to fit the entire screen press the zoom button in the upper lef...

Страница 22: ...dition Use the keyboard to add delete or change as necessary Press the SAVE button at the bottom to save changes Press the SETTINGS MENU button to return to the settings screen or the HOME button to r...

Страница 23: ...nd Combo alarms In the gas settings page you are able to change the medical gas type add subtract a gas designate the location monitored for each gas and manually change the high low alarm settings NO...

Страница 24: ...t one Press SAVE SOURCE underneath to add the new source badge to the list of Source Types The table to the right will then be populated with selectable boxes and a heading with the selected source ga...

Страница 25: ...ring a normal alarm event This allows a technician to perform maintenance without setting off the loud alarm Maintenance mode will automatically toggle back to normal after 15 minutes A timer is displ...

Страница 26: ...rex Technical Service for instruction Test Set High Low Alarm Points to 20 Current Pressure This unique feature easily allows for compliance with NFPA 99 2018 edition 5 1 9 4 2 stating that Area Alarm...

Страница 27: ...is the wrong gas type 3 Low gas pressure less than 20 below nominal Operation TEST Feature To test the alarm horn press the TEST button in the center of the lower bar A caution window will pop up warn...

Страница 28: ...of alarm conditions The specific alarm will be highlighted in red Silencing the Alarm In the event of an alarm pressing the silence button will silence the horn indefinitely The scrolling marquee at t...

Страница 29: ...use a microfiber cloth or soft lint free cloth when cleaning any smudges off of the HMI Do not use a paper towel or tissue paper wet or dry Do not apply an excessive amount of pressure to the screen...

Страница 30: ...arbon Dioxide WAGD Instrument Air TDCR O2 TDCR AIR TDCR VAC TDCR N2O TDCR N2 TDCR CO2 TDCR WAGD TDCR INST Terminal Blocks PE000652AV Snap in Plugs SL057170AV Micro SD Card PE000467AV Horn PE001011AV R...

Страница 31: ...Faulty power supply Replace power supply Wiring harness disconnected Make sure the wiring harness from the power supply and terminal blocks are properly installed in the back of the PLC Alarm panel f...

Страница 32: ...ts Input capable of 24 VDC 120 VAC DC output Dry Contacts capable of 30 VDC or 120 VAC max output Input fuse 2 Amp Power consumption 30 W Maximum Pressure measurement accuracy All positive pressure tr...

Страница 33: ...larm G7HiAlarm G8HiAlarm Appendix A BACnet Object Names BACnet Object Name Object Name Description G1HiAlarm Gas Badge High Alarm Status A displayed value of 0 Normal 1 Alarm G2HiAlarm G3HiAlarm G4HiA...

Страница 34: ...rex 150 Production Drive Harrison OH 45030 USA P 1 888 769 7979 F 513 367 3125 www powerexinc com IN599102AV 15 September 2020 Page 34 of 36 FirstCall Medical Gas Alarm Operating Maintenance Manual No...

Страница 35: ...CONNECTION WITH THE SALE OR USE OF SUCH PRODUCTS TO THE EXTENT PERMITTED BY LAW ANY AND ALL IMPLIED WARRANTIES ARE EXCLUDED All warranty claims must be made in writing and delivered to Powerex in acc...

Страница 36: ...indirect special or consequential damages or loss of production of loss of profits resulting from any cause whatsoever including but not limited to any delay act error or omission of Powerex Supplier...

Отзывы: