5
PITTASOFT
Getting Ready
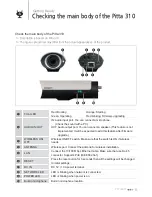
Checking the main body of the Pitta 310
Check the main body of the Pitta 310.
✎
Description is based on Pitta 310W / 310WR.
✎
The figures presented may differ from the actual appearances of the product.
1
Front LED
Red: Booting
Orange: Starting
Green: Operating
Red blinking: Firmware upgrading
2
AUDIO IN/OUT
IN: Audio input port. You can connect a microphone.
(Check the sound with a PC)
OUT: Audio output port. You can connect a speaker. (This feature is not
LPSOHPHQWHG,WZLOOEHH[SHFWHGWRDGGWKLVIHDWXUHDIWHU¿UPZDUH
upgrade.)
3
WIRELESS ON/
OFF
Wireless ON/OFF switch. Make sure that the switch is ON if wireless
needs.
4
ANTENNA
Wireless port. Connect the antenna for wireless installation.
5
LAN
Connect the 10/100 Mbps Ethernet cable. Make sure that use RJ-45
connector. Supports PoE (IEEE 802.3af)
6
RESET
Press the reset button for 3 seconds then all the settings will be changed
to initial settings.
7
DC IN
DC 5V / 1.0A power terminal.
8
NETWORK LED
LED is blinking when network is connected.
9
POWER LED
LED is blinking when power is on.
0
Built-in microphone
Built-in microphone location.
1
2 3
5
6
7
8 9
0
4
Содержание Pitta 310
Страница 1: ...Network IP Camera Pitta 310 user manual...
Страница 32: ...30 PITTASOFT Appendix Dimension 43mm 1mm 13 mm Front Top Right...
Страница 33: ...MEMO...
Страница 34: ...MEMO...


