background image

5

4

ENGLISH

EN

EN

ENGLISH

INSTALLING THE NEW CONTROLLER

Tools required: Phillips screwdriver, zip-tie.

1.  Remove the new Controller from packaging.
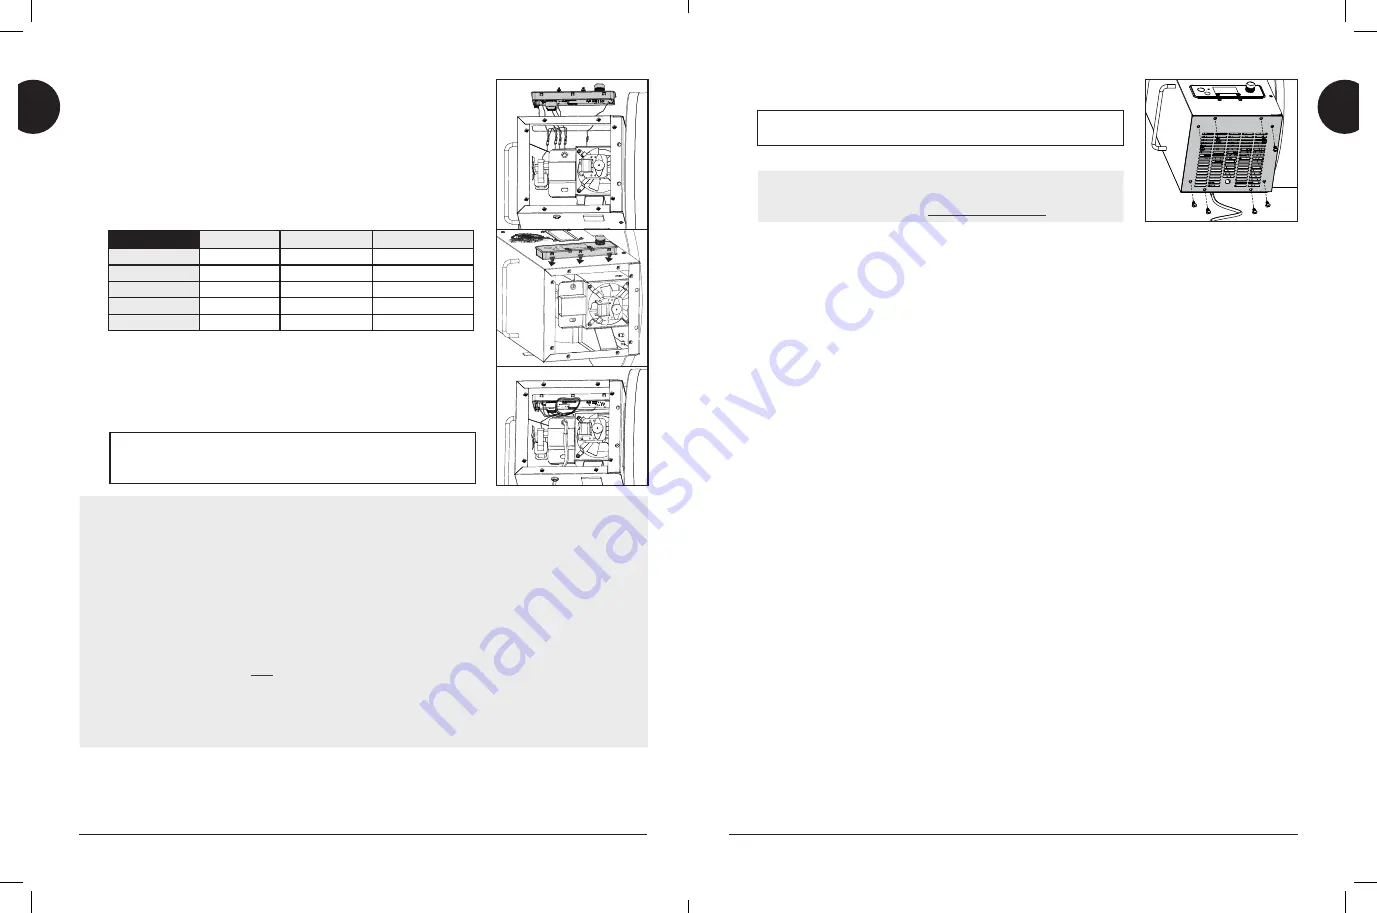
2.  Take the disconnected four WHITE connectors and one BLACK connector from the 

bottom of the hopper (hanging loose) and string them up into the hopper, poking 

them out through the Controller opening on the front.

3.  Prepare the new Controller for wire connecting. Holding the new Controller infront 

of the opening, match and connect all the connectors appropriately. Ensure the 

wires of each are connected firmly.

CONNECTOR

HOPPER WIRE

CONTROLLER WIRE

POWER CORD

WHITE

BLACK/WHITE

BLACK/WHITE

IGNITER

WHITE

WHITE/WHITE

PURPLE/WHITE

AUGER MOTOR

WHITE

RED/RED

RED/WHITE

COMBUSTION FAN

WHITE

YELLOW/YELLOW

YELLOW/WHITE

GRILL PROBE

BLACK

BLACK

WHITE

4.  Next, carefully tipping the top edge forward, insert the Controller bottom edge into 

the hopper opening. Once the bottom three clips are all in position, tip the top edge 

of the Controller into the hopper to lock the top three clips. The Controller should sit 

firmly into position. No wires should be exposed through the front of the hopper.

5.  Take hold of the wires through the bottom of the hopper and fold them inside, 

behind the Controller.

IMPORTANT: Observe the auger motor and combustion fan. Take care 

to ensure none of the wires are near these components. Use a zip-tie 

to fasten the wires together.

  TESTING OPERATION OF THE NEW CONTROLLER

 Each of the functions of the Controller have been factory checked before shipping. However, it is suggested 

that you verify the operation of the new Controller once more. Follow the following instructions to test the new 

Controller is operating as normal. 

i.  Plug the power cord into a grounded power source. Open the main barrel lid. Check the fire pot to ensure there is 

no obstruction for proper ignition. Open the hopper lid. Ensure there are no foreign objects in the hopper or auger 

feed system. Fill the hopper with dry, all natural barbecue hardwood pellets.

ii.  Turn the Temperature Control Dial to a low temperature position. Press the Power Button to turn the unit on. This 

will activate the start-up cycle. The auger feed system will begin to turn, the igniter will begin to glow and the 

fan will supply air to the fire pot. The grill will begin to produce smoke while the start-up cycle is taking place. 

The barrel lid must remain open during the start-up cycle. To confirm the start-up cycle has begun properly, listen 

for a torchy roar, and notice some heat being produced.

iii.  After all operations are checked, with the main barrel lid remaining closed, press and hold the Power Button for 

three seconds to Power-down the unit. The grill will begin its automatic cool-down cycle. The auger system will 

stop feeding fuel, the flame will burn out, and the fan will continue to run until the cycle is complete.

6.  After testing, re-install the hopper access panel to the bottom of the hopper. 

Fasten with the 4-8 screws.

IMPORTANT: Take special care not to strip the hopper access panel 

screws while securing.

7.  The grill is now ready to use as normal. 

NOTE: Refer to your grills Owner's Manual for complete operation 

instructions, care and maintenance, tips, and troubleshooting 

information. If lost, please visit www.pitboss-grills.com .

CONNECTING TO THE SMOKE IT® APP

The Smoke iT® icon indicates a connectivity with Wi-Fi. When searching for a connection by Wi-Fi or via Bluetooth®, the Smoke iT® 

icon will blink. Once a Wi-Fi connection has been established, the Smoke iT® icon will stay solid. When connected, get live updates 

about the actual and set temperatures of the grill, cooking time, and meat probe temperatures. 
Follow these instructions on how to connect your grill to the Smoke iT® app with your Android™ or iOS® device. The app will 

allow you to control and monitor your grill settings and meat probe temperatures from your mobile device. Enjoy the benefits 

that Smoke IT® mobile connectivity has to offer!

1.  Download the Smoke iT® app. Open the app and allow Bluetooth® to be enabled for setup. New users will need to create 

an account and follow the prompts to login. 

2.  If you are within Bluetooth® range (9 m / 30 ft), the Smoke iT® app will automatically detect your grill. Select your grill 

model. If you do not see your grill on the screen, ensure your unit is connected to a power source and is turned on.

3.  Name your grill model (ie. My Smoker) in the app and select "Connect" at the bottom of the screen. This will save your grill 

model in the devices menu. 

4.  From the devices menu, click the grill model to connect. This will show you the Control Board screen.
5.  Click the settings option (gear) in the top-right corner, enter your Wi-Fi credentials, then click the check mark at the 

bottom of the screen to connect. Now both Bluetooth and Wi-Fi (cloud) icons will show on the devices menu, showing 

that the grill is connected.

While using the app, the screen will shine bright when the grill is active and connected. If the app screen or grill goes 

dark on the devices menu, check your wireless connection or power source. 

Содержание 80034

Страница 1: ...ekt an Dansons Unsere Kundendienstabteilung ist montags bis sonntags von 4 bis 20 Uhr PST EN FR ES erreichbar GEB HRENFREI 1 877 303 3134 GEB HRENFREIES FAX 1 877 303 3135 IMPORTANTE NO DEVUELVA EL PR...

Страница 2: ...on cleaning maintenance or service work Ensure the grill is completely cooled to avoid injury INSTALLATION ENVIRONMENT As with most materials plastic and wiring components can become more brittle in c...

Страница 3: ...tart up cycle has begun properly listen for a torchy roar and notice some heat being produced iii After all operations are checked with the main barrel lid remaining closed press and hold the Power Bu...

Страница 4: ...oidi pour viter de vous blesser ENVIRONNEMENT D INSTALLATION Commec estlecaspourlaplupartdesmat riaux lescomposantsdesc blesetlespi cesenplastiquepeuventdevenirplusfragiles par temps froid partir d un...

Страница 5: ...remarquer que de la chaleur est produite iii Une fois que toutes les op rations sont v rifi es avec le couvercle du corps principal referm maintenez le bouton marche arr t enfonc pendant trois seconde...

Страница 6: ...ir la barbacoa para cualquier inspecci n o tarea de limpieza mantenimiento o reparaci n Aseg rese de que la barbacoa se haya enfriado por completo para evitar lesiones LUGAR Y CONDICIONES DE INSTALACI...

Страница 7: ...rmar que el ciclo de arranque ha comenzado correctamente deber a o rse un ruido similar al de una antorcha y observarse la presencia de calor iii Despu s de realizar todas las comprobaciones con la ta...

Страница 8: ...e sicher dass der Grill komplett abgek hlt ist um Verletzungen zu vermeiden MONTAGEUMGEBUNG Wie die meisten Materialien k nnen Plastik und Verkabelungskomponenten bei kaltem Wetter 10 C 50 F und niedr...

Страница 9: ...est tigung dass der Startzyklus richtig gestartet hat warten Sie auf ein flackerndes R hren und achten Sie auf die Hitze die produziert wird iii Wenn Sie alle Funktionen getestet haben halten Sie den...

Страница 10: ...sicurarsi che la griglia si sia raffrossodata completamente per evitare incidenti AMBIENTE DI INSTALLAZIONE Come accade alla maggior parte dei materiali i componenti in plastica e di cablaggio possono...

Страница 11: ...ti che il ciclo di avvio sia iniziato correttamente controllare se si avverte un fruscio simile a quello di una torcia e notare se viene prodotto un po di calore iii Al termine dei necessari controlli...

Страница 12: ...orbindelse med eftersyn reng ring vedligeholdelse eller reparationer S rg for at grillen er helt afk let for at undg personskade INSTALLATIONSMILJ Som for de fleste materialer kan plast og ledningsdel...

Страница 13: ...unne h re flammen og kunne m rke at der frembringes varme iii N r alle dele er kontrolleret holdes hovedt ndens l g lukket mens du trykker p og holder str mknappen nede i tre sekunder for at slukke fo...

Страница 14: ...to ennen kuin avaat grillin tarkistusta puhdistusta tai yll pito ja huoltotoimenpiteit varten Varmista ett grilli on t ysin j htynyt ASENNUSYMP RIST Useimpien materiaalien tavoin muoviosat ja johdot v...

Страница 15: ...maat ett laite alkaa tuottaa l mp iii Kun kaikki toiminnot on tarkistettu sulje p rumpu ja sammuta laite painamalla virtapainiketta kolmen sekunnin ajan Grilli aloittaa automaattisen j hdytysprosessin...

Страница 16: ...en f r du pner grillen for inspeksjon rengj ring vedlikehold eller service S rg for at grillen er helt nedkj lt slik at du unng r skader MONTERINGSMILJ Som med de fleste materialtyper kan plast og led...

Страница 17: ...om den skal ved lytte etter et ildbr l og se at varme produseres iii Etter at alle operasjoner er sjekket trykker du p og holder inne Av p knappen i tre sekunder mens lokket p hovedsylinderen er lukke...

Страница 18: ...STRZE ENIE zawsze od czaj przew d elektryczny przed otworzeniem grilla gdy planujesz jego kontrol czyszczenie konserwacj lub serwis Upewnij si e grill jest ca kowicie ostudzony aby unikn obra e RODOWI...

Страница 19: ...upewnij si e s yszysz warkot palnika i czujesz e wydziela si ciep o iii Po sprawdzeniu wszystkich funkcji pozostaw pokryw g wnego korpusu beczkowego zamkni t naci nij i przytrzymaj przycisk zasilania...

Страница 20: ...f r kontroll reng ring underh ll eller service Var noga med att grillen r helt avsvalnad f r att undvika skada INSTALLATIONSMILJ Som med de flesta material kan plast och kabelkomponenter bli spr dare...

Страница 21: ...ande l ga och k nna efter att det bildas v rme iii N r alla funktioner har kontrollerats med huvudbeh llarens lock st ngt trycker du p och h ller str mbrytaren nedtryckt i tre sekunder f r att st nga...

Страница 22: ...orrastamiseks v i hooldamiseks eemaldage alati elektritoitekaabel Vigastuste v ltimiseks veenduge et grill oleks t iesti jahtunud PAIGALDUSKESKKOND Nagu enamik materjale v ivad plast ja juhtmed muutud...

Страница 23: ...k ivitunud kuulates p lemism hinat ja pannes t hele soojuse teket iii Kui k ik toimingud on kontrollitud veenduge et p hitrumli kaas oleks suletud ning vajutage toitenuppu ja hoidke seda kolm sekundit...

Страница 24: ...rms grila atv r anas lai veiktu p rbaudi t r anu remontu vai apkopi vienm r atvienojiet elektr bas vadu P rliecinieties ka grils ir piln b atdzisis lai izvair tos no traum m UZST D ANAS VIDE T pat k l...

Страница 25: ...ts pareizi klausieties deg anas troksni un v rojiet vai rodas karstums iii Kad darb ba ir p rbaud ta turiet galven korpusa v ku aizv rtu un nospiediet un turiet baro anas pogu tr s sekundes lai iek rt...

Страница 26: ...s SP JIMAS Visada atjunkite elektros laid prie atidarydami kepsnin nor dami ap i r ti i valyti arba atlikti technin prie i r Kad nenusidegintum te sitikinkite ar kepsnin visi kai atv susi MONTAVIMO AP...

Страница 27: ...sykite ar girdite im ir pa i r kite ar skleid iama iluma iii Patikrin visas operacijas laikydami pagrindinio korpuso dangt u daryt paspauskite ir palaikykite maitinimo mygtuk tris sekundes kad i jungt...

Страница 28: ......

Отзывы: