


7
Controls and displays
1
1
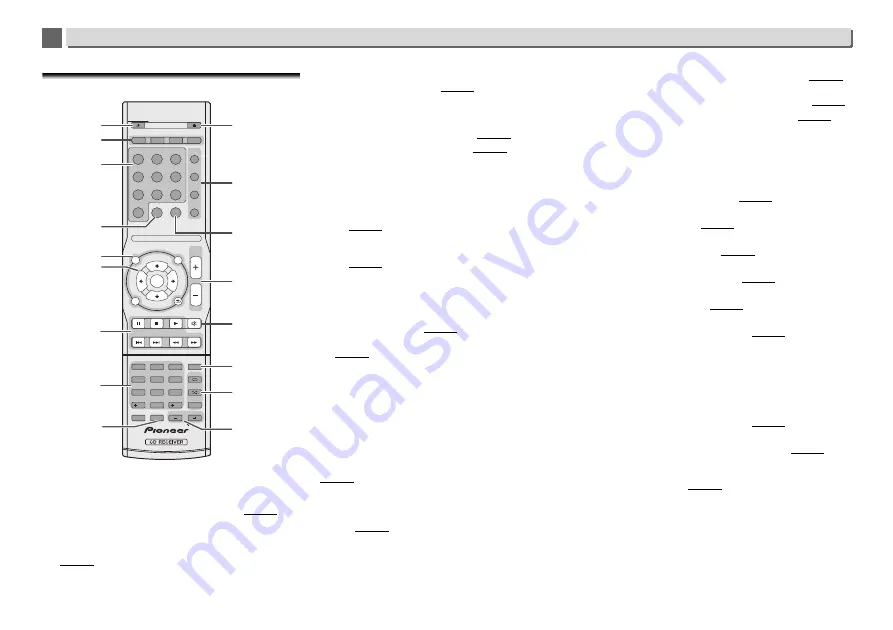
Remote control
•
The following buttons is not used with this receiver:
OPTION
1
STANDBY/ON
Switches the receiver between standby and on (page 20).
2
CD Receiver control buttons
DIMMER
– Make the display brighter, darker, or turn it off
altogether. The brightness can be controlled in four steps
(page 14).
TIMER
– Use for setting the clock, as well as for setting
and checking the timers (page 12).
SLEEP
– Press to change the amount of time before the
receiver switches into standby (
30 min. – 60 min. – 90
min. – Off
). You can check the remaining sleep time at
any time by pressing
SLEEP
once (page 13).
INPUT
– Select the input source (page 13).
3
Input function buttons
Use to select the input source to this receiver.
4
BAND
(X-HM82, XC-HM82 and X-HM72 only)
Switches between AM, FM STEREO and FM MONO radio
bands (page 25).
(X-HM82D, XC-HM82D and X-HM72D only)
Switches between FM STEREO, FM MONO and DAB radio
bands (page 27).
5
CD Receiver control buttons
TOP MENU
– Displays the top menu of each input source.
Displays the Noise Cut menu in Tuner.
iPod CONTROL
– Switches between the iPod controls and
the receiver controls (page 16).
SETUP
– Press to access the receiver setup menu
(page 12).
Cannot be used when
CD
,
BT Audio
,
Digital In
,
Audio In
,
Line1
,
Line2
or
Tuner
functions are selected. Press it after
first selecting another function.
RETURN
– Exit the current menu screen.
6
///
(TUNE
/
, PRESET
/
), ENTER
Use to select/switch system settings and modes, and to
confirm actions.
TUNE
/
can be used to find radio frequencies and
PRESET
/
can be used to select preset radio stations
(page 25).
7
Playback control buttons
The main buttons (
,
, etc.) are used to control each
function after you have selected it using the input function
buttons (page 20).
DAB SCAN
– Use to scan for DAB radio station (page 27).
(X-HM72D, X-HM82D and XC-HM82D only)
RDS DISP
– Use to display the RDS information (page 26).
PTY
– Use to search for RDS program types (page 26).
8
Numeric buttons
Use to enter the number.
9
CLEAR
Use to select/switch system settings.
10
OPEN/CLOSE
Use to open or close the disc tray (page 20).
11
Sound control buttons
Adjust the sound quality (page 14).
12
CD DISP
Displays the disc information (page 22).
13
Volume control buttons
Use to adjust the listening volume (page 14).
14
MUTE
Mutes/unmutes the sound (page 14).
15
TUNER EDIT
Memorizes/names stations for recall (page 25).
16
Playback mode buttons
REPEAT
– Press to change repeat play setting from a CD,
iPod, USB, Internet Radio, Music Server or Favorites.
SHUFFLE
– Press to change shuffle play setting from a CD,
iPod, USB, Internet Radio, Music Server or Favorites.
PLAY MODE
– Press to change the playback mode
between CD and MP3/WMA disc (page 21).
17
/–
Use to select the folder of the MP3/WMA disc (page 22).
+Favorite
– When using the Internet Radio or Music
Server functions, use to add an audio file or a station to
Favorites function (page 47).
SORT
– When using the Music Server function, allows
tracks to be sorted if the DLNA server supports the sort
function.
STANDBY/ON
OPEN/CLOSE
SLEEP
TIMER
DIMMER
SOUND
P.BASS
TREBLE
BASS
CD DISP
BAND
TUNER
AUDIO IN
iPod/USB
CD
NET SERVICE FAVORITES
M.SERVER
BT AUDIO
DIG IN
LINE 1/2
VOLUME
RETURN
MUTE
RDS DISP
DAB SCAN
SETUP
TUNER EDIT
REPEAT
SHUFFLE
PLAY MODE
FOLDER
CLEAR
iPod
CONTROL
TOP
MENU
1
2
3
4
5
6
7
8
9
0
10
100
TU
NE
P
R
E
S
E
T
P
R
E
S
E
T
TUNE
ENTER
PTY
OPTION
Favorite
SORT
INPUT
3
7
1
2
13
17
5
6
11
14
10
8
9
16
15
4
12


