PDP-501MX, PDP-V501X
80
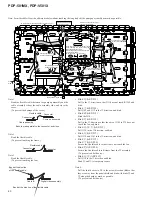
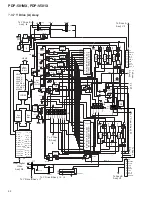
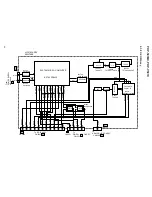
Note: Form the cables from the address module without touching the long leads of the pump up assembly as much as possible.
PA1
PA2
T1
T2
T3
D10
D11
D12
T7
T10
O3
O8
CG3
CG5
CG2
CG1
O2
O1
T15
T8
T11
T9
T12
L3
L6
L4
L7
L5
L8
H2
H9
H6
H1
D9
E8
H3
O4
O9
CG4
CG6
T13
T14
O5 O6 O7
T4 T5 T6
L2
L1
H7
H11
R3349
J101
J111
J109
J112
H10
H8
H12
Q2
CH2
Q1
CH1
K15
M5
M8
M4
M7
M3
M6
K9
K12
K8
K11
K7
K10
Q4
Q9
CH4
CH6
Q3
Q8
CH3
CH5
I
3
I
9
I
6
I
1
I
2
I
4
H4
I
5
H5
Q5 Q6 Q7
K4 K5 K6
M2
K13
M1
K14
I
7
I
10
I
8
K1
K2
K3
E11
E10
E9
Y DRIVE B
Y DRIVE A
X DRIVE A
X DRIVE B
CABLE H
CABLE F
F12
G9
F8
G7
F7
G6
F6
G5
F10
J110
F1
D8
G8
G9
F20
F18
F19
F17
G18
G16
G17
G15
CABLE D
U-CON
CABLE C
CABLE G
CABLE E
CABLE B
DIGITAL VIDEO
CABLE A
PB1
PB2
PD2
PF2
PD1
PF1
E3
E1
D2
D3
E4
D4
E5
D5
E6
D6
E7
D7
E2
E18
E17
E12
E13
D1
D15
D14
D13
E19
E14
E16
HEAT SINK
J108
J103
J113
J310
PF1
PF2
PD1
PD2
PB1
PB2
PB1
PB2
PB1
PB2
PA1
PA2
PA1
PA2
PC1
PC2
PA1
PA2
PE1
PE2
PE1
PE2
PC1
PC2
PA1
PA2
PA1
PB1
PA2
PB2
PB1
PB2
BIND
Q
BIND
U
BIND
X
BIND
V
BIND
W
BIND
L
BIND
Y
BIND
G
BIND
P
BIND
H
BIND
I
BIND
E
BIND
R
BIND
F
BIND
T
Blue
Red
To fan
From
SIDE SWITCH
To fan
Black tape
Red
Red
Red
Red
Note2
Note2
Note2
Note4
Note2
Note3
Note
Do not touch
the heat sink.
Hold the binders so that
they become parallel.
Pull bind
E
so that it does not get
caught by the fan motor.
Move the wires to the assembly side using binds
G
and
Q
.
Pull with bind
R
so that
it does not touch R3349.
Pass through the hole on
the side of the sub-frame.
Pass through the hole on
the side of the sub-frame.
Pass through the hole on
the side of the sub-frame.
B3
B2
B4
Wire outside E2
Wire inside E17 and E18
Pull the shield wire from RGB A6 .
To C1
Wire outside
I
8
Note2
Make sure (J109, J110) do not get caught
when attaching the canter frame (2F)
(when tightening the screws).
Branch the wires to 2F to the left and right
from the center frame.
(Right : Red wire, Left : Blue wire)
3D Y/C
Note 1
Bend the flexible cables between the pump up assembly and the
cable assembly side at the cable assembly side, and close the
cover.
(To prevent the damage of the cover.)
Note 2
Bend the flexible cable.
(To prevent touching the frame.)
Bend to make parallel to the connector, and close.
Note 3
Bend the flexible cable.
(To prevent touching the fan.)
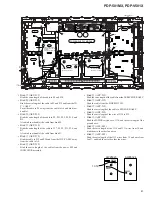
•
Bind
R
(AEP-215)
Pull in the
]
direction so that J111 does not touch R3349, and
bind.
•
Bind
I
(AEP-215)
Pull J109 and J112 in the
]
direction, and bind.
•
Bind
W
(AEP-215)
Bind the J310.
•
Bind
E
(AEP-215)
Pull in the
]
direction so that the wire of J109 to T15 does not
touch the fan, and bind.
•
Bind
G
,
Q
,
L
(AEP-215)
Pull J110 in the
]
direction, and bind.
•
Bind
H
(AEP-215)
Pull J110 and J103 in the
]
direction, and bind.
•
Bind
F
(AEP-215)
Bind
T
(AEC-826)
Secure the flexible cable so that it does not touch the fan.
•
Bind
P
(AEC-826)
Secure the flexible cable to distance from the 2F assembly.
(To prevent sub field noise.)
•
Bind
U
,
V
(AEP-215)
Pull J110 in the
]
direction and bind.
Bind
U
and
V
is temporary secure.
Note 4:
Pull the shield wires to D1 in the arrow direction (
|
) so that
they are away from the panel shield and bind with binds
G
and
Q
along the board as much as possible.
(To prevent sub field noise)
Connector
Pump up assembly
Cable assembly
Connector
Flexible cable
Connector
Flexible cable
Connector
Bend at the blue line
of the flexible cable.
Digital video assembly
Bend at the blue line of the flexible cable.
Cable B
Содержание PDP-501MX
Страница 16: ...PDP 501MX PDP V501X 16 A B C D 1 2 3 4 1 2 3 4 3 3 POWER SUPPLY MODULE 1 2 J 1 2 ...
Страница 17: ...PDP 501MX PDP V501X 17 A B C D 5 6 7 8 5 6 7 8 J 1 2 ...
Страница 18: ...PDP 501MX PDP V501X 18 A B C D 1 2 3 4 1 2 3 4 3 4 POWER SUPPLY MODULE 2 2 J 2 2 ...
Страница 19: ...PDP 501MX PDP V501X 19 A B C D 5 6 7 8 5 6 7 8 J 2 2 ...

