background image

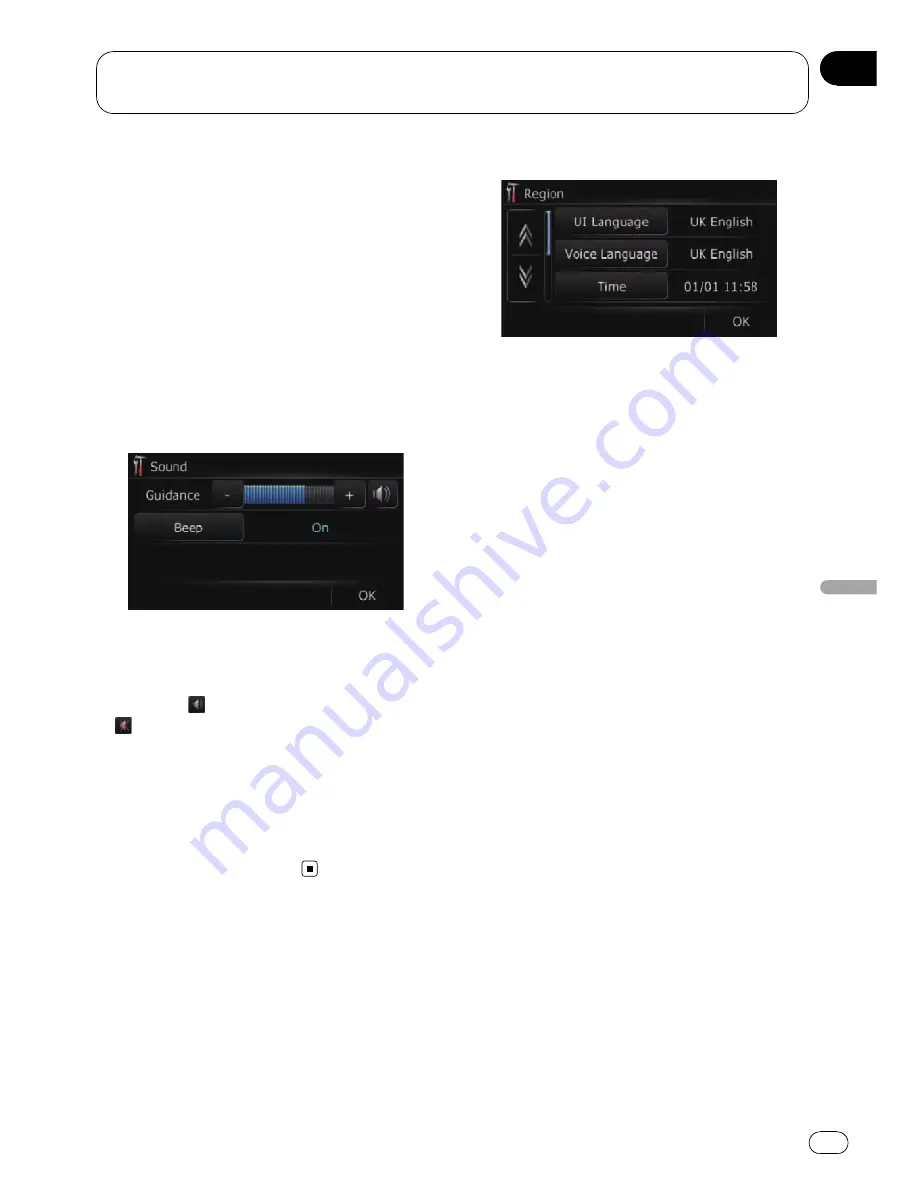
Setting the volume for
navigation system

The sound volume for the navigation can be
set.

p

When using a phone, the sound volume of
the navigation system is dependent on the
phone volume setting.

1

Display the

Navigation Menu

screen.

2

Touch [Settings].

The

Settings Menu

screen appears.

3

Touch [Sound].

The

Sound

screen appears.

4

Touch [+] or [

] next to

Guidance

.

Controls the master volume of both the navi-
gation guidance and beep.
When set to

, guidance is output. When set

to

, no guidance is output.

#

Touch [

Beep

].

Each time you touch the key changes that set-
ting.

!

[

On

] (default):

A beep sounds.

!

[

Off

]:

Muting the beep sound.

Customising the regional
settings

1

Display the

Navigation Menu

screen.

2

Touch [Settings].

The

Settings Menu

screen appears.

3

Touch [Region].

The

Region

screen appears.

Selecting the language

You can set the languages used on the pro-
gramme and voice guidance. Each language
can be set separately.

1

Display the

Region

screen.

2

Touch [UI Language].

The

Select UI Language

screen appears.

3

Touch the desired language.

After the language is selected, the screen re-
turns to the previous screen.

4

Touch [Voice Language].

The

Voice Language Selection

screen ap-

pears.

5

Touch the desired language.

After the language is selected, the screen re-
turns to the previous screen.

6

Touch [OK] on the

Region

screen.

The navigation system restarts.

Setting the time difference

Adjusts the systems clock. Set the time differ-
ence (

+

,

) from the time originally set in your

navigation system.

1

Display the

Region

screen.

2

Touch [Time].

The

Time Settings

screen appears.

Modifying the general settings for navigation
functions

Engb

65

Chapter

12

Modifying

the

general

settings

for

navigation

functions

Содержание AVIC-F310BT

Страница 1: ...GATION AUDIO SYSTEM AVIC F310BT Be sure to read Important Information for the user first Important Information for the user includes the important information that you must understand before using this navigation system English ...

Страница 2: ...Engb 2 ...

Страница 3: ... Flow from startup to termination 14 On first time startup 14 Regular startup 14 How to use the detachable device Checking part names and functions 15 Removing and attaching the detachable device 15 Removing the detachable device 15 Attaching the detachable device 15 Installing the battery 16 Disposing of the battery 16 Turning on the detachable device 17 Charging the battery of detachable device ...

Страница 4: ...ching for POIs by specifying a category first 40 Searching for a POI directly from the name of the facilities 40 Searching for a nearby POI 40 Searching for POIs around the destination 41 Searching for POIs around the city 41 Selecting destination from Favourites 42 Searching for POIs by using the data on the SD memory card 42 Selecting a location you searched for recently 42 Searching for a locat...

Страница 5: ...matically 62 Setting the automatic rejection function 62 Echo cancelling and noise reduction 62 Setting automatic connection 63 Editing the device name 63 Notes for hands free phoning 63 Updating the Bluetooth wireless technology software 64 Modifying the general settings for navigation functions Setting the volume for navigation system 65 Customising the regional settings 65 Selecting the languag...

Страница 6: ...rongest broadcast frequencies 85 Tuning in strong signals 85 Playing audio CDs Reading the screen 86 Operating by hardware buttons 86 Selecting a track from the list 87 Setting a repeat play range 87 Play tracks in random order 87 Scan tracks of a CD 87 Playback and Pause 88 Using advanced sound retriever 88 Playing music files on ROM Reading the screen 89 Operating by hardware buttons 90 Selectin...

Страница 7: ...9 Returning the Navigation System to the Default or Factory Settings Setting items to be deleted 111 Appendix Troubleshooting 113 Messages and how to react to them 116 Messages for audio functions 117 Positioning technology 119 Positioning by GPS 119 Map matching 119 Handling large errors 119 When positioning by GPS is impossible 120 Conditions likely to cause noticeable positioning errors 120 Rou...

Страница 8: ... with double quotation marks e g Navigation Menu screen or Audio Source screen Touch panel keys that are available on the screen are described in bold in brackets e g Address Settings Extra information alternatives and other notes are presented in the following for mat e g p If the home location has not been stored yet set the location first References are indicated like this e g For details refer...

Страница 9: ...ot allow direct sunlight to fall on the LCD screen when this product is not being used Extended exposure to direct sunlight can result in LCD screen malfunction due to the resulting high temperatures p When using a mobile phone keep the aer ial of the mobile phone away from the LCD screen to prevent disruption of the video in the form of spots coloured stripes etc p To protect the LCD screen from ...

Страница 10: ...he navigation function screen is dis played 5 MULTI CONTROL MULTI CONTROL is used only for the audio function For more details refer to the descriptions from Chapter 14 to Chapter 24 Rotating Adjusts the audio source volume Moving MULTI CONTROL to the left or right Allows you to change the frequency one step at a time operates track search con trols Keep moving MULTI CONTROL to the left or right A...

Страница 11: ...f the reach of small children to prevent them from acciden tally swallowing it To prevent data loss and damage to the sto rage device never remove it from this naviga tion system while data is being transferred If data loss or corruption occurs on the sto rage device for any reason it is usually not possible to recover the data Pioneer accepts no liability for damages costs or expenses arising fro...

Страница 12: ...il it clicks The SD memory card is ejected 5 Pull out the SD memory card p Insert the dummy SD card to keep the SD card slot free of dust when the SD memory card is not inserted 6 Touch Restart The navigation system restarts Plugging and unplugging a USB storage device CAUTION To prevent data loss and damage to the sto rage device never remove it from this naviga tion system while data is being tr...

Страница 13: ...n Connecting your iPod Using the USB interface cable for iPod en ables you to connect your iPod to the naviga tion system p A USB interface cable for iPod CD IU50 sold separately is required for connection 1 Pull out the USB storage device after checking that no data is being accessed USB connector USB interface cable for iPod p For more details about iPod compatibility with this navigation system...

Страница 14: ...ou want to use 1 Start the engine to boot up the system After a short pause the navigation splash screen appears And then the Select UI Language screen ap pears 2 Touch the language that you want to use on the screen The Voice Language Selection screen ap pears 3 Touch the language that you want to use for the voice guidance The navigation system will now restart 4 Read the disclaimer carefully ch...

Страница 15: ... automati cally turns the audio source off p Removing the detachable device while dis playing an audio screen automatically turns the audio source off and switches the display to the map screen 1 Press DETACH button to release the de tachable device 2 Gently grip the right side of the front panel and slowly pull it outward Take care not to drop the detachable device and protect it from contact wit...

Страница 16: ...the battery WARNING Keep the battery pack out of the reach of small children to prevent them from acciden tally swallowing it Batteries battery pack or batteries installed shall not be exposed to excessive heat such as sunshine fire or the like CAUTION When disposing of used batteries please comply with governmental regulations or environmental public institutions rules that apply in your coun try...

Страница 17: ...hable device is connected to your PC p Before charging the detachable device by connecting it to your PC turn off the power of detachable device If the power is on the battery may not be charged p When connected to your PC the battery may not be charged depending on the setting of the screen brightness Before charging the detachable device by connecting it to your PC set the screen brightness to a...

Страница 18: ...d the navigation sys tem automatically turns off Connecting with your PC You can connect the detachable device and your PC using the USB cable supplied with the navigation system 1 Connect the supplied USB cable to USB connector 2 Connect the supplied USB cable to your PC How to use the detachable device Engb 18 Chapter 03 ...

Страница 19: ...How to use the detachable device Engb 19 Chapter 03 How to use the detachable device ...

Страница 20: ...oute from this menu 3 Settings Menu screen You can access the screen to customise set tings 4 Phone Menu screen You can access the screen that is related to hands free phoning to see call histories and change the settings on the Bluetooth wireless technology connection 5 Audio operation screen When you play an audio source this screen appears normally p To return to the previous screen touch How t...

Страница 21: ...in ing characters Operating the on screen keyboard 1 3 2 4 6 5 1 Text box Displays the characters that are entered If there is no text in the box an informative guide with text appears 2 Keyboard Touch the keys to enter the characters 3 Returns the previous screen 4 0 9 Sym Others You can enter other characters of alphabet You can also enter text with marks such as or or numbers Touch to toggle th...

Страница 22: ...gain 3 Distance to the guidance point Shows the distance to the next guidance point 4 Zoom in Zoom out Touching displays touch panel keys for changing the map scale and the map orienta tion 5 Current position Indicates the current location of your vehicle The apex of the triangular mark indicates your orientation and the display moves automati cally as you drive p The apex of the triangular mark i...

Страница 23: ...nce value and does not guarantee arrival at that time Travel time to your destination or waypoint c Current time Meaning of guidance flags Destination The checkered flag indicates your destination Waypoint The blue flags indicate your way points Guidance point The next guidance point next turn ing point etc is shown by a yel low flag Displaying the audio information bar You can check the current s...

Страница 24: ...scale p If you do not operate the function for a few seconds the display is automatically re turned Switching the map orientation You can switch the vehicle s direction on the map between Heading up and North up Heading up The map display always shows the vehicle s direction as proceeding toward the top of the screen North up The map display always has north at the top of the screen p The map orie...

Страница 25: ...ppears at registered places home lo cation specific places Favourites entries and places where there is a POI icon or traffic information icon Place the scroll cursor over the icon to view detailed information 1 Scroll the map and move the scroll cur sor to the icon you want to view 2 Touch Information for a specified location appears The information shown varies according to the location There ma...

Страница 26: ... avail able on our website Store the customised POI into the SD memory card properly and then insert it to the SD card slot By select ing the POI icon the system displays it on the map screen 1 Display the Map screen 2 Touch Overlay POI The Overlay POI screen appears 3 Touch Display to turn it On p If you do not want to display the POI icon on the map touch Display to turn it Off Even if Display i...

Страница 27: ...D map screen 1 Display the Map screen 2 Touch View Mode Each time you touch the key changes that set ting 2D default Displays the 2D map screen 3D Detection Displays the 3D map screen Displaying manoeuvres Selects whether to display or hide the next turn ahead of the vehicle on the map 1 Display the Map screen 2 Touch Show Manoeuvre Each time you touch the key changes that set ting View default Di...

Страница 28: ...play the Map screen 2 Touch Close Up View Each time you touch the key changes that set ting On default Switches to an enlarged map Displays the close up view with the 2D map Off Does not switch to an enlarged map Setting the Favourites icon display You can select whether to display the Favour ites icon on the map 1 Display the Map screen 2 Touch Favourites Icon Each time you touch the key changes ...

Страница 29: ...ey changes that set ting View default Displays the street name or city name on the map Hide Hides the street name or city name on the map Changing the setting of navigation interruption screen Set whether to automatically switch to the na vigation screen from the audio screen when your vehicle approaches a guidance point such as an intersection while displaying a screen other than navigation 1 Dis...

Страница 30: ...hecking the location on the map on this page 6 The navigation system calculates the route to your destination and then shows the route on the map 7 Check and decide the route For details refer to Checking the calculated route on this page 8 Your navigation system sets the route to your destination and the map of your surroundings appears 9 After releasing the handbrake drive in accordance with nav...

Страница 31: ...that users can operate Settings marked with an asterisk show that these are default or factory settings Route Condition This setting controls how the route should be calculated by taking into account the time or the distance or the main road Determines which condition takes priority for route calculation Fast Calculates a route with the shortest travel time to your destination as a priority Short ...

Страница 32: ...ed CAUTION If the time difference is not set correctly the navi gation system cannot consider traffic regulations correctly Set the time difference correctly Refer to Setting the time difference on page 65 Checking the current itinerary You can check the route details Touch Profile on the Route confirma tion screen The Route Profile screen appears p When a long distance route is calculated your na...

Страница 33: ...uch OK to add to the Way points List screen For details refer to Searching for and select ing a location on page 37 4 Touch OK on the Waypoints List screen Route confirmation screen appears Setting a route to your destination Engb 33 Chapter 06 Setting a route to your destination ...

Страница 34: ...he list as you drive on Editing waypoints You can edit waypoints locations you want to visit on the way to your destination and recal culate the route so that is passes through these locations To edit the waypoints display the Waypoints List screen 1 Display the Route confirmation screen 2 Touch Waypoints on the Route con firmation screen The Waypoints List screen appears Adding a waypoint Up to 5...

Страница 35: ...y passed 1 Display the Waypoints List screen 2 Touch Sort The Sort Waypoints screen appears 3 Touch the waypoint or destination Put them in the desired order Touch Automatic You can sort the destination and waypoints auto matically The system will show the nearest way point distance in a straight line from the current location as waypoint 1 and sort the other points including your destination in o...

Страница 36: ...ger need to travel to your destina tion follow the steps below to cancel the route guidance 1 Display the Navigation Menu screen 2 Touch Cancel A message confirming the cancellation of the current route appears 3 Touch Yes The current route is deleted and a map of your surroundings reappears Touch Skip The next waypoint along the route can be skipped A new route to your destination through all re ...

Страница 37: ...e search results some steps may be skipped 1 Display the Navigation Menu screen 2 Touch Address The Address Search screen appears 3 Touch City The Enter City Name screen appears Touch the key next to Country to select the country If the location that you want to search for is in an other country this changes the country setting p Once the country has been selected you only have to change countries...

Страница 38: ... including the following two words below are displayed as a result The word that matches with the first key word you entered The word beginning with the second key word Entering three keywords The names including the following two words below are displayed as a result The words that match with both first and second keywords you entered The word beginning with the third keyword e g Searching City o...

Страница 39: ...r the street name and then touch OK The Select Street screen appears If there is no house number the searched lo cation appears on the map screen 7 Touch the desired road The House screen appears If the selected street has only one matching lo cation the searched location appears on the map screen 8 Enter the house number and then touch OK The searched location appears on the map screen Setting up...

Страница 40: ... want to search for is outside of the country you selected 4 Touch Name The POI Name screen appears 5 Enter the POI name and then touch OK The POI Name Input Menu screen appears p You can search for a POI name by keyword For details refer to Searching for a name by entering multiple keywords on page 38 6 Touch Search The POI List screen appears 7 Touch the POI you want The searched location appear...

Страница 41: ...en appears If the location that you want to search for is in another country this changes the country set ting p Once the country has been selected you only have to change countries when the lo cation that you want to search for is outside of the country you selected 4 Touch Name The Enter City Name screen appears 5 Enter the city name and then touch OK The Around City Input Menu screen ap pears p...

Страница 42: ...tem to use the data for searches 1 Insert an SD memory card into the SD card slot For more details of the operation refer to In serting and ejecting an SD memory card on page 11 2 Display the Navigation Menu screen 3 Touch AVIC FEEDS The Select List screen appears 4 Touch the folder you want on the list The Select POI screen appears 5 Touch the POI you want The searched location appears on the map...

Страница 43: ...and then touch OK The screen returns to the previous screen p To enter N 5 1 2 5 for example touch N 0 5 0 1 0 2 and 5 5 Touch OK The searched location appears on the map screen Searching for a location by scrolling the map Specifying a location after scrolling the map enables you to set the position as destination waypoint or register the location to Favour ites 1 Display the map screen 2 Touch a...

Страница 44: ... location by scroll mode 1 Scroll to the location you want to regis ter Cursor 2 Touch The location is registered and then the Edit Favourite screen appears For details refer to Editing the entry in Fa vourites on this page 3 Touch OK The registration is completed Editing registered locations Editing the entry in Favourites 1 Display the Navigation Menu screen 2 Touch Favourites The Select Favouri...

Страница 45: ...e from Favourites screen ap pears 4 Select the location you want to delete A tick mark appears by the selected location Touch All Selects all entries Touch None Displayed when all locations are selected Can cels all selected locations 5 Touch Delete A message will appear asking you to confirm the deletion 6 Touch Yes The data you selected is deleted Touch No Cancels the deletion Registering and ed...

Страница 46: ...s p Home location is displayed on the top of the list 3 Touch next to the home location The Edit Favourite screen appears Touch Phone You can edit the registered phone number To dial the number touch For details refer to Making a call home ea sily on page 56 Touch Modify Location You can change the registered location by scrol ling the map 4 Touch OK The registration is completed Deleting an entry...

Страница 47: ... selected Can cels all selected locations 5 Touch Delete A message will appear asking you to confirm the deletion 6 Touch Yes The data you selected is deleted Touch No Cancels the deletion Registering and editing locations Engb 47 Chapter 09 Registering and editing locations ...

Страница 48: ...hecking your route and the information related with these events cannot be turned off If you select other traffic information in Traffic Settings the information can be displayed in a list or on a map For details refer to Selecting traffic infor mation to display on page 51 1 Display the Navigation Menu screen 2 Touch Traffic The Traffic Menu screen appears Checking all traffic information All tra...

Страница 49: ...played on the screen is the same for Checking all traffic information How to read traffic information on the map The traffic event information displayed on the map is as follows p A line is displayed only when the map scale is 5 km 2 5 miles or lower p Icon appears only when the scale on the map is 20 km 10 miles or lower If the scale is changed the icons are resized ac cording to the selected sca...

Страница 50: ... is displayed The noti fication icon is only displayed on the naviga tion map screen if there is any traffic information on your route p The notification icon will not be available when your vehicle deviate from the route 1 Set Traffic Incident to View For details refer to Selecting traffic informa tion to display on page 28 2 Display the map screen The icon appears when the system acquires traffi...

Страница 51: ...mation Touch All Selects all traffic information Touch None Displayed when all traffic information are se lected Cancels all selected traffic information 4 Touch OK The selected traffic information icon is added to the screen 5 Touch OK Selecting preferred RDS TMC service provider manually A default preferred TMC service provider for each country has been set The navigation sys tem tunes to the ra...

Страница 52: ...ation system is turned off the Bluetooth connection is also discon nected When the system restarts the sys tem automatically attempts to reconnect the previously connected mobile phone Even when the connection is severed for some reason the system automatically re connects the specified mobile phone ex cept when the connection is severed due to mobile phone operation Displaying the Phone Menu Use ...

Страница 53: ... displays them in the list if the device has found p Up to 15 mobile phones will be listed in the order that the mobile phone is found 5 Wait until your mobile phone appears in the list p If you cannot find the mobile phone you want to connect check that the mobile phone is waiting for the Bluetooth wireless technology connection 6 Touch the mobile phone name you want to register A message prompti...

Страница 54: ... the PIN code 1111 using the mobile phone When a connection is successfully estab lished a connection complete message ap pears the screen returns to the Bluetooth Settings screen by touching OK Pairing from your mobile phone You can register the mobile phone by setting the navigation system to standby mode and re questing connection from the mobile phone 1 Activate the Bluetooth wireless tech nol...

Страница 55: ...2 Display the Phone Menu screen 3 Touch Settings The Bluetooth Settings screen appears 4 Touch Connections The Connection List screen appears 5 Touch the name of the mobile phone that you want to connect Connection starts When a connection is successfully estab lished a connection complete message ap pears the screen returns to the Bluetooth Settings screen by touching OK p To cancel the connectio...

Страница 56: ...l home easily You can call home without taking the time to enter the phone number if the phone number has been registered 1 Display the Phone Menu screen 2 Touch Call Home Dialling home starts p If you have not registered your home num ber a message appears Touch Yes to start registration For more details about Set Home refer to Registering your home on page 45 Calling a number in the Contacts Aft...

Страница 57: ...try will be deleted 1 Display the Phone Menu screen 2 Touch Received The Received Calls screen appears 3 Touch an entry on the list Dialling starts p To cancel the call after the system starts dialling touch Touch Detail The Detail Information screen appears You can check the details of the party before mak ing a phone call 4 Touch to end the call Making a phone call using the dialled number histo...

Страница 58: ...ll after the system starts dialling touch Touch Detail The Detail Information screen appears You can check the details of the party before mak ing a phone call 4 Touch to end the call Dialling the entry in the Favourites You can make a call to the entry registered in the Favourites 1 Display the Navigation Menu screen 2 Touch Favourites The Select Favourite screen appears 3 Touch next to the locat...

Страница 59: ...d information is displayed 3 Touch to make a call To cancel the call after the system starts dial ling touch 4 Touch to end the call Receiving a phone call You can perform hands free answering by using the navigation system Answering an incoming call The system informs you that it is receiving a call by displaying a message and producing a ring sound once If Auto Answer Preference is set to Off an...

Страница 60: ...ur phone book using your mobile phone p The maximum 400 entries can be trans ferred per mobile phone If the entries ex ceed 400 the extra entries will not be transferred If more than one number is re gistered for one person such as work place and home each number is counted sepa rately p Each entry can hold up to 3 phone num bers p Depending on the mobile phone that is connected to this navigation...

Страница 61: ...history list Missed Calls You can clear the missed call history list Touch Clear All It clears all the data that correspond to the con nected mobile phone 3 Touch OK Data on the selected item is cleared from this navigation system s memory p If you do not want to clear memory that you have selected touch No Setting the phone Setting the phone volume The volume level for hands free phoning can be a...

Страница 62: ...fter 6 seconds Answers after six sec onds After 10 seconds Answers after ten sec onds Setting the automatic rejection function If this function is on the navigation system automatically rejects all incoming calls 1 Touch Settings on the Phone Menu screen The Bluetooth Settings screen appears 2 Touch Refuse All Calls Touching Refuse All Calls switches between On and Off p If both Refuse All Calls a...

Страница 63: ...ion system and your mobile phone must be 10 metres or less when sending and receiving voice and data via Bluetooth technology However the actual transmis sion distance may be shorter than the esti mated distance depending on the usage environment With some mobile phones the speakers of the system may not produce a ring sound If private mode is selected on the mobile phone hands free phoning may be...

Страница 64: ...l items in the Con tacts at one time In this case transfer items one by one from your mobile phone Depending on the mobile phone this navi gation system may not display the phone book correctly Some characters may be garbled or first name and last name may be in reverse order If the phone book in the mobile phone con tains image data the phone book may not be transferred correctly Image data can n...

Страница 65: ... Region The Region screen appears Selecting the language You can set the languages used on the pro gramme and voice guidance Each language can be set separately 1 Display the Region screen 2 Touch UI Language The Select UI Language screen appears 3 Touch the desired language After the language is selected the screen re turns to the previous screen 4 Touch Voice Language The Voice Language Selectio...

Страница 66: ...e unit of distance and speed displayed on your navigation system 1 Display the Region screen 2 Touch km mile Each time you touch the key changes that set ting km default Show distance in kilometres mile Show distance in miles Mile Yard Show distance in miles and yards Changing the virtual speed of the vehicle When calculating the expected time of arrival and the number of hours to the destination ...

Страница 67: ...navigation system restarts Setting Safe Mode For safety reasons you can limit the functions that are available while your vehicle is in mo tion 1 Display the Navigation Menu screen 2 Touch Settings The Settings Menu screen appears 3 Touch Safe Mode Each time you touch the key changes that set ting On default Activates the Safe Mode function Off Deactivates the Safe Mode function Inputting the fuel...

Страница 68: ...the Navigation Menu screen 2 Touch Settings The Settings Menu screen appears 3 Touch Backlight Timeout Each time you touch the key changes that set ting Never Deactivates the power saving feature of the screen backlight 30 sec Dims the backlight automatically if you do nothing for 30 seconds Adjusting the response positions of the touch panel touch panel calibration If you feel that the touch pane...

Страница 69: ... is received Colour Signal com munication Used in posi tioning Orange Yes Yes Yellow Yes No 2 Hand Brake When the handbrake is applied On is dis played When the handbrake is released Off is displayed 3 Illumination When the headlights or small lamps of a ve hicle are on On is displayed When the small lamps of a vehicle are off Off is dis played If the orange white lead is not con nected Off appear...

Страница 70: ...ed refer to Set ting items to be deleted on page 111 1 Display the Navigation Menu screen 2 Touch Settings The Settings Menu screen appears 3 Touch F Reset The message confirming whether to restore the settings appears 4 Touch Yes Returning the navigation system to the initial state You can return settings or recorded content to the default or factory settings For more detailed information about t...

Страница 71: ...details screen appears 3 Touch Fuel Price The Fuel Price Calculation screen appears 4 Enter the following settings Distance Enter the distance travelled since the pre vious fuelling p The distance is entered automatically only when the distance travelled since the previous fuelling is recorded Fuel Pumped Enter the amount of fuel pumped Fuel Price Unit Enter the fuel unit price When all the items ...

Страница 72: ... p When the detachable device is removed from the head unit this function is not available 1 Insert an SD memory card into the SD card slot For more details of the operation refer to In serting and ejecting an SD memory card on page 11 2 Touch Settings The Settings Menu screen appears 3 Touch Drive Log The Drive Log screen appears 4 Touch Drive Log Each time you touch the key changes that set ting...

Страница 73: ...n a location that is already registered in Favourites is imported the location is overwritten 1 Insert an SD memory card into the SD card slot For more details of the operation refer to In serting and ejecting an SD memory card on page 11 2 Display the Navigation Menu screen 3 Touch Data In Out The Export Import Menu screen appears 4 Touch Import next to Favourites The following message appears 5 ...

Страница 74: ... the detach able device as a removable disc Switching to PC Mode 1 Connect the detachable device and your PC using the USB cable For details refer to Connecting with your PC on page 18 2 Display the Navigation Menu screen 3 Touch Connect PC A message confirming whether to restart the navigation system appears 4 Touch OK The navigation system restarts And then the navigation system changes to PC Mo...

Страница 75: ...Switching the audio operation screen 1 Press MODE button when the map of the current location is displayed 2 Press SRC OFF button repeatedly to switch between the following sources TUNER tuner CD built in CD player USB USB storage device iPod iPod con nected using USB input AUX auxiliary device Basic flow of operation Engb 75 Chapter 14 Basic flow of operation ...

Страница 76: ...s Press and hold for a few seconds Press the centre of MULTI CONTROL Turn and press the centre of MULTI CONTROL Pressing LIST or EJECT button enables you to perform the equivalent operation Basic flow of operation Engb 76 Chapter 14 ...

Страница 77: ... 3 Function Menu screen You can access the screen to customise addi tional function settings 4 Audio Menu screen You can access the screen where various set tings are available with the audio source ac cording to your sound requests 5 Source off screen 6 Initial Setting screen You can access the screen that lets you per form system set up of different settings for this navigation system Basic flow...

Страница 78: ...d in stead 7 NEWS indicator Shows when the set news programme is re ceived 8 TRFC indicator Shows when a TP station a station that broad casts traffic information is tuned in 9 Signal level indicator a Touch panel keys to Recalls radio stations For details refer to Storing and recalling broadcast frequencies on the next page b Local indicator Shows when local seek tuning is on For details refer to...

Страница 79: ...o in order of their signal strength When this is complete BSM stops flashing p To cancel the storage process press the centre of MULTI CONTROL again p Storing broadcast frequencies with BSM may replace broadcast frequencies you have already saved by using to Tuning in strong signals Local seek tuning allows you to tune in only those radio stations with sufficiently strong signals for good receptio...

Страница 80: ...ls refer to Using Auto PI Seek for preset stations on page 103 Limiting stations to regional programming When AF is used to automatically retune fre quencies the regional function limits the se lection to stations broadcasting regional programmes 1 Display the Function Menu screen For details refer to Screen switching over view on page 76 2 Turn MULTI CONTROL to display Regional 3 Pressing the cen...

Страница 81: ... Function Menu screen For details refer to Screen switching over view on page 76 2 Turn MULTI CONTROL to display News Interrupt 3 Pressing the centre of MULTI CONTROL switches between On and Off p A news programme can be cancelled by pressing BAND ESC or SRC OFF button Searching for an RDS station by PTY information You can search for general types of broadcast ing programmes For details refer to ...

Страница 82: ...es the radio alarm code Alarm appears on the display and the volume adjusts to the TA volume When the station stops broadcasting the emergency announcement the system returns to the pre vious source p You can also cancel an emergency an nouncement by changing the source or moving MULTI CONTROL to the left or right Using the radio FM Engb 82 Chapter 15 ...

Страница 83: ...s National music Oldies Oldies music golden oldies Folk Mus Folk music Classics L Class Light classical music Classics Serious classical music Others Educate Educational programmes Drama All radio plays and serials Culture National or regional culture Science Nature science and technology Varied Light entertainment Children Children s Social Social affairs Religion Religion affairs or services Pho...

Страница 84: ...sing MULTI CONTROL up or down You can recall radio stations assigned to pre set tuning keys to Pressing MULTI CONTROL left or right The frequencies move up or down step by step Pressing and holding MULTI CONTROL left or right The tuner will scan the frequencies until a broadcast strong enough for good reception is found p You can cancel seek tuning by pressing MULTI CONTROL left or right Pressing ...

Страница 85: ...ng p To cancel the storage process press the centre of MULTI CONTROL again p Storing broadcast frequencies with BSM may replace broadcast frequencies you have already saved by using to Tuning in strong signals Local seek tuning allows you to tune in only those radio stations with sufficiently strong signals for good reception 1 Display the Function Menu screen For details refer to Screen switching...

Страница 86: ...ows the title of the track currently playing when available 3 NEWS indicator Shows when the set news programme is re ceived 4 TRFC indicator Shows when a TP station a station that broad casts traffic information is tuned in 5 Repeat Random Scan indicator Shows the current playback status 6 Touch panel keys Changes the display in the text area S Rtrv Sets advanced sound retriever function For detai...

Страница 87: ...TI CONTROL enables you to perform the equivalent operation Pressing the centre of MULTI CONTROL Plays the selected track p Pressing MULTI CONTROL right en ables you to perform the equivalent op eration Setting a repeat play range Touch repeatedly until the desired repeat range appears in the display Repeats just the current track No indicator disc repeat Repeats the current disc p If you skip a tr...

Страница 88: ... p If you touch during scan play the scan play is automatically cancelled and tracks will be played in random order Playback and Pause Touch Playback of the current track pauses and Pause is displayed p To turn pause off touch again Using advanced sound retriever Advanced sound retriever function automati cally enhances compressed audio and re stores rich sound Touch S Rtrv repeatedly to select th...

Страница 89: ...play ing Track number indicated next to TRK Shows the track number currently play ing Play time Shows the elapsed playing time within the current track Comment Shows the comment of the file currently playing when available Folder name Shows the folder name currently play ing File name Shows the file name currently playing Track title Shows the title of the track currently playing Artist name Shows...

Страница 90: ...kips to the start of the current track Pressing it twice continuously will skip to the previous track Pressing and holding MULTI CONTROL left Performs fast reverse p Fast reverse is cancelled when it reaches the beginning of the first track on the disc Pressing the centre of MULTI CONTROL The function select screen appears Pressing LIST button Shows the list to select a track For details refer to ...

Страница 91: ...m play begins p When you turn random play on ap pears p To turn random play off touch again p If you touch while the repeat play range is set to the repeat play range changes to automatically and tracks will be played in random order Scan folders and tracks Scan play lets you hear the first 10 seconds of each track Scan play is performed in the cur rent repeat play range Touch Scan play begins p A...

Страница 92: ...ompressed audio and re stores rich sound Touch S Rtrv repeatedly to select the desired setting Each touch of S Rtrv changes the settings as follows Sets to S Rtrv1 Sets to S Rtrv2 No indicator Sets to off p S Rtrv2 is more effective than S Rtrv1 Playing music files on ROM Engb 92 Chapter 18 ...

Страница 93: ... information is tuned in 5 File type indicator Shows the type of audio file currently playing 6 Repeat Random Scan indicator Shows the current playback status 7 Touch panel keys Changes the display in the text area S Rtrv Sets advanced sound retriever function For details refer to Using advanced sound retriever on page 95 Playback and Pause Plays files in random order For details refer to Playing ...

Страница 94: ...t can be played the file list is not dis played 2 Use MULTI CONTROL to select the de sired file name Pressing MULTI CONTROL up or down Selects the desired file name p Turning MULTI CONTROL enables you to perform the equivalent operation Pressing the centre of MULTI CONTROL When a folder is selected it displays the content of the lower folder When a file is selected it plays the selected file p Pre...

Страница 95: ...o automatically and scanning files will begin p If you touch while the repeat play range is set to all scan play is performed for only the first files of each folder p If you skip a file forward backward or re turn to the root folder during scan play the scan play is automatically cancelled p If you touch during scan play the scan play is automatically cancelled and play back of the current file w...

Страница 96: ...um for the cur rent song When a podcast is played the podcast title is displayed 3 NEWS indicator Shows when the set news programme is re ceived 4 TRFC indicator Shows when a TP station a station that broad casts traffic information is tuned in 5 Shuffle play indicator Appears when shuffle play is activated 6 Repeat play indicator Appears when repeat play is activated 7 Touch panel keys Changes th...

Страница 97: ...albums Songs songs Podcasts podcasts Genres genres Composers composers Audiobooks audiobooks Pressing MULTI CONTROL up or down Select the desired item p Turning MULTI CONTROL enables you to perform the equivalent operation Pressing the centre of MULTI CONTROL When an item is selected it narrows down the item with the list p Pressing MULTI CONTROL right en ables you to perform the equivalent op era...

Страница 98: ...h S Rtrv repeatedly to select the desired setting Each touch of S Rtrv changes the settings as follows Sets to S Rtrv1 Sets to S Rtrv2 No indicator Sets to off p S Rtrv2 is more effective than S Rtrv1 Operating this navigation system s iPod function from your iPod This navigation system s iPod function can be operated from your iPod Sound can be heard from the car s speakers and operation can be c...

Страница 99: ... in random order shuffle all Touch All to turn shuffle all on All songs on the iPod will play randomly p To turn shuffle all off set Shuffle Mode in the Function Menu screen to off For details refer to Playing songs in random order shuffle on this page Playing songs related to the currently playing song Songs related to the currently playing song are played You can play songs of the following list...

Страница 100: ...er 6 Press the centre of MULTI CONTROL to display the alphabetical list p An article listed below and space at the be ginning of the artist name will be ignored and the next character will be taken into ac count for searching A or a AN An or an THE The or the p If alphabet search is aborted Not Found is displayed 7 On the song or episode list turn MULTI CONTROL to select the song you want to play ...

Страница 101: ...tion a station that broad casts traffic information is tuned in Switching the auxiliary setting 1 Turn MULTI CONTROL to select AUX in the Initial Setting screen For details refer to Displaying the Initial Setting screen on page 103 2 Press the centre of MULTI CONTROL to turn AUX on p To turn AUX off press MULTI CONTROL again Selecting AUX as the source Press SRC OFF button to display the AUX scree...

Страница 102: ...and hold until the audio source turns off For details refer to Switching the audio op eration screen on page 75 p To return to the display of each source press SRC OFF button Turning the source off Engb 102 Chapter 22 ...

Страница 103: ... or right to select the desired colour White white Light Green light green Green green Light Blue light blue Blue blue Yellow yellow Amber amber Red red Scan scan Cus tom custom Scan Shifts between the eight default colours in sequence gradually Custom Sets your created colour which is installed from SD as the illumination colour Setting the FM tuning step Normally the FM tuning step employed by s...

Страница 104: ...etting screen For details refer to Displaying the Initial Setting screen on the previous page 2 Turn MULTI CONTROL to select S W Control 3 Press the centre of MULTI CONTROL to switch between Rear SP F Range and Rear SP S W When no subwoofer is connected to the rear output select Rear SP F Range When a subwoofer is connected to the rear output select Rear SP S W p Both rear speaker leads output and...

Страница 105: ...ttings as follows ATT The audio source is attenuated automati cally when the voice guidance is output Mute The audio source is muted automatically when the voice guidance is output Normal The audio source volume does not change p Operation returns to normal when the cor respond action is ended Customising the initial settings Engb 105 Chapter 23 Customising the initial settings ...

Страница 106: ...ont15 to Rear15 is displayed as the front rear speaker balance moves from front to rear Setting Front and Rear to 0 is correct when using a two speaker system When Rear SP S W is selected in S W Con trol front rear speaker balance cannot be ad justed Refer to Setting the rear output on page 104 4 Press MULTI CONTROL left or right to adjust left right speaker balance Each time MULTI CONTROL is pres...

Страница 107: ... screen on the previous page 2 Turn MULTI CONTROL to select P EQ Setting1 3 Press MULTI CONTROL left or right to select the equaliser band to adjust Each time MULTI CONTROL is pressed left or right level is selected in the following order Low Mid High 4 Press MULTI CONTROL up or down to adjust the level of the equaliser band Each time MULTI CONTROL is pressed up or down the level of the equalisati...

Страница 108: ...ULTI CONTROL left or right to select cut off frequency Each time MULTI CONTROL is pressed left or right frequencies are selected in the following order 50 Hz 63 Hz 80 Hz 100 Hz 125 Hz 7 Press MULTI CONTROL up or down to adjust the output level of the subwoofer Each time MULTI CONTROL is pressed up or down subwoofer level increases or decreases 6 to 24 is displayed as the level is in creased or dec...

Страница 109: ...TI CONTROL to select SLA 4 Press MULTI CONTROL up or down to adjust the source volume Each time MULTI CONTROL is pressed up or down source volume increases or decreases SLA 4 to SLA 4 is displayed as the source volume is increased or decreased Enhancing bass Bass The Bass enhances bass sounds which can be muted by driving noise 1 Display the Audio Menu screen For details refer to Displaying the Au...

Страница 110: ...SET button Pressing the RESET button clears almost all settings of the audio function For details refer to Resetting the micro processor on page 9 Method 2 Touch F Reset For details refer to Restoring the default setting on page 70 Method 3 Touch Reset on the Date Setting Clear screen Method 4 Touch Clear user informa tion on the Date Setting Clear screen Clears some items in the Settings Menu and...

Страница 111: ...d 4 Map function View mode and scale setting on the map 1 1 1 Direction of the map 1 1 1 Last cursor position on the map screen 1 1 1 Route Setting Current route 1 1 Guidance state of the current route 1 1 1 Vehicle position information 1 1 Route conditions 1 1 1 Navigation Menu Point registered in Favourites 1 1 Sorting order selected in Fa vourites 1 1 1 History 1 1 Fuel details 1 1 1 Traffic Se...

Страница 112: ... histories 1 1 1 Audio functions Method 1 Method 2 Method 3 Method 4 Volume 1 Initial Settings All settings 1 Audio Menu All settings 1 Function Menu of each source All settings 1 Returning the Navigation System to the Default or Factory Settings Engb 112 Chapter 25 ...

Страница 113: ... authorised Pioneer Ser vice Station You cannot position your vehicle on the map without a significant positioning error Signal quality from the GPS satel lites is poor causing reduced posi tioning accuracy Such a loss of signal quality may occur for the fol lowing reasons This product is in an unsuitable lo cation Obstacles are blocking signals from the satellites The position of satellites relat...

Страница 114: ...slightly before speaking There s no picture The backlight of the LCD panel is turned off Turn on the backlight Page 70 There is no response when the touch panel key are touched or a different key responds The touch panel keys deviate from the actual positions that respond to your touch for some reason Perform touch panel calibration Page 68 Problems in the audio screen Symptom Cause Action Referen...

Страница 115: ... naviga tion system Update the iPod software version Problems with the phone screen Symptom Cause Action Reference Dialling is not possible because the touch panel keys for dialling are inactive Your phone is out of range for ser vice Retry after re entering the range for service The connection between the mobile phone and the navigation system cannot be established now Perform the connection proc...

Страница 116: ...ystem please wait When the navigation system starts the message is displayed if the re maining battery power of the de tachable device is low Wait until the message Ready to start up system appears After the message is dis played the navigation system restarts Consult the nearest authorised Pioneer ser vice station if this message persists Dataloading failed You may have transferred the data from ...

Страница 117: ... inserted disc are secured by DRM Replace the disc Heat The temperature of the navigation system is outside of the normal op erating range Wait until the unit s temperature returns to within normal operating limits USB iPod Message Cause Action Reference No Audio The connected USB storage device does not contain any files that can be played back Store playable files Protect All the files on the in...

Страница 118: ...m Use an iPod of a compatible version Communication failure Disconnect the cable from iPod Once iPod main menu is displayed connect the cable again Disconnect the cable from iPod Once iPod main menu is displayed connect the cable again If the message appears frequently consult your dealer N A USB The iPod is not compatible with this navigation system Use an iPod of a compatible version Old version...

Страница 119: ...t if signal quality is poor only two dimen sions latitude and longitude can be obtained and positioning errors are somewhat greater Map matching As mentioned the positioning systems used by this navigation system are susceptible to certain errors Their calculations may on occa sion place you in a location on the map where no road exists In this situation the processing system understands that vehi...

Страница 120: ...ecause this may block the reception of GPS signals p If a GPS signal have not been received for a long time your vehicle s actual position and the current position mark on the map diverge considerably or do not be updated In such case once GPS reception is re stored accuracy will be recovered Conditions likely to cause noticeable positioning errors For various reasons such as the state of the road...

Страница 121: ...with many height changes If you enter or exit a multi storey car park or similar structure using a spiral ramp If your vehicle is turned on a turntable or si milar structure If trees or other obstacles block the GPS signals for a considerable period If you drive very slowly or in a start and stop manner as in a traffic jam If you join the road after driving around a large car park Appendix Engb 12...

Страница 122: ... route cannot be set During voice guidance turns and intersec tions from the motorway are announced However if you pass intersections turns and other guidance points in rapid succes sion some may delay or not be announced It is possible that guidance may direct you off a motorway and then back on again In some cases the route may require you to travel in the opposite direction to your current head...

Страница 123: ...mp discs with a soft cloth Playback of discs may not be possible be cause of disc characteristics disc format recorded application playback environ ment storage conditions and so on Road shocks may interrupt disc playback Read the precautions for discs before using them Ambient conditions for playing a disc At extremely high temperatures a tempera ture cutout protects this product by switch ing it...

Страница 124: ... The text information of some audio files may not be correctly displayed File extensions must be used properly There may be a slight delay when starting playback of files on a USB storage device with complex folder hierarchies It may not be possible to play some music files from USB because of file characteris tics file format recorded application play back environment storage conditions and so on...

Страница 125: ...card compatibility with this navigation system refer to Specifications on page 135 This system is not compatible with Multi Media Card MMC Handling guidelines and supplemental information Copyright protected files cannot be played back Appendix Engb 125 Appendix Appendix ...

Страница 126: ...0 kbps CBR VBR Sampling frequency 16 kHz to 48 kHz ID3 tag ID3 Tag Ver 1 0 1 1 2 2 2 3 2 4 Notes Ver 2 x of ID3 Tag is given priority when both Ver 1 x and Ver 2 x exist The navigation system is not compatible with the following MP3i MP3 interactive mp3 PRO m3u playlist WMA compatibility Media CD R RW USB storage device File extension wma Bit rate 48 kbps to 384 kbps CBR VBR Sampling frequency 32 ...

Страница 127: ...ay when starting playback of audio files encoded with image data The navigation system is not compatible with packet write data transfer This navigation system can recognise up to 32 characters beginning with the first char acter including extension for the file and folder name However the maximum num ber of the characters that you can display varies according to the width of each char acter and o...

Страница 128: ... Other trademarks and trade names are those of their respective owners SD and SDHC logo SD Logo is a trademark SDHC Logo is a trademark WMA The Windows Mediaä logo printed on the box indicates that this unit can play back WMA data WMA is short for Windows Media Audio and refers to an audio compression technology that is developed by Microsoft Corporation WMA data can be encoded by using Windows Me...

Страница 129: ...it may be come jammed under the brake or accelerator pedal For details refer to the iPod s manuals iPod Made for iPod means that an electronic ac cessory has been designed to connect specifi cally to iPod and has been certified by the developer to meet Apple performance stan dards iPod is a trademark of Apple Inc registered in the U S and other countries iPhone Works with iPhone means that an elec...

Страница 130: ...ure to form inside the navigation unit re sulting in possible damage Small black dots or white dots bright dots may appear on the LCD screen These are due to the characteristics of the LCD screen and do not indicate a malfunction The LCD screen will be difficult to see if it is exposed to direct sunlight When using a mobile phone keep the an tenna of the mobile phone away from the LCD screen to pr...

Страница 131: ...ing 67 Data In Out 72 73 Eject SD 12 Settings 131 Phone 52 Settings Menu screen Page Sound 65 Region 65 UI Language Voice Language 65 Time 65 km mile 66 Speed 66 Keyboard 66 Map 25 Overlay POI 26 View Mode 27 Show Manoeuvre 27 AV Guide Mode 29 Day Night Display 27 Road Colour 28 Close Up View 28 Favourites Icon 28 Show Speed Limit 28 Traffic Incident 28 Current Street 29 Backlight Timeout 68 Calib...

Страница 132: ...Call Home 56 Contacts 56 Received 57 Dialled 57 Missed 58 Transfer 60 Volume 61 Phone Ringtone Phone Voice Settings 61 Connections 55 Bluetooth On Off 62 Auto Answer Preference 62 Refuse All Calls 62 Echo Cancel 62 Auto Connect 63 Edit Name 63 Clear Memory 61 Bluetooth Software Update 64 Appendix Engb 132 Appendix ...

Страница 133: ...d on the map by the yellow flag icon Home location Your registered home location ID3 tag This is a method of embedding track related information in an MP3 file This embedded in formation can include the track title the ar tist s name the album title the music genre the year of production comments and other data The contents can be freely edited using software with ID3 Tag editing functions Althoug...

Страница 134: ...he data such as railway stations shops restaurants and amusement parks RDS TMC A communication system for informing drivers of the latest traffic information using FM multi plex broadcast Information such as traffic jams or accidents can be checked on the dis play Route setting The process of determining the ideal route to a specific location route setting is done auto matically by the system when...

Страница 135: ...o Maximum power output 50 W 4 Continuous power output 22 W 4 50 Hz to 15 kHz 5 THD 4 W LOAD Both Channels Driven Load impedance 4 W 4 W to 8 W 2 W for 1 ch allowable Preout output level max 2 2 V Preout impedance 1 kohm Equaliser 3 Band Parametric Equaliser Low Frequency 40 Hz 80 Hz 100 Hz 160 Hz Q Factor 0 35 0 59 0 95 1 15 6 dB when boosted Gain 12 dB Mid Frequency 200 Hz 500 Hz 1 kHz 2 kHz Q Fa...

Страница 136: ...tified Output power 4 dBm Max Power class 2 FM tuner Frequency range 87 5 MHz to 108 0 MHz Usable sensitivity 8 dBf 0 7 µV 75 W mono S N 30 dB Signal to noise ratio 75 dB IEC A network Distortion 0 3 at 65 dBf 1 kHz stereo 0 1 at 65 dBf 1 kHz mono Frequency response 30 Hz to 15 000 Hz 3 dB Stereo separation 45 dB at 65 dBf 1 kHz MW tuner Frequency range 531 kHz to 1 602 kHz 9 kHz Usable sensitivit...

Страница 137: ...C P O Box 1540 Long Beach California 90801 1540 U S A TEL 800 421 1404 PIONEER EUROPE NV Haven 1087 Keetberglaan 1 B 9120 Melsele Belgium Belgique TEL 0 3 570 05 11 Published by Pioneer Corporation Copyright 2009 by Pioneer Corporation All rights reserved CRB3019 A EU MAN F310BT EN KMZZX 09E00000 ...

Отзывы: