background image

4

Touch [OK].

The navigation system restarts.
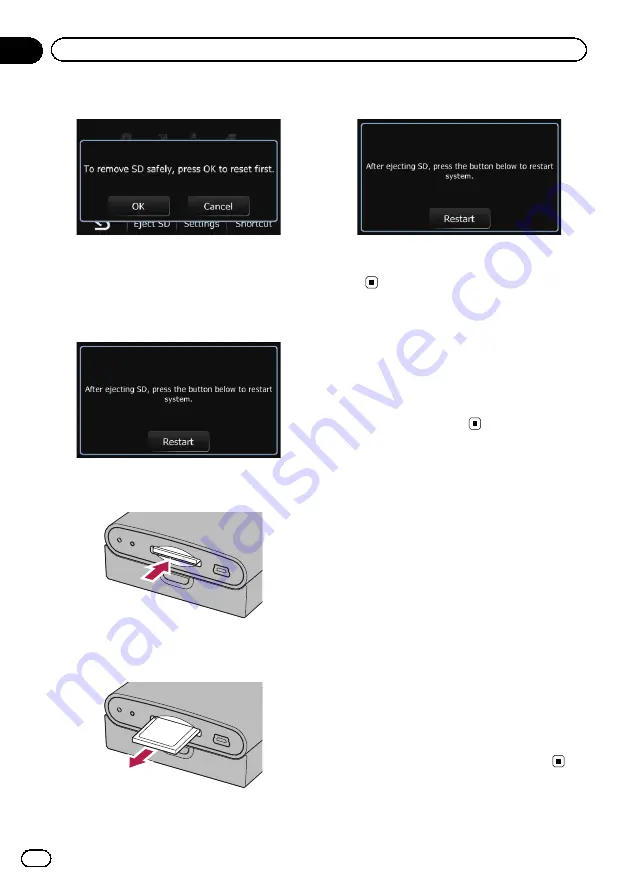
After a short pause, the navigation screen re-
turns.

5

Check that the following screen is dis-

played.

6

Press the middle of the SD memory

card gently until it clicks.

The SD memory card is ejected.

7

Pull the SD memory card out straight.

8

Touch [Restart].

The navigation system restarts.
After a short pause, the navigation screen re-
turns.

Protecting your product
from theft

The detachable device can be removed from
the base unit to discourage theft.

=

For details, refer to

Removing the detach-

able device

on page 7.

Flow from startup to
termination

1

Start the engine to boot up the system.

2

Press the MODE button of the AV recei-

ver.

After a short pause, the navigation screen ap-
pears.

p

The display will turn off if you press the

MODE

button of the AV receiver immedi-

ately after the navigation system restarts, so
wait (approximately 10 seconds) after re-
start before pressing the

MODE

button.

=

For details of the operations, refer to

Screen

switching overview

on page 12.

3

Turn off the vehicle engine to termi-

nate the system.

The navigation system is also turned off.

Engb

10

Chapter

02

Before you start

Содержание AVIC-F220

Страница 1: ... Important Information for the User includes the important information that you must understand before using this navigation system Indications of this unit may be different from the actual value Some of the features of this device do not take in to consideration the type of vehicle it is installed into English ...

Страница 2: ...up 11 How to use the navigation menu screens Screen switching overview 12 What you can do on each menu 13 Shortcut Menu 13 Selecting the shortcut 13 Cancelling the shortcut 14 Operating menu screens e g Navigation Menu screen 14 Operating list screens e g POI list 14 Operating the on screen keyboard 15 How to use the map How to read the map screen 16 Audio information bar 17 Enlarged map of the in...

Страница 3: ...location by Favourites 39 Registering a location by scroll mode 39 Editing registered locations 39 Editing the entry in the Favourites list 39 Editing your home 40 Sorting the entry in the Favourites list 40 Deleting the entry from the Favourites list 41 Registering and editing your home 41 Registering your home 41 Editing your home 42 Deleting the entry from the History list 42 Exporting and impo...

Страница 4: ...de 57 Other functions Replicating the settings 58 Returning the navigation system to the default or factory settings 58 Restoring the default setting 58 Returning the navigation system to the initial state 59 Setting items to be deleted 60 Interruption of the AV receiver screen 61 When a phone call is received 61 When news or traffic announcement is received 61 When the rear view camera is activat...

Страница 5: ...d with double quotation marks e g Navigation Menu screen Touch panel keys that are available on the screen are described in bold in brackets e g Address Settings Extra information alternatives and other notes are presented in the following for mat e g p If the home location has not been stored yet set the location first Descriptions of separate operations to be performed on the same screen are ind...

Страница 6: ...ation of equip ment When adding removing additional pro ducts that connect to the navigation sys tem If your vehicle position is shown on the map with a significant positioning error Press the RESET button with a pen tip or other pointed implement RESET button Engb 6 Chapter 01 Introduction ...

Страница 7: ...vice turn the ignition switch off ACC OFF When you attach the detachable device be sure to attach it to the base unit before turn ing the ignition switch on ACC ON Never use force when removing or attaching Avoid subjecting the detachable device to ex cessive shocks Keep the detachable device out of direct sun light and high temperatures After removing the detachable device keep it in a safe place...

Страница 8: ...he charging temperature range The operating temperature range of the bat tery is from 20 C to 60 C The charging temperature range of the battery is from 0 C to 55 C The battery of the detachable device is charged in the following situations When the detachable device is attached to the base unit while the ignition switch is turned on ACC ON When the detachable device is connected to your PC Monito...

Страница 9: ...ards p If data related to map data such as custo mised POI data is stored on the SD mem ory card the navigation system restarts Inserting an SD memory card Insert an SD memory card into the SD card slot Insert the card with the contact end first into the SD card slot and press the card until it clicks and completely locks Label side Ejecting an SD memory card 1 Press the MODE button of the AV rece...

Страница 10: ...to discourage theft For details refer to Removing the detach able device on page 7 Flow from startup to termination 1 Start the engine to boot up the system 2 Press the MODE button of the AV recei ver After a short pause the navigation screen ap pears p The display will turn off if you press the MODE button of the AV receiver immedi ately after the navigation system restarts so wait approximately ...

Страница 11: ...system restarts the AV receiver screen is displayed 5 Read the disclaimer carefully checking its details and then touch OK if you agree to the conditions The map screen appears Regular startup 1 Start the engine to boot up the system 2 Press the MODE button of the AV recei ver After a short pause the navigation screen ap pears p The display will turn off if you press the MODE button of the AV rece...

Страница 12: ...Screen switching overview Navigation screen 2 5 1 4 3 2 Press the MODE button of the AV receiver AV receiver screen e g AVH P3200BT Engb 12 Chapter 03 How to use the navigation menu screens ...

Страница 13: ...ngs Menu screen You can access the screen to customise set tings 5 Applications Menu screen You can launch applications downloaded to an SD memory card via the utility programme navgate FEEDS Shortcut Menu Registering your favourite menu items in shortcuts allows you to quickly jump to the re gistered menu screen by a simple touch on the Shortcut Menu screen Selecting the shortcut p Up to 8 menu i...

Страница 14: ... Move the icon to the right side of the screen and then release it 3 To finish the selection touch Close Operating menu screens e g Navigation Menu screen 1 2 3 1 Screen title 2 The previous screen returns 3 Shows the next or previous page Operating list screens e g POI list 1 4 2 3 5 1 Screen title 2 Touching or on the scroll bar scrolls through the list and allows you to view the re maining item...

Страница 15: ... returns 4 0 9 Sym Others You can enter other characters of alphabet You can also enter text with marks such as or numbers Touch to toggle the selection p When you use any of A Ä Å Æ the displayed result is the same 5 When you select Cyrillic keyboard touch allows you to see remaining characters 6 OK Confirms the entry and allows you to proceed to the next step 7 Deletes the input text one letter ...

Страница 16: ...t guidance point 4 Eco Meter Displays a graph comparing the past average fuel mileage and the average fuel mileage since the navigation system was last started Touching this item displays the Eco Graph screen For details refer to Displaying Eco Graph on page 22 5 Map control Touching displays touch panel keys for changing the map scale and the map orienta tion 6 Street name or city name that your ...

Страница 17: ...e actual driving speed The estimated time of arrival is only a reference value and does not guarantee arrival at that time Travel time to your destination or waypoint d Current time Meaning of guidance flags Destination The checkered flag indicates your destination Waypoint The blue flags indicate your way points Guidance point The next guidance point next turn ing point etc is shown by a yel low ...

Страница 18: ...p only the arrival gui dance for the destination or a waypoint is available Please review and obey all local traf fic rules along the highlighted route For your safety No turn by turn directions will be displayed on these roads Non routable roads pink colour road Map display is possible but it cannot be used for route calculation Please review and obey all local traffic rules along this route For ...

Страница 19: ...on for a few seconds the initial map screen automati cally returns Switching the map between 2D and 3D 2D map screen 3D map screen 1 Display the map screen 2 Touch on the map screen or appears p When the 2D map screen is selected is displayed p When the 3D map screen is selected is displayed 3 Touch or Each time you touch the key changes that set ting p If you do not operate the function for a few...

Страница 20: ...own The infor mation shown varies depending on the position p The scrolling increment depends on your dragging length Touch The map returns to the current position Viewing information about a specified location An icon appears at registered places home lo cation specific places Favourites entries and places where there is a POI icon Place the scroll cursor over the icon to view detailed informatio...

Страница 21: ... For details refer to Setting the Favourites icon display on page 54 For details refer to Displaying POI on the map on page 52 Engb 21 Chapter 04 How to use the map How to use the map ...

Страница 22: ...Graph Reading the screen 5 2 3 1 4 1 Average fuel mileage comparison graph Displays a comparison of the average fuel mileage up to the point the navigation system was last stopped past average fuel mileage and the current average fuel mileage The dis play is updated every 3 seconds The more the value moves in the direction of the better the fuel mileage There are three different graph bars Total A...

Страница 23: ...co Drive Level function that estimates how well you have driven in an environmentally friendly way The points of Eco Drive Level change ac cording to Eco Score when the vehicle reaches the destination When a certain num ber of points is reached the level increases and a message appears 1 1 Tree icon As the level increases a tree icon changes from a young tree to a big tree p This is not displayed ...

Страница 24: ...vel have increased or de creased Off No message appears and no sound beeps when the vehicle reaches the destination For details refer to Displaying Eco Drive Level guidance on the previous page Rapid Start Warning On A message appears and a sound beeps when the vehicle experiences a sudden start Off default No message appears and no sound beeps when the vehicle experiences a sudden start Clear Rec...

Страница 25: ... your route 1 Park your vehicle in a safe place and apply the handbrake j 2 Display the Top Menu screen For details of the operations refer to Screen switching overview on page 12 j 3 Select the method of searching for your destination j 4 Enter the information about your destina tion to calculate route j 5 Confirm the location on the map For details refer to Setting a route to your destination on...

Страница 26: ...one of the items on the list to set the country as search area The screen returns to the previous screen p Once the country has been selected you only have to change countries when the lo cation is outside of the country you se lected 5 Touch City The Enter City Name screen appears 6 Enter the city name and then touch OK The Select City screen appears 7 Touch the desired city name The Enter Street...

Страница 27: ...displayed as a result First keyword you entered The word beginning with the second key word Entering three keywords The names including the following words below are displayed as a result The words that completely match with both first and second keywords you entered The word beginning with the third keyword e g Searching North West Park Entered keywords Search results NORTH W North West Park is s...

Страница 28: ...h OK 11 Touch the desired house number range The searched location appears on the map screen For the subsequent operations refer to Set ting a route to your destination on page 34 Setting up a route to your home If your home location is stored the route to your home can be calculated by touching a single key 1 Touch Home on the map screen and then touch Navigation For details of the operations ref...

Страница 29: ...ce the country has been selected you only have to change countries when the lo cation that you want to search for is outside of the country you selected 5 Touch one of the items on the list to set the country as search area The POI Name Input Menu screen returns 6 Touch Name The POI Name screen appears 7 Enter the POI name and then touch OK The POI Name Input Menu screen returns 8 Touch Search The...

Страница 30: ...4 Touch the category you want p If there are more detailed categories within the selected category repeat this step as many times as necessary The POI List screen appears 5 Touch the POI you want The searched location appears on the map screen For the subsequent operations refer to Set ting a route to your destination on page 34 Searching for POIs around the city You can search for POIs around a s...

Страница 31: ...Storing a location in Fa vourites on page 39 1 Touch Home on the map screen and then touch Navigation For details of the operations refer to Screen switching overview on page 12 2 Touch Favourites The Select Favourite screen appears 3 Touch the entry you want The searched location appears on the map screen For the subsequent operations refer to Set ting a route to your destination on page 34 Searc...

Страница 32: ...u perform a route calculation you can select History p History can store up to 100 locations If the entries reach the maximum the new entry overwrites the oldest one 1 Touch Home on the map screen and then touch Navigation For details of the operations refer to Screen switching overview on page 12 2 Touch History The Destination History screen appears 3 Touch the entry you want The searched locati...

Страница 33: ...searched location appears on the map screen For details of the operations refer to Screen switching overview on page 12 Searching for a location by scrolling the map Specifying a location after scrolling the map enables you to set the position as destination waypoint 1 Display the map screen 2 Touch and drag the screen to scroll the map to the position you want 3 Touch For details of the operation...

Страница 34: ...ot set Waypoint is not available 3 Touch OK Route confirmation screen 1 2 3 4 Sets the displayed route as your route and starts the route guidance 1 Distance to the destination 2 Travel time to your destination 3 Estimated fuel cost to your destination For details refer to Inputting the fuel consumption information for calculating the fuel cost on page 45 4 Route calculation condition Touch The me...

Страница 35: ...e Route info screen on this page 2 Touch Options The Route Options screen appears 3 Touch the desired items to change the route calculation conditions and then touch OK The route is recalculated and the Route con firmation screen appears Items that users can operate Settings marked with an asterisk show that these are default or factory settings Route Condition This setting controls how the route ...

Страница 36: ...ld be taken into account p If you want to set your route to avoid raised draw bridges select On On Calculates a route while avoiding streets or bridges with traffic restrictions during a cer tain time Off Calculates a route while ignoring traffic re strictions p The system may calculate a route that in cludes streets or bridges that are subject to traffic restrictions during a certain time even if...

Страница 37: ... recalculate the route You can delete successive waypoints 1 Display the Route info screen For details refer to Displaying the Route info screen on page 35 2 Touch Waypoints The Waypoints List screen appears 3 Touch Delete next to the waypoint that you want to delete The touched waypoint will be deleted from the list 4 Touch OK on the Waypoints List screen The route is recalculated and the Route c...

Страница 38: ...tion screen appears 7 Touch OK The map of the current position appears Cancelling the route guidance If you no longer need to travel to your destina tion follow the steps below to cancel the route guidance 1 Touch Home on the map screen and then touch Navigation For details of the operations refer to Screen switching overview on page 12 2 Touch Cancel A message confirming the cancellation of the c...

Страница 39: ... a location on page 25 5 When the map of the location you want to register is displayed touch OK The location is registered and then the Edit Favourite screen appears For details refer to Editing the entry in the Favourites list on this page 6 Touch OK The registration is completed Registering a location by scroll mode 1 Touch and drag the screen to scroll the map to the position that you want to ...

Страница 40: ...12 2 Touch Favourites The Select Favourite screen appears p Home location is displayed on the top of the list 3 Touch next to the home location The Edit Favourite screen appears 4 Touch the item that you want to change the setting Touch Phone You can register your home phone number Touch Modify Location You can change the registered location by scrol ling the map p For home information Name and Ic...

Страница 41: ...elete A tick mark appears next to the selected loca tion Touch All or None Selects or deselects all entries 5 Touch Delete A message will appear asking you to confirm the deletion 6 Touch Yes The data you selected is deleted Touch No Cancels the deletion Registering and editing your home Registering your home position saves time and effort Also routes to home positions can be calculated easily wit...

Страница 42: ...isplayed on the top of the list 3 Touch next to the home location The Edit Favourite screen appears 4 Touch the item that you want to change the setting Touch Phone You can edit the registered phone number Touch Modify Location You can change the registered location by scrol ling the map p For home information Name and Icon are not editable 5 Touch OK The registration is completed Deleting the ent...

Страница 43: ...verwritten with new data when current data is exported 1 Insert an SD memory card into the SD card slot For details of the operation refer to Insert ing an SD memory card on page 9 2 Touch Home on the map screen and then touch Navigation For details of the operations refer to Screen switching overview on page 12 3 Touch Data In Out The Export Import Menu screen appears 4 Touch Export next to Favou...

Страница 44: ...operation refer to Insert ing an SD memory card on page 9 3 Touch Home on the map screen and then touch Navigation For details of the operations refer to Screen switching overview on page 12 4 Touch Data In Out The Export Import Menu screen appears 5 Touch Import next to Favourites The following message appears 6 Touch Yes Data import starts After the data is imported the Navigation Menu screen ap...

Страница 45: ...lometres 60 miles When Fuel Unit is set to Gallon Enter how many kilometres miles you get to a gallon Fuel Price Unit Enter the fuel unit price Fuel Unit Set the fuel unit Currency Set the unit of currency When all the items are entered inputting the fuel consumption information is complete Calculating the fuel consumption When you enter the fuelling information to the navigation system and export...

Страница 46: ... new data when current data is exported 1 Insert an SD memory card into the SD card slot For details of the operation refer to Insert ing an SD memory card on page 9 2 Touch Home on the map screen and then touch Navigation For details of the operations refer to Screen switching overview on page 12 3 Touch Fuel details The Fuel details screen appears 4 Touch Export After a message confirming whethe...

Страница 47: ...xport next to Fuel details Data export starts After the data is exported the completion mes sage appears 5 Touch OK The Navigation Menu screen appears Engb 47 Chapter 10 Fuel cost management Fuel cost management ...

Страница 48: ...he supplied USB cable to your PC 5 Download the application using the uti lity programme navgate FEEDS Launching the application You can launch applications downloaded to an SD memory card via the utility programme navgate FEEDS p Navigation functions are unavailable when an application is running Close the appli cation to use navigation functions p The navigation system can run one applica tion a...

Страница 49: ... the navi gation guidance and beep When set to guidance is output When set to no guidance is output Touch Beep Each time you touch the key changes that set ting On default A beep sounds Off The beep sound is muted Customising the regional settings Selecting the language You can set the languages used on the pro gramme and voice guidance Each language can be set separately 1 Display the Settings Me...

Страница 50: ...ssary adjust the time difference Touching or changes the time difference display in half hour incre ments The time difference can be set from 4 0 to 9 0 hours 5 Touch Summer Time If necessary set to summer time Summer time setting is off by default Touch Summer Time to change the setting if you are in the summer time period 6 Touch Time format Each time you touch the key changes that set ting 24 h...

Страница 51: ... Regional Settings screen appears 3 Touch Speed The Average Speed Settings screen ap pears 4 Touch or to set the speed p The estimated time of arrival is not necessa rily estimated based on this speed value 5 Touch OK The settings are completed Setting the keyboard layout You can select the type of keyboard to be used for inputting characters 1 Display the Settings Menu screen For details of the o...

Страница 52: ...g the POI icon the system displays it on the map screen 1 Display the Settings Menu screen For details of the operations refer to Dis playing the Settings Menu screen on page 49 2 Touch Map The map setting screen appears 3 Touch Overlay POI The Overlay POI screen appears 4 Touch Display to change the setting to On p If you do not want to display the POI icon on the map touch Display to turn it Off...

Страница 53: ...ween 2D and 3D on page 19 1 Display the Settings Menu screen For details of the operations refer to Dis playing the Settings Menu screen on page 49 2 Touch Map The map setting screen appears 3 Touch View Mode Each time you touch the key changes that set ting 2D default Displays the 2D map screen 3D Displays the 3D map screen Displaying manoeuvres Selects whether to display or hide manoeuvres on th...

Страница 54: ... a junction 1 Display the Settings Menu screen For details of the operations refer to Dis playing the Settings Menu screen on page 49 2 Touch Map The map setting screen appears 3 Touch Close Up View Each time you touch the key changes that set ting On default Switches to an enlarged map Displays the close up view with the 2D map Off Does not switch to an enlarged map Setting the Favourites icon di...

Страница 55: ...ime you touch the key changes that set ting On default Displays Eco Meter on the map Off Hides Eco Meter on the map Setting the speed limit display Selects whether to display or hide the speed limit of the current road Speed Limit 1 Display the Settings Menu screen For details of the operations refer to Dis playing the Settings Menu screen on page 49 2 Touch Map The map setting screen appears 3 To...

Страница 56: ... Connection screen appears 1 2 3 1 Status Indicates the connection status of the GPS aerial the reception sensitivity and from how many satellites the signal is received Colour Signal com munication Used in posi tioning Orange Yes Yes Yellow Yes No 2 Handbrake When the handbrake is applied On is dis played When the handbrake is released Off is displayed 3 Illumination When the headlights or small ...

Страница 57: ...changes that set ting On You can export your track log to the SD memory card Off default You cannot export your track log to the SD memory card p While the setting is On the navigation system continues to store the track logs in the inserted SD memory card 5 Touch Type Each time you touch the key changes that set ting Private default Changes the track log attribute to Private Business Changes the ...

Страница 58: ... situa tions and the cleared contents are different for each method For the contents that are cleared in each method see the list presented later For detailed information about the items which would be erased refer to Setting items to be deleted on page 60 Method 1 Press the RESET button For details refer to Resetting the micro processor on page 5 Method 2 Touch F Reset For details refer to Restor...

Страница 59: ...een For details of the operations refer to Dis playing the Settings Menu screen on page 49 2 Touch and hold F Reset The Clear Data Setting screen appears 3 Touch Clear user information Touching Clear user information displays the confirmation message for clearing the memory Touch Reset Various settings registered to the navigation sys tem are reset to the default or factory settings 4 Touch Yes Th...

Страница 60: ...1 Last cursor position on the map screen 1 1 1 Route Setting Current route 1 Guidance state of the current route 1 1 Vehicle position information 1 1 1 Route info 1 1 1 Navigation Menu Point registered in Favourites 1 Sorting order selected in Fa vourites 1 1 History 1 Fuel details 1 1 1 Driving data of Eco Graph 1 1 1 Eco Settings 1 1 1 Settings Menu UI Language Voice Language 1 1 Time 1 1 Set Ho...

Страница 61: ...utomatically returns to the navigation screen When news or traffic announcement is received When the news programme interruption or traffic announcement standby function is acti vated in the AV receiver and such information is broadcast from an RDS station the AV re ceiver tunes to that station and informs the re ception by the Audio information bar When the rear view camera is activated The AV re...

Страница 62: ... the navigation system is ready Wait until the navigation screen reap pears You cannot position your vehicle on the map without a significant positioning error The GPS aerial is in an unsuitable location The quality of signals from the GPS satellites is poor causing reduced positioning accu racy Check the GPS signal reception and the position of the GPS aerial if necessary Obstacles are blocking s...

Страница 63: ... consult the dealer that installed the system Eco Graph is not available The navigation system is unable to obtain past average fuel mileage data so Eco Graph cannot be dis played Drive about 10 km on a road without obstruc tions Then park your vehicle in a safe place turn off the navigation system and turn the power to the navigation system back on The map colour does not switch automatically bet...

Страница 64: ...are in an area where no road exists e g a mountain and the route calculation is impossible Set a destination and waypoint s on roads Reset the destination after you drive the ve hicle to any road Route to destination cannot be calculated The destination or waypoint s are in an isolated island etc without a ferry and the route calculation is im possible If there is no road con nected to your starti...

Страница 65: ...t if signal quality is poor only two dimen sions latitude and longitude can be obtained and positioning errors are somewhat greater Map matching As mentioned the positioning systems used by this navigation system are susceptible to certain errors Their calculations may on occa sion place you in a location on the map where no road exists In this situation the processing system understands that vehi...

Страница 66: ...because this may block the reception of GPS signals p If a GPS signal have not been received for a long time your vehicle s actual position and the current position mark on the map diverge considerably or do not be updated In such case once GPS reception is re stored accuracy will be recovered Conditions likely to cause noticeable positioning errors For various reasons such as the state of the roa...

Страница 67: ...with many height changes If you enter or exit a multi storey car park or similar structure using a spiral ramp If your vehicle is turned on a turntable or si milar structure If trees or other obstacles block the GPS signals for a considerable period If you drive very slowly or in a start and stop manner as in a traffic jam If you join the road after driving around a large car park Engb 67 Appendix...

Страница 68: ...need to take a certain street set a waypoint on that street If the destination is too far there may be in stances where the route cannot be set During voice guidance turns and intersec tions from the motorway are announced However if you pass intersections turns and other guidance points in rapid succes sion some may delay or not be announced It is possible that guidance may direct you off a motor...

Страница 69: ...ory card you use this navigation system may not recognise the storage device or files may not be played back properly This system is not compatible with Multi Media Card MMC For details about SD memory card compat ibility with this navigation system refer to Specifications on page 73 SD and SDHC logo SD Logo is a trademark of SD 3C LLC SDHC Logo is a trademark of SD 3C LLC Engb 69 Appendix Appendi...

Страница 70: ... details 45 45 Eco Graph 22 Route info 35 Cpy Setting 58 Data In Out 43 46 Settings Menu screen Page Sound 49 Region 49 UI Language Voice Language 49 Time 50 km mile 50 Speed 51 Keyboard 51 Map 52 Overlay POI 52 View Mode 53 Show Manoeuvre 53 Day Night Display 53 Road Colour 54 Close Up View 54 Favourites Icon 54 Show Speed Limit 55 Current Street 54 Eco Meter 55 Service Info 55 Set Home 41 Locati...

Страница 71: ... Settings Menu screen Page Connection 56 Demo Mode 56 Drive Log 57 Safe Mode 57 F Reset 58 Engb 71 Appendix Appendix Appendix ...

Страница 72: ...y the yellow flag icon Home location Your registered home location Point Of Interest POI Any of a range of locations stored in the data such as railway stations shops restaurants and amusement parks Route setting The process of determining the ideal route to a specific location route setting is done auto matically by the system when you specify a destination Set route The route marked out by the s...

Страница 73: ...m Reception frequency 1 575 42 MHz Sensitivity 140 dBm typ Position update frequency Approx once per second GPS aerial Aerial Micro strip flat aerial right handed helical polarisation Aerial cable 3 55 m Dimensions W H D 33 mm 14 7 mm 36 mm Weight 96 g USB USB standard spec USB 2 0 High Speed Max current supply 500 mA File system FAT16 FAT32 USB class Mass storage class SD Compatible physical form...

Страница 74: ...Engb 74 ...

Страница 75: ...Engb 75 ...

Страница 76: ...RONICS USA INC P O Box 1540 Long Beach California 90801 1540 U S A TEL 800 421 1404 PIONEER EUROPE NV Haven 1087 Keetberglaan 1 B 9120 Melsele Belgium Belgique TEL 0 3 570 05 11 Published by Pioneer Corporation Copyright 2010 by Pioneer Corporation All rights reserved CRB3377 A UW KMZZX 10C00000 ...

Отзывы: