background image

49

En

10

Setting up the remote to control 
your TV

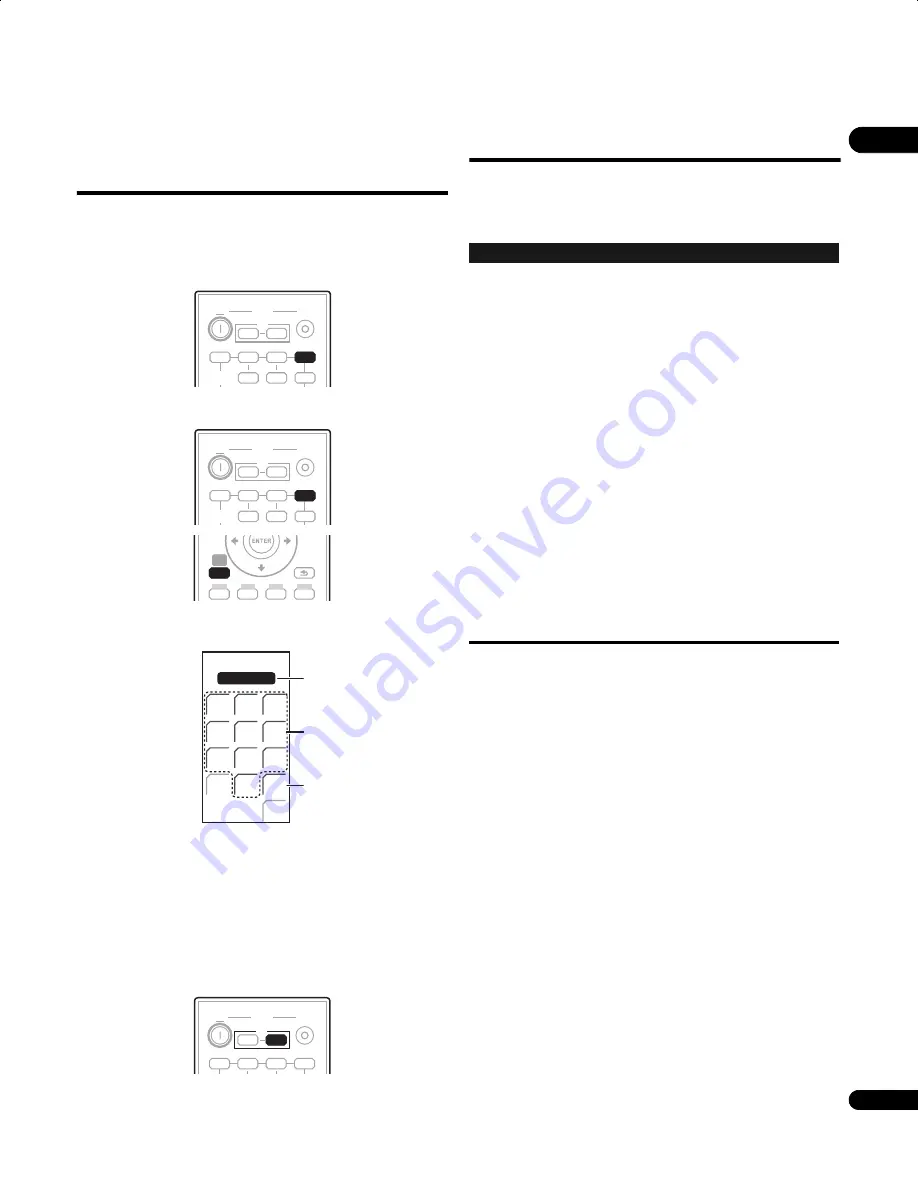
You can use the supplied remote to control your TV. To be able to use 
this feature you first have to program the remote with a maker code 
from the table on the following page.

1

Set the input to TV.

2

Press and hold the TV button and press SETUP.

The TV preset screen is shown on the remote control, and the 
current maker code is displayed on the LCD screen.


3

Use the number buttons to input the maker code for your 

TV, and press ENTER.

See the table on the next page for the list of maker codes. If there is 
more than one code given for your make, input the first one in the 
list.

• If the maker’s name of your TV doesn’t appear in the table, you 

will not be able to use this remote to control your TV.

4

Point the remote towards your TV and press TV 

 to check 

that the remote works with your TV.

If the remote is set up correctly, the TV should switch off. If it doesn’t 
and there is another code given for your maker, repeat step 

2

 with a 

new code.

TV Preset code list

Please note that there are cases where only certain functions may 
be controllable after assigning the proper preset code, or the codes 
for the manufacturer in the list will not work for the model that you 
are using.

INPUT

BD

DVR

DVD

TV

FM / AM

ON

SYSTEM

INPUT

SELECT

OFF

HDMI 1

HDMI 2

HDMI 3

TV

TV

INPUT

BD

DVR

DVD

TV

FM / AM

ON

SYSTEM

INPUT

SELECT

OFF

HDMI 1

HDMI 2

HDMI 3

TV

TV

SETUP

HOME
MENU

RETURN

SETUP

TV  PRESET

3 5 1

EXIT

ENTER

CLEAR

1

2

3

4

5

6

7

8

0

9

Maker code

Number buttons

ENTER

INPUT

BD

DVR

DVD

TV

ON

SYSTEM

OFF

HDMI 1

HDMI 2

HDMI 3

TV

TV

Manufacturer 

Code(s)

Manufacturer 

Code(s)

AIWA

 006

AKAI

 009, 010

ALBA

 011

BESTER

 015

BLAUPUNKT

 016, 017

BLUE


SKY

 018

BRANDT

 019

BUSH

 022

CLATRONIC

 023

DAEWOO

 035, 036, 037

DUAL

 039, 040

FERGUSON

 048, 049, 050

FIRSTLINE

 051

FISHER

 053

FRABA

 054

FUNAI

 056, 058, 059

GOLDSTAR

 070

GOODMANS

 071, 072, 073

GRUNDIG

 074, 075, 076

ICE

 084

IRRADIO

 085

ITT

 086, 087

JVC

 093, 094, 095, 096

KENDO

 098

LOEWE

 103, 104, 105

MARK

 116

MATSUI

 117, 118

MEDION

 119

MITSUBISHI

 123, 124, 125

MIVER

 127

NEC

 130

NOKIA

 086, 087, 132, 133, 134, 135, 136

NORDMENDE

 137, 138, 139

OCEANIC

 135, 136

OKANO

 140

ONWA

 141

PANASONIC

 146, 147

PHILIPS

 155

PHONOLA

 157

RADIO

 163

RADIOLA

 168

SABA

 176, 177, 178, 179, 180

SAMSUNG

 185, 186

SANYO

 190, 191, 192, 193, 194

SCHNEIDER

 199, 200, 201, 202

SHARP

 208, 209

SIEMENS

 212

SONY

 215

TATUNG

 221

TELEFUNKEN

 222, 223, 224, 225

THOMSON

 226, 227

THORN

 228

TOSHIBA

 231, 232

UNIVERSUM

 235

W.HOUSE

 239

WATSON

 244

YAMAHA

 245, 246, 247, 248, 249

PIONEER

 001, 002

LX01BD_1.book  Page 49  Tuesday, September 2, 2008  12:33 PM

Содержание AS-LX71

Страница 1: ...Operating Instructions Blu ray Disc Home Cinema System Audio Multi channel Receiver Subwoofer Satellite Speaker Blu ray Disc Player Accessory Box SX LX70SW SSP LX70ST SBDP LX08 AS LX71 ...

Страница 2: ... 2 1 7a_A_En Operating Environment Operating environment temperature and humidity 5 ºC to 35 ºC 41 ºF to 95 ºF less than 85 RH cooling vents not blocked Do not install this unit in a poorly ventilated area or in locations exposed to high humidity or direct sunlight or strong artificial light D3 4 2 1 7c_A_En WARNING The voltage of the available power supply differs according to country or region B...

Страница 3: ... ASTA mark or the BSI mark on the body of the fuse If the plug contains a removable fuse cover you must ensure that it is refitted when the fuse is replaced If you lose the fuse cover the plug must not be used until a replacement cover is obtained A replacement fuse cover can be obtained from your local dealer If the fitted moulded plug is unsuitable for your socket outlet then the fuse shall be r...

Страница 4: ...eries correctly you will help to save valuable resources and prevent any potential negative effects on human health and the environment which could otherwise arise from inappropriate waste handling For more information about collection and recycling of old products and batteries please contact your local municipality your waste disposal service or the point of sale where you purchased the items Th...

Страница 5: ... system Effective Sound for optimum sound 30 Auto listening mode 30 Listening in surround sound 30 Dolby Pro Logic II Music settings 31 Center image setting 31 Using Advanced Surround 31 Using Front Stage Surround Advance 32 Listening in stereo 32 Genre Sync Mode 32 Using the Sound Retriever 32 Listening with MCACC Effect 33 Using Midnight Loudness and Quiet listening modes 33 Adjusting the bass a...

Страница 6: ... amp mode 47 10 Additional information Dimming the display 48 Setting the sleep timer 48 Setting up the remote to control your TV 49 TV Preset code list 49 Resetting the system 50 Installation and maintenance 50 Hints on installation 50 Surround sound formats 50 Dolby 50 DTS 51 Troubleshooting 52 General 52 Tuner 53 HDMI 53 Displayed Messages 53 Specifications 54 Section Two Operating instructions...

Страница 7: ...enna page 13 Microphone for Auto MCACC setup page 26 HDMI cables x2 page 14 43 45 Control cable page 14 Display cable page 13 Optical digital cable page 14 iPod cable page 42 Warranty card Setup Guide These operating instructions Receiver subwoofer SX LX70SW box Cleaning cloth Speakers SSP LX70ST box Speakers front center x2 surround x2 page 8 13 Speaker cables x6 page 13 Speaker bases x4 page 8 N...

Страница 8: ...peaker bases that can be used to adjust the speakers to the design of the room in which they are placed Using the supplied speaker bases 1 Attach the non skid pads to the speaker bases as shown below Use the adhesive side of the pads to attach them to the base of each speaker base 2 Attach the speaker bases Place the speaker atop a supplied speaker base and fix the base in place by using one of th...

Страница 9: ...eaker to fall and cause damage or bodily injury All speakers supplied with this system are magnetically shielded However depending on the installation location color distortion may occur if a speaker is installed extremely close to the screen of a television set If this happens turn the power switch of the television set OFF and turn it ON after 15 min to 30 min If the problem persists place the s...

Страница 10: ...Out jack 5 DIGITAL OPTICAL IN jacks x2 To listen to optical digital audio change the input to Digital 1 or Digital 2 When the digital output jacks of your TV are connected to these jacks set TV Input see page 40 6 AM LOOP antenna terminal 7 FM antenna socket 8 ANALOG AUDIO IN jacks Handle sound from an external component by using stereo audio code To listen to analog audio change the input to Anal...

Страница 11: ...etc 3 VIDEO OUT terminals VIDEO Connect with the video input terminal on a TV S VIDEO Connect with the S Video input terminal on a TV COMPONENT VIDEO Connect with the component video input terminals on a TV 4 AC IN Connect the power cord here 5 HDMI OUT terminal Connect to the HDMI IN 1 jack of the receiver subwoofer with the supplied HDMI cable 6 DIGITAL OUT OPTICAL jack Connect with the digital ...

Страница 12: ...na FM antenna Front center speaker L Front center speaker R Listening position Surround speaker L Surround speaker R Important When connecting this system or changing connections be sure to switch power off and disconnect the power cord from the wall socket After completing all connections connect the power cords to the wall socket WARNING Pioneer bears no responsibility for accidents resulting fr...

Страница 13: ...xtended and not coiled or hanging at the rear of the unit 4 Connect each speaker Each speaker cable has a color coded connector at one end and two wires at the other end Twist and pull off the protective shields on each wire Connect the wires to the speaker Each speaker in the illustration can be identified by means of the color coded indicator provided on the rear surface model label Match the co...

Страница 14: ...ct the TV s audio output to DIGITAL OPTICAL IN 1 on the receiver subwoofer To use the HDMI Control function when you are connected to a supported Pioneer Flat Screen TV you must connect via HDMI You must first set TV Input to switch the audio from a Flat Screen TV with the HDMI Control function or to switch the input source of this unit to TV audio and operate your TV with the supplied remote cont...

Страница 15: ...subwoofer Connect each power cord to a wall socket in the following order 1 Blu ray disc player 2 Receiver subwoofer 3 TV Run the cords that are connected to the side panel of the receiver subwoofer over the back side of the unit and replace the cover on the side panel Note Do not use any power cord other than the one supplied with this system Do not use the supplied power cord for any purpose oth...

Страница 16: ...icators STEREO Lights when the Stereo mode is selected or when a stereo source is being played back in the Auto listening mode page 32 F S SURR Lights when one of the Front Stage Surround Advance listening modes is selected page 32 ADV SURR Lights when one of the Advanced Surround listening modes is selected page 31 3 2 PRO LOGIC II Lights during Dolby Pro Logic II decoding page 31 4 Sound process...

Страница 17: ...dden behind the front panel door 1 STANDBY ON Press to switch the Blu ray disc player on into standby 2 HDMI indicator This lights when an HDMI compatible device is connected page 91 3 Disc tray 4 FL OFF indicator This lights when Off is selected with FL DIMMER 5 OPEN CLOSE Press to open and close the disc tray 6 PLAY Press to start playback 7 STOP Press to stop playback 8 Front panel display Disp...

Страница 18: ...HDMI 3 when a separately sold Pioneer DVD player is connected The remote control switches to the DVD player operating mode The DVD player s power can be switched between on and standby using the button below TV Switches to the input selected at TV Input setup page 40 FM AM Switches between FM and AM bands page 34 5 LCD touch screen Displays the buttons used to control external components such as a...

Страница 19: ...o restore CD quality sound to compressed audio sources page 32 18 DIRECT Use to switch on off the Effective Sound mode page 30 19 LINE Press repeatedly to select one of the receiver subwoofer s audio inputs Digital 1 Digital 2 Analog iPod or Front Audio In page 42 20 MCACC Starts the Auto MCACC setup page 26 21 TEST TONE Use to output the test tone for speaker setup page 39 22 SOUND Press to acces...

Страница 20: ... BD ROM on which secondary audio is recorded press to switch to the secondary audio page 70 14 2nd VIDEO When playing a BD ROM on which secondary video Picture in Picture is recorded press to switch to the secondary video page 70 15 OPEN CLOSE Press to open and close the disc tray 16 Number buttons Use these to select and play the title chapter track you want to watch or listen to and to select it...

Страница 21: ...2 Number buttons TV External input mode Selects a channel Teletext mode Selects a page 13 TV DTV For Pioneer Flat Screen TV only Switches the mode among TV and DTV 14 P TV External input mode Selects a channel 15 INPUT Selects an input source of the Flat Screen TV 16 MUTE Mutes the sound 17 TV VOL Sets the volume The following only apply to Pioneer Flat Screen TVs 18 Jumps to Teletext subtitle pag...

Страница 22: ... to navigate all on screen displays Press ENTER to select the currently highlighted option While watching D TV press ENTER to display the Channel List screen 7 HOME MENU Press to display the Home Menu from which you can navigate many functions of the system 8 RETURN Press to go back one level in the on screen menu or display Also press to exit the MHEG application 9 GUIDE Plus Action buttons Use w...

Страница 23: ... a GUIDE Plus screen use for One Button Record STOP REC Press to stop recording 18 REC MODE Press repeatedly to change the recording mode picture quality 19 HELP Press for help on how to use the current GUI screen 20 TIMER REC Press to set a timer recording 21 TIMER ON OFF This button cannot be used for an HDD DVD recorder 22 Number buttons Use the number buttons for track chapter title selection ...

Страница 24: ... Press to start or resume playback Press to stop playback you can resume playback by pressing Press to pause playback press again to restart Press to skip to the previous or next title chapter track folder or to display the previous or next menu page Press to start reverse or forward scanning Press again to change the speed While paused press and hold to start slow motion playback Press repeatedly...

Страница 25: ... governmental regulations or environmental public instruction s rules that apply in your country area WARNING Do not use or store batteries in direct sunlight or other excessively hot place such as inside a car or near a heater This can cause batteries to leak overheat explode or catch fire It can also reduce the life or performance of batteries Using the remote control Please keep in mind the fol...

Страница 26: ... After you have set up the microphone provided the system uses the information from a series of test tones to measure standing wave and reverb optimizing the speaker settings and equalization MCACC Effect for your particular room Important The test tones used for Auto MCACC setup are loud however do not turn the volume down during setup as this may result in a sub optimal setup Make sure the micro...

Страница 27: ... final settings may be incorrect Check for household appliances air conditioner fridge fan etc that may be affecting the environment and switch them off if necessary Some older TVs may interfere with the operation of the mic If this seems to be happening switch off the TV during Auto MCACC setup If Complete doesn t appear it is likely an error occurred during the setup Please check all connections...

Страница 28: ...urns on and off each time the LIGHT button is pressed The illumination automatically turns off after 30 seconds The LCD touch screen s display turns off after one minute To have the display shown once again either touch the LCD or press a button on the remote control Watching a Blu ray disc DVD Remember that when using the remote to control the supplied Blu ray disc player you should point the rem...

Страница 29: ...emote control to FM AM mode 3 Tune to a station page 34 The LCD screen changes to that for the radio and you can then operate the desired component 4 Adjust the volume BD 1 2 BD 1 2 VOL MUTE GUIDE INFO VOL SYSTEM SYSTEM CONTROL TV VOL SYSTEM INPUT BD DVR DVD TV ON SYSTEM OFF HDMI 1 HDMI 2 HDMI 3 TV ON SYSTEM BD 1 2 BD DVR DVD TV FM AM INPUT SELECT HDMI 1 HDMI 2 HDMI 3 BD HDMI 1 BD 1 2 VOL MUTE GUI...

Страница 30: ... mode can be turned off activating Direct mode by doing the following Press DIRECT to switch to Direct Sound Press this button to switch between Effective Sound and Direct Sound When Direct Sound is selected the DIRECT indicator lights Auto listening mode The Auto listening mode is the simplest way to listen to any source as it was mastered the output from the speakers mirrors the channels in the ...

Страница 31: ...rm Center image setting When listening to two channel sources in Neo 6 Music mode see page 30 you can also adjust the center image effect Adjusts the center image to create a wider stereo effect with vocals 1 Press SOUND when Neo 6 Music mode is active 2 Select Center Image Use to select then press ENTER 3 Adjust the setting Use to select then press ENTER to confirm Adjust the effect from 0 all ce...

Страница 32: ...rol function you can make use of the Genre Sync Mode to have the listening mode automatically change to that which best matches the genre of the contents playing from the recorder Set the HDMI Mode to AMP Mode page 43 Press GENRE when listening to media contents from a recorder The most appropriate listening mode is selected and shown in the display When the related genre could not be determined N...

Страница 33: ...ms you cannot select a mode other than Bass Treble Adjusting the bass and treble Use the bass and treble controls to adjust the overall tone 1 Press SOUND to open the sound menu 2 Select Tone Use to select then press ENTER 3 Select Bass Treble Use to select then press ENTER Selecting Bass Treble cancels the Midnight Loudness and Quiet listening modes These modes cannot be used at the same time 4 U...

Страница 34: ...ntil you reach the frequency you want If necessary fine tune the frequency using the manual tuning method Improving poor FM reception If you re listening to an FM station in stereo but the reception is weak you can improve the sound quality by switching to mono 1 Press SETUP after tuning to an FM radio station 2 Select Tuner Setup Use to select then press ENTER 3 Select FM Auto Mono Use to select ...

Страница 35: ...arm and No Type Alarm and Test are used for emergency announcements You can t search for these but the tuner will switch automatically to this RDS broadcast signal No Type appears when a program type cannot be found Displaying RDS information You can display the different types of RDS information available Press DISPLAY to display the RDS information Each press changes the display as follows Radio...

Страница 36: ...d above 1 Press FM AM to select the FM band 2 Press DISPLAY repeatedly until Search appears in the display 3 Select the program type you want to hear Use to select 4 Press ENTER to start the search The system searches the station presets for a match If it finds one searching stops for five sec 5 If you want to keep listening to the station press ENTER within the five seconds If you don t press ENT...

Страница 37: ...en press ENTER 4 Use to select a channel or use to adjust the level of that channel You can adjust the level of each channel by 10 dB 5 Press ENTER once when you re finished If you use the Auto MCACC feature again it will overwrite the settings you have made here Note When this function is set while MCACC Effect is on the value for the same function adjusted with the Auto MCACC feature is overwrit...

Страница 38: ...ment feature is available on the Blu ray disc player see Adjusting the Audio DRC on page 80 Dual mono setting Specifies how dual mono encoded Dolby Digital soundtracks should be played You can also use this setting to switch the audio channel on DVD RW discs recorded with bilingual audio 1 Press SETUP 2 Select Sound Setup Use to select then press ENTER 3 Select Dual Mono Use to select then press E...

Страница 39: ...aker in turn allowing you to adjust the level as it plays You can also adjust the channel levels for surround sound using test tone 1 Carry out tone testing Press TEST TONE The test tone is output from each speaker in turn Adjust the volume level below 50 2 Adjust the channel level of a tune while it is playing Use to adjust The aim is to adjust the levels so that you hear the test tone at the sam...

Страница 40: ...utput settings on the TV For details consult the operating instructions for your TV Audio input settings from TVs TV Input To listen to audio from a Flat Screen TV on this device you will need to connect an audio cable other than an HDMI cable From this menu set the audio input to that which you would like to connect Press TV on the remote control to switch this unit to the input source selected h...

Страница 41: ...nal components when not using it for sound input from a TV Connecting an analog audio component You can use the ANALOG AUDIO IN jacks to connect an analog audio component such as a tape player You can use the F AUDIO input jack on the display unit to easily playback audio from a digital audio player or PC Use a stereo mini plug cable to connect a source to the display unit When you connect a cable...

Страница 42: ...loop antenna connected For an external FM antenna use a PAL connector to hook up an external FM antenna About control out connections Many Pioneer components support CONTROL connections by which you can use the remote controls of any connected components by aiming them at the sensor of just one component When you use a remote control the control signal is passed along the chain to the appropriate ...

Страница 43: ...tput from your TV or Flat Screen TV no sound will be heard from this receiver If the video signal does not appear on your TV or Flat Screen TV try adjusting the resolution settings on your component or display Note An HDMI connection can only be made with DVI equipped components compatible with both DVI and High Bandwidth Digital Content Protection HDCP If you choose to connect to a DVI connector ...

Страница 44: ... delay settings manually page 33 About HDMI HDMI High Definition Multimedia Interface supports both video and audio on a single digital connection for use with DVD players DTV set top boxes and other AV devices HDMI was developed to provide the technologies of High bandwidth Digital Content Protection HDCP as well as Digital Visual Interface DVI in one specification HDCP is used to protect digital...

Страница 45: ...ot support HDMI Control We cannot guarantee this unit will work with HDMI Control compatible components other than those made by Pioneer Making the HDMI Control connections You can use synchronized operation for a connected Flat Screen TV and up to three other components including a maximum of two players or recorders Be sure to connect the Flat Screen TV s audio cable to the audio input of this u...

Страница 46: ... set this unit s HDMI Control function On or Off You will need to set it to Control On to use the HDMI Control function When using a TV not manufactured by Pioneer put this setting to Control Off 1 Press SETUP 2 Select HDMI Setup Use to select then press ENTER 3 Select HDMI Ctrl Use to select then press ENTER 4 Adjust the setting Use to adjust then press ENTER to confirm Control On Enables the HDM...

Страница 47: ...you to synchronize the following operations Displays on the Flat Screen TV when you mute or adjust the volume of this unit The input of this unit is automatically changed when playback occurs on a connected component Even if you change this unit s input to a device that is not connected by HDMI the synchronized amp mode remains in effect Canceling synchronized amp mode If you cancel synchronized a...

Страница 48: ...mer The sleep timer switches off the receiver subwoofer after a specified time so you can fall asleep without worrying about it Press SLEEP to select an option Choose between the following options Sleep On Switches off after about an hour Sleep Off Cancels the sleep timer After selecting Sleep On you can press SLEEP again to check how much time is left Each line indicates approximately 12 minutes ...

Страница 49: ...he codes for the manufacturer in the list will not work for the model that you are using INPUT BD DVR DVD TV FM AM ON SYSTEM INPUT SELECT OFF HDMI 1 HDMI 2 HDMI 3 TV TV INPUT BD DVR DVD TV FM AM ON SYSTEM INPUT SELECT OFF HDMI 1 HDMI 2 HDMI 3 TV TV SETUP HOME MENU RETURN SETUP TV PRESET 3 5 1 EXIT ENTER CLEAR 1 2 3 4 5 6 7 8 0 9 Maker code Number buttons ENTER INPUT BD DVR DVD TV ON SYSTEM OFF HDM...

Страница 50: ...five full range channels and a special LFE low frequency effects channel used mainly for deep rumbling sound effects hence the term 5 1 channel Dolby Digital In addition to the format features above Dolby Digital decoders offer downmixing for compatibility with mono stereo and Dolby Pro Logic audio from a number of bit rates and channels Another feature called Dialog Normalization attenuates progr...

Страница 51: ...nsmittance during playback DTS ES DTS ES the ES stands for Extended Surround is a decoder that is capable of decoding both DTS ES Discrete 6 1 and DTS ES Matrix 6 1 encoded sources DTS ES Discrete 6 1 gives true 6 1 channel sound with a completely separate discrete surround back channel DTS ES Matrix 6 1 has a surround back channel matrixed into the surround left right channels Both sources are al...

Страница 52: ...cing Do not block the air intake opening on the bottom as well as the air exhaust opening on the back of this unit No sound is output when an input function is selected When playing back a source on the supplied Blu ray disc player make sure that the settings for Audio Out page 82 and the HDMI under HDMI Audio Out page 83 are all at their default values If you re using the line input make sure the...

Страница 53: ...that this unit s HDMI Control mode is set to Control On page 46 Check whether the connected component supports HDMI Control or not For more information refer to the operating instructions of your Flat Screen TV HDD DVD recorder DVD player etc This unit does not guarantee HDMI Control compatible components other than those made by Pioneer Message Description 192kHz PCM SACD DTS HD DTS Express Dolby...

Страница 54: ...r your dealer for servicing Message Description Model SX LX70SW Rated voltage AC 220 V to 240 V Rated frequency 50 Hz 60 Hz Power consumption 69 W Power consumption standby 0 39 W HDMI Control ON 0 29 W HDMI Control OFF Weight 17 8 kg External dimensions including projecting parts 245 mm W x 409 mm H x 600 mm D Tolerable operating temperature 5 C to 35 C Tolerable operating humidity 5 to 85 no con...

Страница 55: ...s 4 Note Specifications and design subject to possible modification without notice due to improvements Model SSP LX70ST Front center speakers Enclosure Closed box bookshelf type magnetically shielded System 5 2 cm 1 way system Speakers 5 2 cm cone type x3 Nominal impedance Front channel 8 Ω Center channel 8 Ω Frequency range 200 Hz to 20 kHz Maximum input power Front channel 50 W Center channel 50...

Страница 56: ... Section Two Blu ray Disc Player SBDP LX08 ...

Страница 57: ...dio and video Adjusting the video 79 Adjusting the Audio DRC 80 05 Advanced settings Changing the settings Initial Setup 81 Operating the Initial Setup screen 81 Changing to other language at language setting 84 Changing the speaker setup 85 Adjusting the output level of the various speakers Channel Level 85 Registering or Changing the password 86 Changing the Age Restriction for watching BD ROMs ...

Страница 58: ...n the disc label package or jacket can be played Disc type Logo Application format BDMV1 1 Including the AVCHD format BDAV DVD Video DVD VR CD DA DTS CD DATA DISC2 2 Discs on which movie files or music files are recorded BD BD ROM BD R BD RE DVD DVD ROM DVD R DVD R DL Dual Layer DVD RW DVD R DVD RW CD CD DA Music CD CD R CD RW CD ROM ...

Страница 59: ...l Out are trademarks of DTS Inc 1996 2007 DTS Inc All Rights Reserved Playing BDs BDs BDMV compatible with the formats below can be played Blu ray Disc Read Only ROM Format Version 2 Blu ray Disc Recordable R Format Version 2 Blu ray Disc Rewritable RE Format Version 3 This player supports BD ROM Profile 1 Version 1 1 BONUSVIEW Functions such as playback of secondary video Picture in Picture and s...

Страница 60: ...ion settings or environment Record discs in the proper format For details contact the dealer Playable files Movie and music files recorded on DVDs and CDs can be played Caution In DVD only the one recorded by the ISO 9660 file system can be played Some files may not be playable For some files it may not be possible to use certain functions during playback It may not be possible to play some files ...

Страница 61: ... Corporation in the United States and or other countries This product includes technology owned by Microsoft Corporation and cannot be used or distributed without a license from Microsoft Licensing Inc MPEG 1 Audio Layer 3 MP3 Bit rate Up to 320 kbps Sampling frequencies 8 kHz 11 025 kHz 12 kHz 16 kHz 22 05 kHz 24 kHz 32 kHz 44 1 kHz and 48 kHz Playable file extensions Movie files divx and avi Mus...

Страница 62: ...ngs are imported from the Pioneer Flat Screen TV s language settings before Setup Navigator begins 4 Select and set the video and audio output terminals Select the actually connected video and audio output terminals This system uses the HDMI terminal Use to select HDMI for both Video and Audio then press ENTER Proceed to Step 5 When Component Video is selected for Video proceed to step 6 When S Vi...

Страница 63: ... ENTER For details on the resolution settings see Switching the output video resolution on page 65 7 Select the aspect ratio of your TV Use to select then press ENTER 8 Check the settings Select Proceed then press ENTER 9 Output test tones Use to select Yes then press ENTER Caution The screen in step 10 and test tones are output simultaneously according to the settings in steps 4 to 7 Lower the vo...

Страница 64: ...ray The items that can be selected depend on the player s status To close the TOOLS menu Press TOOLS or RETURN TOOLS menu item list Setup Navigator BD PLAYER Setup is complete The setup menu comes back in 30 seconds Finish Go Back PAGE TOPMENU DISC NAVIGATOR DISPLAY LIGHT TOOLS MENU TOOLS Video Adjust Audio DRC Add to HMG Playlist Audio Subtitle BD PLAYER TOOLS Item Description Output Video Resolu...

Страница 65: ...ile when the video output terminal is switched When the HDMI OUT terminal is selected no video signals are output from the other video output terminals When a video output terminal other than the HDMI OUT terminal is selected no video signals are output from the HDMI OUT terminal However audio signals are output Switching the output video resolution Use the procedure below to switch the output vid...

Страница 66: ...ting lights on the front panel display page 17 About Film material The film material is a video signal with a frame rate of 24 frames second For example these materials include 1080 24p 720 24p etc To output film material To output 1080 24p film material from the HDMI output terminal set the output video resolution to either Auto or Source Direct Caution 1080 24p signals can only be output from th...

Страница 67: ...e password registered in the player s settings to unlock the parental lock For details see page 87 For some BD R RE playback protection is set for the disc or titles Input the code number set for the disc to unlock the protection If the disc menu is displayed For some discs the disc menu is displayed automatically when playback starts The contents of the disc menu and the way to operate differ fro...

Страница 68: ...s ahead to the beginning of the next title chapter track file When is pressed the disc skips back to the beginning of the currently playing title chapter track file Press twice to skip back to the beginning of the previous title chapter track file Note There are some discs for which skipping is not possible Playing in slow motion During playback press or LCD page 1 The speed switches each time the...

Страница 69: ...ge 84 Switching the subtitles For discs or files on which multiple subtitles are recorded the subtitles can be switched during playback During playback press LCD page 1 The current subtitle and total number of recorded subtitles are displayed on the TV screen and on the player s front panel display When pressed again the subtitle switches The subtitles can also be switched using The subtitles can ...

Страница 70: ... During playback press 2nd VIDEO LCD page 1 The current secondary video stream and total number of recorded secondary video streams are displayed on the TV screen and on the player s front panel display When pressed again the secondary video stream switches The secondary video streams can also be switched using The secondary video streams can also be switched by selecting Secondary Video from the ...

Страница 71: ...scs for which Time Search is not available Playing a specific title chapter or track Search 1 Press PLAY MODE to display the Play Mode screen The Play Mode screen can also be displayed by selecting Play Mode from the TOOLS menu 2 Select the type of search Use to select then press ENTER See the table on page 74 for the search types BD 2 2 ENTER CLEAR 1 2 3 4 5 6 7 8 0 9 PLAY MODE RESO VIDEO ADJ BD ...

Страница 72: ...se to select then press ENTER 3 Select the starting point for A B Repeat Use to select A Start then press ENTER 4 Select the end point for A B Repeat Use to select B End then press ENTER A B Repeat playback starts To cancel A B Repeat play Select Off from the Repeat Random screen then press ENTER During playback press stop or CLEAR Note A B Repeat play is canceled in the following cases When the a...

Страница 73: ...t other repeat or random play Playing in random order Random Play Use this procedure to play the tracks or files in random order 1 During playback press PLAY MODE to display the Play Mode screen The Play Mode screen can also be displayed by selecting Play Mode from the TOOLS menu 2 Select Repeat Random Use to select then press ENTER 3 Select the Random Play Use to select then press ENTER To cancel...

Страница 74: ...track repeatedly A B Repeat Playing a title repeatedly Title Repeat Playing a chapter repeatedly Chapter Repeat Playing a track or file repeatedly Track Repeat Playing all the titles tracks or files on the disc repeatedly All Repeat 3 3 The original titles are played repeatedly However the playlist titles cannot be played repeatedly 4 4 The files in the folder are played repeatedly 5 5 The files i...

Страница 75: ... discs have playback protection To cancel the protection input the password set for the disc To play DVD R RW VR format playlists switch to the playlist using the Original Play List command on the TOOLS menu page 64 Playing movie files 1 Press HMG to display the Home Media Gallery The Home Media Gallery can also be displayed by selecting Home Media Gallery from Home Menu then pressing ENTER 2 Sele...

Страница 76: ...ying music files 1 Press HMG to display the Home Media Gallery The Home Media Gallery can also be displayed by selecting Home Media Gallery from Home Menu then pressing ENTER 2 Select the disc Use to select then press ENTER 3 Select Music Use to select Music then press ENTER DVD RW View available movies Movies Music Movies DVD RW Folders All Movies Folders DVD RW Movies 15 items Movie Folder001 Mo...

Страница 77: ...HMG to display the Home Media Gallery The Home Media Gallery can also be displayed by selecting Home Media Gallery from Home Menu pressing ENTER 2 Select the disc Load the disc beforehand Use to select then press ENTER 3 Select the track file to be added Use to select Music CD ROM Folders All Songs Folders CD ROM Music 15 items Music Folder001 Music Folder002 Music Folder003 Music Folder004 Music0...

Страница 78: ...ct then press ENTER Playback starts The Now Playing screen shown below is displayed Press stop to stop playback When playback of a music CD is stopped the Now Playing screen turns off When playback of a music file is stopped the HMG Playlist screen reappears Deleting tracks files from the HMG Playlist Select the track file to be deleted then press TOOLS to display the TOOLS menu Use to select Dele...

Страница 79: ...en reappears when ENTER is pressed Prog Motion Adjust according to the type of image movie or still image This is effective when outputting video materials as progressive images Pure Cinema This setting optimizes the operation of the progressive scanning circuit for playing film materials Normally set it to Auto1 If the picture seems unnatural switch this to Auto 2 On or Off page 80 YNR Reduces no...

Страница 80: ...ly Adjust the setting for example when watching movies late at night and the dialogs are difficult to hear 1 During playback display the TOOLS menu Press TOOLS 2 Select and set Audio DRC Use to select then press ENTER 3 Adjust the setting Use to switch between Off Low Medium High and Auto Closing the Audio DRC screen Press ENTER or HOME MENU Note This only affects the Dolby TrueHD Dolby Digital Pl...

Страница 81: ...ed display the Home Menu screen Press HOME MENU 2 Select and set Initial Setup Use to select then press ENTER 3 Select the item and change the setting Use to select then press ENTER Closing the Initial Setup screen Press HOME MENU BD 1 2 BD DVR DVD TV FM AM INPUT SELECT HDMI 1 HDMI 2 HDMI 3 BD HDMI 1 BD 1 2 SETUP HOME MENU RETURN SETUP HOME MENU SETUP TOPMENU DISC NAVIGATOR HOME MENU TOOLS MENU RE...

Страница 82: ...put With BD ROMs the secondary audio and interactive audio are mixed for output DTS 2 DTS Digital Surround audio signals are output With BD ROMs the signals are output without mixing the secondary audio and interactive audio signals DTS PCM Select this when the connected AV receiver or amplifier etc is not compatible with DTS Digital Surround audio signals The DTS Digital Surround audio signals ar...

Страница 83: ...able languages Choose a language from the listed languages to set the default audio language for BD ROM and DVD Video playback Other Continue to the next screen to set the default audio language for BD ROM and DVD Video playback You can select the language name or enter the code number see page 100 for the code table If a language not recorded on the BD DVD is set one of the recorded languages is ...

Страница 84: ...isplay the angle mark secondary video mark and secondary audio mark on the TV screen Hybrid Disc Playback BD The BD layer of hybrid discs with two or more layers BD and DVD or CD is played DVD The DVD layer of hybrid discs with two or more layers BD and DVD is played If there is no DVD layer the BD layer is played CD The CD layer of hybrid discs with two or more layers BD and CD is played If there...

Страница 85: ...lect then press ENTER Fix The output level of all the speakers is set to the maximum Variable The output level of all the speakers is set 6 0 dB lower than when Fix is selected From this point the output levels of the L C R SL SR SBL SBR and SW speakers can be adjusted within the range of 6 0 dB to 6 0 dB If you have selected Variable proceed to step 3 Caution This cannot be selected when Audio Ou...

Страница 86: ...input the number then press ENTER to set Use to move the cursor To change the code number Input the previously registered password then input the new password Note We recommend making a note of the password If you forget the password reset the player to the factory default setting then register the password again page 89 L C R SR SBR SBL SL SW 0 0 dB 0 0 dB 0 0 dB 0 0 dB 0 0 dB 0 0 dB 0 0 dB 0 0 d...

Страница 87: ...the discs 1 Select and set Parental Lock Use to select then press ENTER 2 Select and set DVD Video Parental Lock Next Screen Use to select then press ENTER BD Movie files DVD Music files AVCHD CD SETUP TOPMENU DISC NAVIGATOR HOME MENU TOOLS MENU RETURN Set Password DVD Video Parental Lock BDMV Parental Lock Country Code Off 255 us Video Out Audio Out Speakers HDMI Language Parental Lock Options Se...

Страница 88: ... 5 6 7 8 0 9 SETUP TOPMENU DISC NAVIGATOR HOME MENU TOOLS MENU RETURN Video Out Audio Out Speakers HDMI Language Parental Lock Options Setup Navigator Initial Setup BD PLAYER DVD Video Parental Lock Enter the password Level Video Out Audio Out Speakers HDMI Language Parental Lock Options Setup Navigator Initial Setup BD PLAYER DVD Video Parental Lock Off BD Movie files DVD Music files AVCHD CD SET...

Страница 89: ...MI HDMI OUT terminal Digital Audio DIGITAL OUT OPTICAL terminal Analog Audio AUDIO OUT 2 ch terminals or AUDIO OUT 7 1 ch terminals The optimum audio signals for the audio format and the player s settings are output from the output terminal s set here Caution Linear PCM 2 channel audio signals are output from the audio terminals other than the one set at Audio regardless of the audio format and th...

Страница 90: ... the connected HDMI device is not compatible with Dolby Digital or DTS Digital Surround bitstream the signals are output in linear PCM BD ROM Dolby Digital Converted to 2 channel audio 5 1 channel audio Converted to 2 channel audio Dolby Digital 5 1 channel audio Dolby Digital Dolby Digital Plus 7 1 channel audio9 9 Only compatible with 7 1 channel surround back 6 1 channel surround back is output...

Страница 91: ...rueHD Dolby Digital Plus Dolby Digital DTS HD Master Audio DTS HD High Resolution Audio DTS Digital Surround MPEG 2 AAC Linear PCM Linear PCM audio signals meeting the following conditions can be output Sampling frequency 32 kHz to 192 kHz Number of channels Up to 8 up to 6 for a 192 kHz sampling frequency For details see About the audio output settings on page 90 About the HDMI high speed transmi...

Страница 92: ...eck that the player s picture is output to the Flat Screen TV Also check after changing the connected devices and reconnecting HDMI cables The HDMI Control function may not operate properly if the player s picture is not properly output to the Flat Screen TV Use High Speed HDMI cables when using the HDMI Control function The HDMI Control function may not operate properly if other HDMI cables are u...

Страница 93: ...utput material that is recorded by a DVD recorder video deck Furthermore the picture may not be displayed properly due to the copy protection when the player is connected to a TV with a built in video deck For details contact the manufacturer of your TV R R AUDIO OUT 2 ch AUDIO OUT 7 1 ch VIDEO OUT HDMI OUT DIGITAL OUT CONTROL IN L L Y PB PR FRONT OPTICAL COMPONENT VIDEO SURROUND CENTER VIDEO S VI...

Страница 94: ...ideo cable commercially available or a video cable commercially available When connecting to a 7 1 channel compatible AV receiver or amplifier Connect using 4 commercially available audio cables diagram below When connecting to a 5 1 channel compatible AV receiver or amplifier Connect using 3 commercially available audio cables do not connect to the surround back left and right terminals After con...

Страница 95: ...hold STANDBY ON on the player s front panel for over 5 seconds The power will turn off No picture is displayed or the picture is not displayed properly Is the video cable properly connected Insert the cable firmly and all the way in Is the video cable damaged If the cable is damaged replace it with a new one Is the input setting on the connected TV or AV receiver or amplifier right Read the operat...

Страница 96: ... etc Check that you connect the player to the PHONO input terminals of the AV receiver or amplifier etc Are the connected components AV receiver or amplifier etc properly set Read the operating instructions of the connected components and check the volume input speaker settings etc Are the audio cables properly connected Insert the cables firmly and all the way in Is the audio cable damaged If the...

Страница 97: ...s HDMI Audio Out properly set Set HDMI Audio Out to PCM page 83 Are Dolby Digital Out and DTS Out properly set Set Dolby Digital Out to Dolby Digital 1 DTS Out to DTS 1 page 82 Sound is fast or slow When an HDMI cable is connected are audio signals being output from devices connected with cables other than HDMI cables When this player is connected by HDMI cable to a Pioneer AV receiver or amplifie...

Страница 98: ...terminals HDMI Control function does not work Is the HDMI cable properly connected Connect the HDMI cable properly Is the HDMI cable you are using a High Speed HDMI cable Use a High Speed HDMI cable The HDMI Control function may not work properly if HDMI cable other than a High Speed HDMI cable is used Is HDMI Control set to On on the player Set HDMI Control to On on the player page 83 Does the co...

Страница 99: ...was on Has there been a power failure If the power cord is disconnected or there is a power failure while the player s power is on the settings you have made may be cleared Always press STANDBY ON on the player s front panel or STANDBY ON on the remote control and check that POWER OFF has turned off from the player s front panel display before disconnecting the power cord Be particularly careful w...

Страница 100: ...1909 Slovak sk slk 1911 Slovenian sl slv 1912 Samoan sm smo 1913 Shona sn sna 1914 Somali so som 1915 Albanian sq sqi 1917 Serbian sr srp 1918 Swati ss ssw 1919 Sotho Southern st sot 1920 Sundanese su sun 1921 Swahili sw swa 1923 Tamil ta tam 2001 Telugu te tel 2005 Tajik tg tgk 2007 Thai th tha 2008 Tigrinya ti tir 2009 Turkmen tk tuk 2011 Tagalog tl tgl 2012 Tswana tn tsn 2014 Tonga Tonga Island...

Страница 101: ...nsation Output terminals Video outputs Video 1 set RCA jack 1 0 Vp p 75 Ω S Video 1 set S Video jack Y luminance 1 0 Vp p 75 Ω C color 0 300 Vp p 75 Ω PAL 0 286 Vp p 75 Ω NTSC Component video 1 set RCA jacks Y 1 0 Vp p 75 Ω PB PR 0 7 Vp p 75 Ω HDMI 1 set 19 pin 5V 150 mA Audio outputs 2 channel stereo Number of channels 2 RCA jacks 7 1 channel multi channel front left right surround left right cen...

Страница 102: ...ound of a radio Condensation If the player is moved suddenly from a cold place into a warm room in winter for example or if the temperature in the room in which the player is installed rises suddenly due to a heater etc water droplets condensation may form inside on operating parts and the lens When condensation is present the player will not operate properly and playback is not possible Let the p...

Страница 103: ...ing the disc Glossary Aspect ratio The ratio of a TV screen s width to its height Conventional TVs have an aspect ratio of 4 3 while high definition HD and widescreen TVs have an aspect ratio of 16 9 Audio language Multiple audio tracks for example the original sound and the dubbed sound can be recorded on BD ROM or DVD Video discs Up to 32 languages 32 audio tracks can be recorded on BD ROM discs...

Страница 104: ...scan method 576i 1080i etc HDCP High bandwidth Digital Content Protection A technology for protecting copyrights that encrypts digital video signals HDMI High Definition Multimedia Interface A digital interface standard for next generation TVs expanding the DVI Digital Video Interface terminal used for example for computer displays It allows transfer of non compressed digital video and audio signa...

Страница 105: ...udio streams are called secondary audio On some discs this secondary audio is recorded as the audio for the secondary video Secondary video Some BD ROMs include sub videos superimposed on the main videos using the Picture in Picture function These sub videos are called secondary video Subtitle language This refers to the language of the subtitles often used on movies Up to 255 languages 255 types ...

Страница 106: ...NESS INTERRUPTION HOWEVER CAUSED AND ON ANY THEORY OF LIABILITY WHETHER IN CONTRACT STRICT LIABILITY OR TORT INCLUDING NEGLIGENCE OR OTHERWISE ARISING IN ANY WAY OUT OF THE USE OF THIS SOFTWARE EVEN IF ADVISED OF THE POSSIBILITY OF SUCH DAMAGE This product includes cryptographic software written by Eric Young eay cryptsoft com This product includes software written by Tim Hudson tjh cryptsoft com ...

Страница 107: ...thorize others to exercise some or all of the rights granted herein subject to the following conditions Redistribution of source code must retain this license file FTL TXT unaltered any additions deletions or changes to the original files must be clearly indicated in accompanying documentation The copyright notices of the unaltered original files must be preserved in all copies of source files Red...

Страница 108: ...hillips Davide Rossi Guido Vollbeding Ge Weijers and other members of the Independent JPEG Group IJG is not affiliated with the official ISO JPEG standards committee DOCUMENTATION ROADMAP This file contains the following sections OVERVIEW General description of JPEG and the IJG software LEGAL ISSUES Copyright lack of warranty terms of distribution REFERENCES Where to learn more about JPEG ARCHIVE ...

Страница 109: ...thmetic coding cannot legally be used without obtaining one or more licenses For this reason support for arithmetic coding has been removed from the free JPEG software Since arithmetic coding provides only a marginal gain over the unpatented Huffman mode it is unlikely that very many implementations will support it So far as we are aware there are no patent restrictions on the remaining code The I...

Страница 110: ...at called SPIFF SPIFF is interoperable with JFIF in the sense that most JFIF decoders should be able to read the most common variant of SPIFF SPIFF has some technical advantages over JFIF but its major claim to fame is simply that it is an official standard rather than an informal one At this point it is unclear whether SPIFF will supersede JFIF or whether JFIF will remain the de facto standard IJ...

Страница 111: ...y associated interface definition files plus the scripts used to control compilation and installation of the executable However as a special exception the source code distributed need not include anything that is normally distributed in either source or binary form with the major components compiler kernel and so on of the operating system on which the executable runs unless that component itself ...

Страница 112: ...Library Public License version 2 hence the version number 2 1 Preamble The licenses for most software are designed to take away your freedom to share and change it By contrast the GNU General Public Licenses are intended to guarantee your freedom to share and change free software to make sure the software is free for all its users This license the Lesser General Public License applies to some spec...

Страница 113: ...f derivative or collective works based on the Library In addition mere aggregation of another work not based on the Library with the Library or with a work based on the Library on a volume of a storage or distribution medium does not bring the other work under the scope of this License 3 You may opt to apply the terms of the ordinary GNU General Public License instead of this License to a given co...

Страница 114: ...any other system and a licensee cannot impose that choice This section is intended to make thoroughly clear what is believed to be a consequence of the rest of this License 12 If the distribution and or use of the Library is restricted in certain countries either by patents or by copyrighted interfaces the original copyright holder who places the Library under this License may add an explicit geog...

Страница 115: ...e under the terms of a GNU General Public License A copy of the corresponding source code can be obtained by being charged the fee for distribution To obtain a copy contact your local Pioneer Customer Support Center See the GNU website http www gnu org for details of the GNU General Public License ...

Страница 116: ... TEL 800 421 1404 PIONEER ELECTRONICS OF CANADA INC 300 Allstate Parkway Markham Ontario L3R 0P2 Canada TEL 1 877 283 5901 905 479 4411 PIONEER EUROPE NV Haven 1087 Keetberglaan 1 B 9120 Melsele Belgium TEL 03 570 05 11 PIONEER ELECTRONICS ASIACENTRE PTE LTD 253 Alexandra Road 04 01 Singapore 159936 TEL 65 6472 7555 PIONEER ELECTRONICS AUSTRALIA PTY LTD 178 184 Boundary Road Braeside Victoria 3195...

Отзывы: