11
En
02
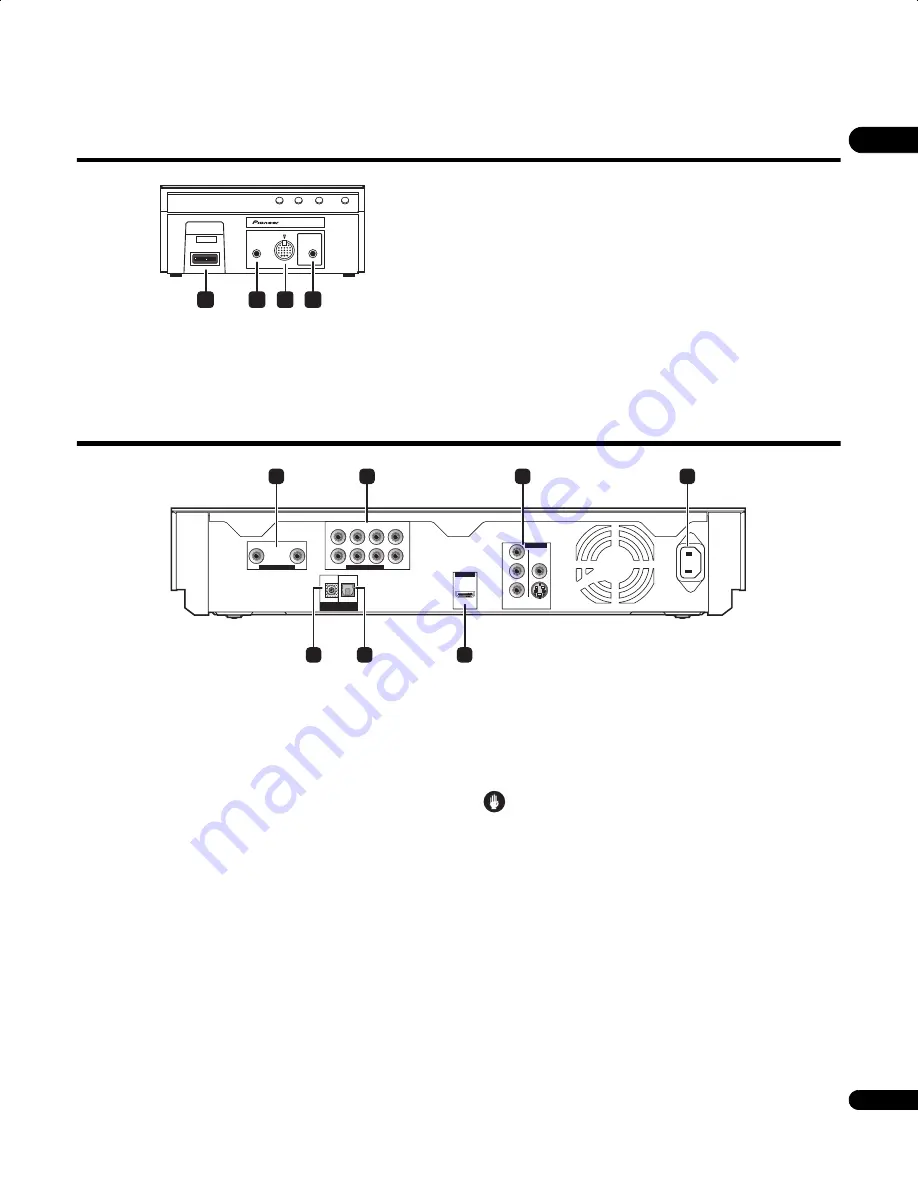
Display unit
1
SYSTEM connector
Connect to the receiver subwoofer.
2
F.AUDIO input
To listen to audio from an external component, connect with a
stereo mini-plug cable. Once connected, the input automatically
changes to
Front Audio In
.
3
iPod input terminal
Use to connect your Apple iPod as an audio source.
When you connect an iPod, the input automatically changes to
iPod
.
4
MCACC SETUP MIC jack
Use to connect the supplied microphone for the Auto MCACC setup
(see page 26).
Blu-ray disc player
1
AUDIO OUT (2 ch) terminals
Connect with the audio input terminals on a TV or tape recorder, etc.
2
AUDIO OUT (7.1 ch) terminals
Connect with the 7.1 channel audio input terminals on an AV
receiver or amplifier, etc.
3
VIDEO OUT terminals
VIDEO
– Connect with the video input terminal on a TV.
S-VIDEO
– Connect with the S-Video input terminal on a TV.
COMPONENT VIDEO
– Connect with the component video
input terminals on a TV.
4
AC IN
Connect the power cord here.
5
HDMI OUT terminal
Connect to the
HDMI IN 1
jack of the receiver subwoofer with the
supplied HDMI cable.
6
DIGITAL OUT (OPTICAL) jack
Connect with the digital audio input terminal on the other audio
component.
7
CONTROL IN terminal
Connect to the
CONTROL OUT 1
jack of the receiver subwoofer
using the supplied control cable.
Caution
• Be sure to connect cables for outputting the audio and video
signals (page 91, 94).
F.AUDIO
DISPLAY UNIT
iPod
MCACC
SETUP MIC
SYSTEM
1
2
3
4
R
R
AUDIO OUT ( 2 ch )
AUDIO OUT ( 7.1 ch )
VIDEO OUT
HDMI OUT
DIGITAL
OUT
CONTROL
IN
L
L
Y
P
B
P
R
FRONT
OPTICAL
COMPONENT
VIDEO
SURROUND
CENTER
VIDEO
S-VIDEO
SUB WOOFER
SURROUND BACK
AC IN
2
1
3
4
6
5
7
LX01BD_1.book Page 11 Tuesday, September 2, 2008 12:33 PM
Содержание AS-LX71
Страница 56: ... Section Two Blu ray Disc Player SBDP LX08 ...


