43
En
08
Connecting using HDMI
If you have an HDMI or DVI (with HDCP) equipped component, you
can connect it to this receiver using a commercially available HDMI
cable.
The HDMI connection transfers uncompressed digital video, as well
as almost every kind of digital audio that the connected component
is compatible with, including DVD-Video, DVD-Audio, SACD, Blu-ray
Disc, Video CD/Super VCD, CD and MP3, etc.
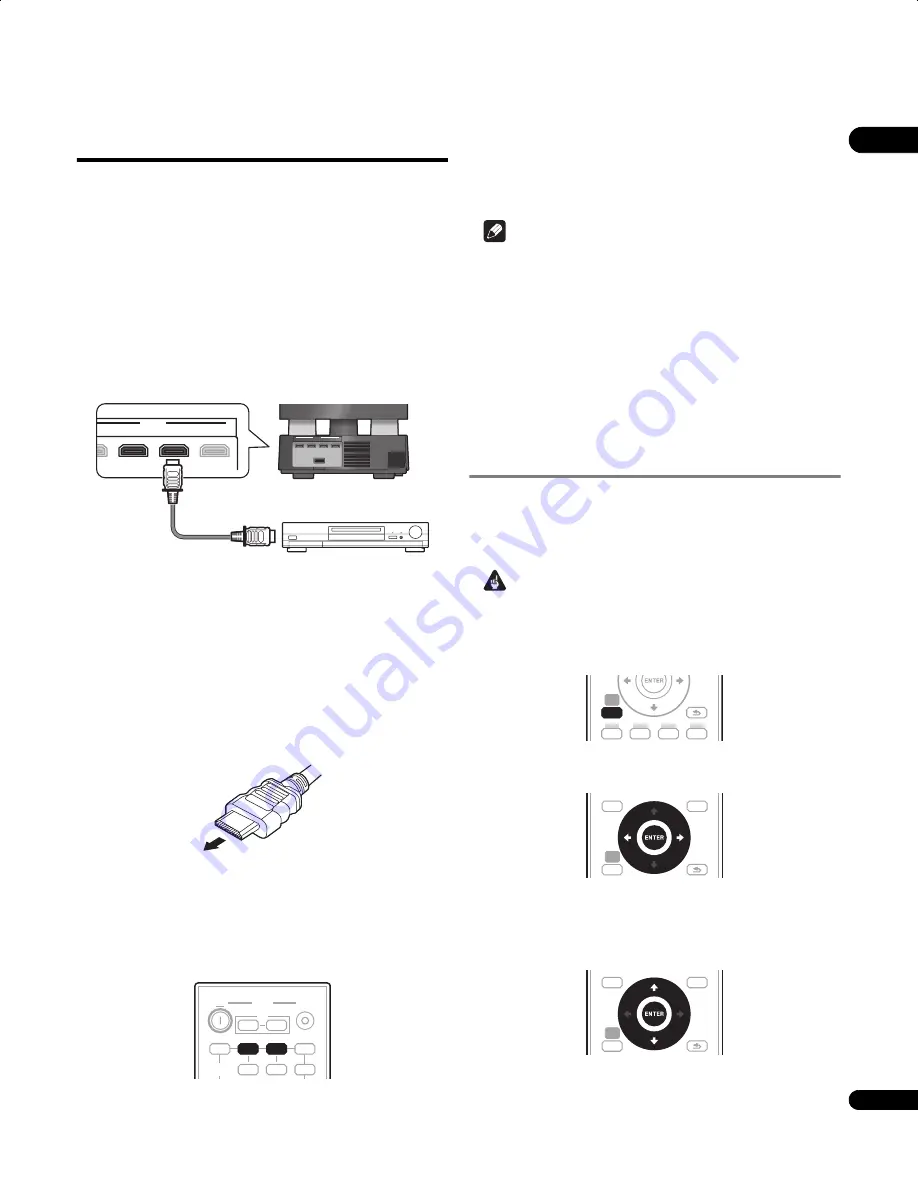
If you have a Pioneer HDD/DVD recorder equipped with an HDMI
output terminal, connect it to the receiver subwoofer’s
HDMI IN 2
terminal. The receiver subwoofer’s input can be switched and the
recorder operated easily using the included remote control. (In the
same way, connect a Pioneer DVD player to the
HDMI IN 3
terminal.)
1
Use the supplied HDMI cable to connect the HDMI IN 2 to 3
interconnect on this receiver subwoofer to an HDMI output on
your HDMI component.
Once this receiver subwoofer is properly connected to your HDMI
component, the
HDMI
indicator (red) lights up on the display unit
when you watch HDMI contents.
2
Use the supplied HDMI cable to connect the HDMI OUT
interconnect on this receiver subwoofer to an HDMI
interconnect on a HDMI-compatible display.
• The arrow on the cable connector body should be face down for
correct alignment with the connector on the unit.
3
Use the HDMI 2 to 3 button to select the HDMI input you’ve
connected to.
The remote control switches to the
DVR
control mode when
HDMI 2
is pressed, the
DVD
control mode when
HDMI 3
is pressed. If you
do not want to operate these components, press the
SYSTEM
CONTROL
button to set the remote control to the receiver control
mode.
You can also use the display unit
INPUT SELECTOR
to carry out this
operation.
• Set the HDMI Mode in
HDMI mode setting
below to
Through
Mode
if you want to hear HDMI audio output from your TV or
Flat Screen TV (no sound will be heard from this receiver).
• If the video signal does not appear on your TV or Flat Screen TV, try
adjusting the resolution settings on your component or display.
Note
• An HDMI connection can only be made with DVI-equipped
components compatible with both DVI and High Bandwidth
Digital Content Protection (HDCP). If you choose to connect to
a DVI connector, you will need a separate adaptor (DVI
HDMI)
to do so. A DVI connection, however, does not support audio
signals. Consult your local audio dealer for more information.
• This unit has been designed to be compliant with HDMI (High-
Definition Multimedia Interface).
• This unit supports SACD, Dolby Digital Plus, Dolby TrueHD and
DTS-HD Master Audio. To take advantage of these formats,
however, make sure that the component connected to this unit
also supports the corresponding format.
HDMI mode setting
Specifies the routing of the HDMI audio signal out of this receiver
subwoofer (amp) or through to a TV or Flat Screen TV. You cannot
use a number of sound functions of this unit when HDMI Mode is
set to
Through Mode
.
Important
• Press
SYSTEM CONTROL
to set the remote control to receiver
control mode in order to operate the receiver subwoofer (make
sure that the LCD displays the
SYSTEM
screen).
1
Press SETUP.
2
Select ‘HDMI Setup’.
Use
/
to select, then press
ENTER
.
3
Select ‘HDMI Mode’.
Use
/
to select, then press
ENTER
.
4
Adjust the setting.
Use
/
to adjust, then press
ENTER
to confirm.
•
AMP Mode
– Output an HDMI audio signal from this unit.
•
Through Mode
– Output an HDMI audio signal from a TV or Flat
Screen TV. The
HDMI THROUGH
indicator lights.
HDMI
T
IN 3
IN 2
IN 1
HDMI
OUT
IN 3
SYSTEM
IN 2
IN 1
Receiver subwoofer
HDMI/DVI-equipped component
Rear panel
From HDMI output
INPUT
BD
DVR
DVD
TV
FM / AM
ON
SYSTEM
INPUT
SELECT
OFF
HDMI 1
HDMI 2
HDMI 3
TV
DVR
DVD
HDMI 2
HDMI 3
SETUP
HOME
MENU
RETURN
SETUP
SETUP
TOP MENU
DISC
NAVIGATOR
HOME
MENU
TOOLS
MENU
RETURN
SETUP
TOP MENU
DISC
NAVIGATOR
HOME
MENU
TOOLS
MENU
RETURN
LX01BD_1.book Page 43 Tuesday, September 2, 2008 12:33 PM
Содержание AS-LX71
Страница 56: ... Section Two Blu ray Disc Player SBDP LX08 ...


