


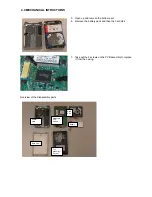
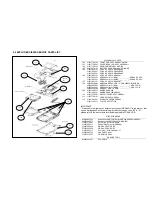


1.0 TECHNICAL SPECIFICATION and SERVICE HINTS
General
Dimensions (WxLx H) :
53 x 86 x 16.7 mm (2.1 x 3.4 x
0.7 inches)
Weight :
78 g (2.8 oz)
Output power :
2 x 5 mW
(16 ohm)
Frequency response :
20-20 000 Hz
Equalizer :
5 band DSP controlled
Hard disk :
1,0” micro HDD
Capacity :
3GB
Display :
Black/White
: 96 x 64 pixels
Backlight :
White Led
Battery :
640 mAh Li-ion internal
rechargeable battery
Battery life time:
>9hr
File transfer rate using
USB :
800kbyte/s
Battery charging current
320 -420mA
Maximum charging time :
4hrs
Battery cutoff voltage:
3.4V
Connections:
Stereo headphone
Mini USB (B-type)
DC charger input
Battery level detection
Detection Level
Typ.
4-step to 3-step voltage
3.95V
3-step to 2-step voltage
3,8V
2-step to 1-step voltage
3,7V
Force Power Off voltage
3,4V
Current consumption
DC-IN SUPPLY (3.8V)
Battery Charging Current
370mA typ.
BATT. SUPPLY (3.4V)
Power Off
<15uA
Idle with LCD Backlight on
55mA
Playback without HDD reading
45mA
Playback with HDD reading
350mA
File transfer using USB1.1
350mA
Headphone out (headphone output load 2x16 ohm)
Maximum output power :
1mW
Frequency response :
20Hz - 20kHz
SNR (A-wght) :
>75 dB
THD (1kHz) :
0,5% - 1.0%
Left-Right Channel
Separation :
40dB typ.
Left-Right Channel
Balance :
0,5dB
Supported playback format
MP3 :
8 - 320 Kbps and VBR
WMA :
32 - 192 Kbps
Sample rates :
8, 11.025, 16, 22.050
32, 44.1, 48
ID3-tag support :
Yes
PC Connectivity :
USB
File Transfer
For HDD084
via
Windows Media Player 9 or 10
for music playback
or Windows Explorer for general data (music playback
disabled)
For HDD082/HDD085/HDD086
via
Windows Media Player 10
for music playback or
Windows Explorer for general data (music playback
disabled)
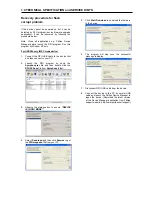
Firmware and software upgrades
For HDD084
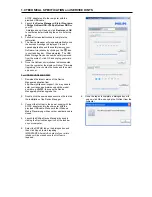
1. Download the latest version of the Device
Manager application from
http://www.philips.com/support. You may need to
enter your language preference and the model
number e.g.hdd084, to access the Device
Manager application upgrade file.
2. Double click the downloaded execution file to start
the installation of the Device Manager.
3. Once the installation is completed, connect the
GoGear to the power supply with the AC/DC
adapter.
4. Launch
the
Device Manager
at
Start->Programs-
>Philips GoGear HDD->Philips GoGear HDD
on
your PC
5. A dialogue box will pop up; click Upgrade to start
the upgrading of the firmware.
(Please do not
disconnect the jukebox during the upgrading
process as this interruption may damage the
firmware!)
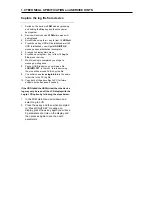
6. Follow all screen instructions to complete the
firmware upgrade.
7. The Device Manager will close automatically once
the success message is displayed. Close all
opened application and then safely remove your
GoGear micro jukebox by clicking on the
icon
in your task tray bar. When prompted, “The USB
Mass Storage Device can now be safely removed
from the system”, click OK and unplug your micro
jukebox.


