background image

24

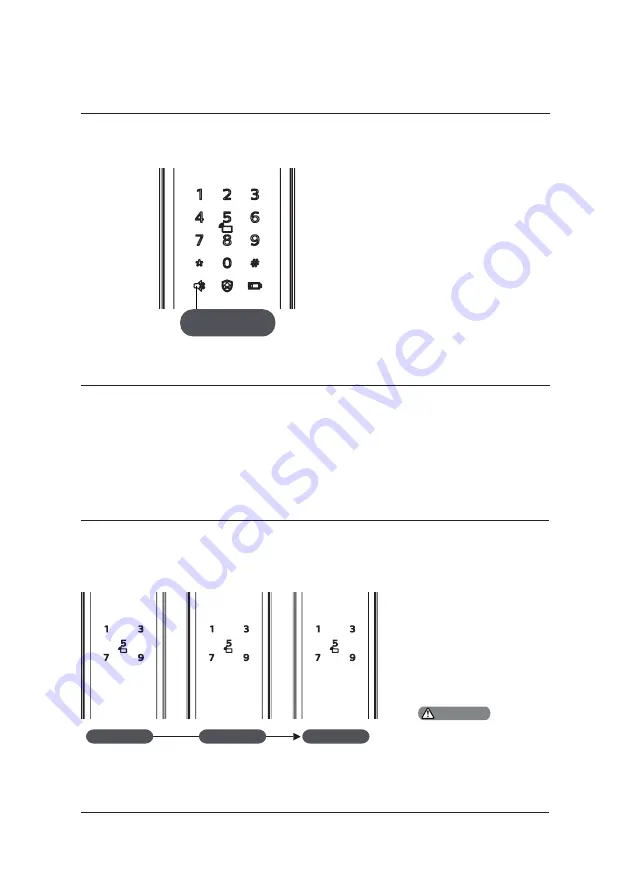
Colors of the light and the 

corresponding meanings:

1. White: Indicates the 

mute mode is off.

2. Green: Indicates the 

mute mode is on.

Mute mode indicator light

System lock indicator light

3 flashes  

2 flashes 

1 flash

If there are 10 

consecutive inputs of 

any of the 3 types of 

verification information 

(fingerprint/PIN code/

card), this type of 

verification will be 

locked for 3 minutes. 

You can unlock with 

the other 2 types of 

verification information. 

The prompt only 

appears after the 

system wakes up.

Attention

3 minutes  

2 minutes

1 minute

Mute mode 

indicator light

Содержание EasyKey 7100

Страница 1: ......

Страница 2: ......

Страница 3: ...0 安全 警告 旧产品和电池的处理 产品清单 安装立体装配图 安装前须知 安装步骤 防猫眼功能 恢复出厂设置 一键静音功能 门锁状态提示灯 低电量提示灯 静音状态提示灯 系统锁定提示灯 报警功能的种类与报警方式 如何使用紧急电源 如何更换电池 设置前须知 安全模式下 如何设置易锁 修改管理密码 用户设置 用户删除 系统设置 扩展功能 系统查询 一般模式下 如何设置易锁 用户设置 用户删除 系统设置 扩展功能 系统查询 开启 室外开锁 密码开门 指纹开门 卡片开门 室内开锁 执手开门 上锁 室外上锁 室内上锁 室内反锁 机械钥匙开启 3 了解您的易锁 09 外面板 内面板 ...

Страница 4: ...锁 并保护好相关固封标志 门锁安装调试合格后 请您在第一时间内修 改出厂设置的默认管理密码 并妥善保管好 机械钥匙 不要轻易泄露密码信息 门锁触发低电量报警后 请及时更换掉全部 电池 并确保电池正负极安装正确 警告 不要将电池靠近火源 以免发生爆炸 请勿使用不符合安全规定的紧急电源给产 品供电 请勿用金属物将电池引线的两极连接短 路 以免引起爆炸 确保由飞利浦 飞利浦授权的服务中心或专 业的维修人员进行更换部件 请勿使用其它制造商生产的 或未经飞利 浦特别推荐的附件或部件 如果使用此类附 件和部件 您的保修可能失效 旧产品和电池的处理 您可以在由飞利浦和飞利浦授权的服务中 心回收您的智能锁 如果您的产品符合条件 您将获得折抵款项 请自行了解当地的电子产品分类收 集系 统 请遵守当地规定 不要将旧产品丢弃到普 通生活垃圾中 正确弃置旧产品有助于避免对环境和人类 健康造成潜在的负面影响 涉及电...

Страница 5: ... 2 安装您的易锁 产品清单 本产品清单仅供参考 一切以实物包装内容为准 外面板含硅胶垫 固定板 合格证 安装配件包 内面板含硅胶垫 用户手册 智能门卡x2 百洁布 开孔模板 快速入门指南 机械钥匙x2 锁体 保修卡 电池 EasyKey易锁 User Manual Quick Start Guide EasyKey易锁 EasyKey易锁 Warranty Card EasyKey易锁 合格证 侧扣板 ...

Страница 6: ...10 11 12 13 14 15 16 17 1 外面板 1个 2 外面板硅胶垫 1个 3 连接螺栓 2枚 4 方轴压簧 2枚 5 方轴 2个 6 开口销 2个 7 机械钥匙拨片 1个 8 锁体 1个 9 锁体固定螺丝 4枚 10 固定板 1个 11 固定板固定螺丝 2枚 12 内面板硅胶垫 1片 13 内面板 1个 14 内面板固定螺丝 4枚 15 电池盒盖 1个 16 内面板下盖 1个 17 保险旋钮拨片 1个 4 5 6 7 8 ...

Страница 7: ...5 安装前须知 第一步 安装前确认开门方向 本智能锁产品适用于左外拉 右内推 右外拉 左内推四种开向的门 第二步 执手换向 左开门 左内开 室内 室内 室内 室内 室外 室外 室外 室外 右内开 左外开 右外开 右开门 将面板上的2个十字槽 沉头换向螺钉拆下 1 直接旋转执手180 2 将2个十字槽沉头换向 螺钉锁回去 3 ...

Страница 8: ... 斜舌换向 改变斜舌方向来适应内外开门方向 斜舌斜面朝门外即内开 斜舌斜面朝门内即外开 斜舌 定向螺丝 斜舌调向拨片 1 将 斜舌条向拨片 上推至顶 2 按进斜舌并转动180度 再拉出斜舌 3 再将 斜舌调向拨片 下推至底 4 根据内外开门需求 更改定向螺丝方向 定向螺丝一定要装在门的内侧 即哪面装定向 螺丝 哪面必须是内面板 1 根据开孔模板在门上开好孔 将锁体放 入门框内 锁体插入时钩好上下天地杆 安装木门 时无此步骤 2 安装步骤 注意 以下安装步骤 适用于右开门 如果是左开门 请仔细阅读 安装前须知 完成相关换向调节 ...

Страница 9: ...7 将连接线穿过门上方的过线口 外面 板上的机械钥匙拨片与方轴对准锁体 上的两个转动口插入 使外面板紧贴门 外侧 旋紧锁体上的四颗固定螺丝 注意 根据门的厚度适度裁剪机械钥匙拨片 选择适当长度的 方轴和连接螺管 固定螺管 在外面板上装上连接螺栓以及机械钥 匙拨片 执手孔中放上压簧和方轴 3 4 将固定板紧贴门内侧 旋紧两颗固定螺 丝 5 6 ...

Страница 10: ...8 在内面板上依次放入压簧和方轴 并插 好保险旋钮拨片 将外面板连接线及电 机线插入内面板相应的插座中 再将内 面板上的拨片与方轴对准锁体上的两 个转动口插入 内面板紧贴门内面 旋紧四颗固定螺丝 装上电池 盖上电池盒盖和内面板下 盖 智能锁安装成功 拧动内外执手 保险旋钮 机械钥匙 检查各部件是否连接完好 7 8 9 10 请 务必 将 多出的 连 接线藏于门孔内 注意 ...

Страница 11: ...9 指纹传感器 卡片识别区 数字键盘区 静音按键 回形执手 门锁状态提示灯 低电量提示灯 紧急电源接口 机械钥匙孔 电池盒 防猫眼开关 恢复出厂设置键 旋钮 回形执手 扩展模块 设置键 S 3 了解您的易锁 外面板 内面板 7 1 1 2 2 3 3 4 4 5 5 6 6 7 7 8 9 7 5 1 2 4 6 8 3 9 1 2 3 4 5 6 ...

Страница 12: ...户时 您可以依据其编号 在系统中直接删除 无需全部删除 您可以将用户信息填入此编号表 方便您管理和查看 安全模式与一般模式互相切换时 所有登记的用户数据会被清空 请谨慎操作 管理密码 用户密码 进入管理模式的方式 一次性用户密码 访客密码 指纹数量 智能卡数量 安全模式 有 初始管理密码 12345678 10组 6 12位 有编号 00 09 通过输入管理密码 1组 无 100枚 有编号 00 99 100张 有编号 00 99 一般模式 无 1组 4 12位 无编号 通过输入用户密码 1组 1组 100枚 无编号 100张 无编号 00 01 02 03 04 05 06 07 08 09 编号 姓名 指纹 密码 卡 注意 ...

Страница 13: ...理密码 1 按下设置键 s 输入管理密码后 按 确认 安全模式下 如何设置易锁 用户设置 按下设置键 s 输入管理密码后 按 确认 按 2 进入用户设置 再按 1 进入添加用户密码 1 2 输入6 12位用户密码 按 确认 再次输入用 户密码 按 确认 语音提示添加成功后 按 设置键 s 退出设置 输入2位用户编号 编号范围 00 09 按 确认 修改管理密码 添加用户密码 图标注释 管理密码 用户编号 00 99 一次性用 户密码 输入指纹 访客密码 输入卡片 用户密码 设置键 用户编号 00 09 号键 1 进入管理模式必须在门锁开着的状态下 2 开始设置及结束设置必须按 S 键 以免误操作 3 进入菜单操作流程时 如需返回上一级菜单 请按 键 注意 ...

Страница 14: ...采集器上 待听到语音提示 请拿开手指 再放一次 时 拿开手指重新放回 指纹采集器上 此操作重复4次 语音提示添加 成功后 按设置键 s 退出设置 按 2 进入用户设置 再按 2 进入添加用户指纹 按 2 进入用户设置 再按 3 进入添加用户卡片 按 2 进入用户设置 再按 4 进入添加一次性用 户密码 2 2 2 2 3 将卡片靠近卡片识别区 直到 嘀 声响 语 音提示添加成功后 按设置键 s 退出设置 4 添加用户指纹 添加用户卡片 添加一次性用户密码 用户删除 按 3 进入删除用户 再按 1 进入删除用户密码 按下设置键 s 输入管理密码后 按 确认 1 3 输入需要删除密码的用户的2位 用户编号 编 号范围 00 09 按 确认 语音提示删除成 功后 按设置键 s 退出设置 在语音提示输入用户编号时 输入管理密码 可 以删除全部用户密码 注意 删除用户密码 ...

Страница 15: ...删除的卡片的2位 用户编号 编号范 围 00 99 按 确认 语音提示删除成功 后 按设置键 s 退出设置 在语音提示输入用户编号时 输入管理密码 可 以删除全部用户指纹 注意 在语音提示输入用户编号时 输入管理密码 可 以删除全部用户卡片 注意 删除用户卡片 按下设置键 s 输入管理密码后 按 确认 删除用户指纹 输入管理密码 按 确认 语音提示删除成功 后 按设置键 s 退出设置 按 3 进入删除用户 再按 4 进入删除一次性用户 密码 按下设置键 s 输入管理密码后 按 确认 3 4 删除一次性用户密码 按下设置键 s 输入管理密码后 按 确认 按 3 进入删除用户 再按 5 进入删除全部用户信息 3 全部删除 输入管理密码 按 确认 语音提示删除成功 后 按设置键 s 退出设置 5 ...

Страница 16: ...管理密码后 按 确认 按 4 进入系统设置 再按 2 进入音量设置 或 或 2 2 默认音量为高音量 注意 4 音量设置 按下设置键 s 输入管理密码后 按 确认 按 6 进入 系统查询 系统将会自动语音播报 产品序列号 6 1 选择您需要的音量 静音模式请按 1 低音量 请按 2 高音量请按 3 语音提示设置成功 后 按设置键 s 退出设置 或 2 1 系统查询 系统查询快捷方式 直接输入400 开启系统查询 注意 输入4 12位用户密码 按 确认 再次输入用 户密码 按 确认 语音提示设置成功后 按 设置键 s 退出设置 按 4 进入系统设置 再按 1 进入切换一般模式 4 1 按下设置键 s 输入管理密码后 按 确认 系统设置 切换为一般模式 ...

Страница 17: ...次 时 拿开手指重新放回指 纹采集器上 此操作重复4次 语音提示添加成 功后 按设置键 s 退出设置 按 1 进入用户设置 再按 2 进入添加用户指纹 1 2 按下设置键 s 输入用户密码后 按 确认 添加用户指纹 按下设置键 s 输入用户密码后 按 确认 按 1 进入用户设置 再按 3 进入添加用户卡片 1 3 添加用户卡片 将卡片靠近卡片识别区 直到 嘀 声响 语音 提示添加成功后 按设置键 s 退出设置 按下设置键 s 输入用户密码后 按 确认 添加一次性用户密码 4 按 1 进入用户设置 再按 4 进入添加一次性用户 密码 1 输入4 12位 一次性用户密码 后 按 确认 再次输入 一次性用户密码 按 确认 语音 提示添加成功后 按设置键 s 退出设置 添加访客密码 按下设置键 s 输入用户密码后 按 确认 ...

Страница 18: ...确认 删除全部用户卡片 2 2 输入用户密码 按 确认 语音提示删除成功 后 按设置键 s 退出设置 按 2 进入用户删除 再按 2 进入删除全部用户卡片 按下设置键 s 输入用户密码后 按 确认 删除一次性用户密码 输入用户密码 按 确认 语音提示删除成功 后 按设置键 s 退出设置 用户删除 2 按下设置键 s 输入用户密码后 按 确认 按 2 进入用户删除 再按 1 进入删除全部用户指纹 1 删除全部用户指纹 2 按下设置键 s 输入用户密码后 按 确认 输入用户密码 按 确认 语音提示删除成功 后 按设置键 s 退出设置 按 2 进入用户删除 再按 4 进入删除访客密码 4 删除访客密码 2 输入用户密码 按 确认 语音提示删除成功 后 按设置键 s 退出设置 按 2 进入用户删除 再按 3 进入删除一次性用户 密码 3 ...

Страница 19: ...置 成功后 按设置键 s 退出设置 按 3 进入系统设置 再按 2 进入语音设置 3 音量设置 按下设置键 s 输入用户密码后 按 确认 输入 管理密码 按 确认 再次输入 管理密 码 按 确认 语音提示设置成功后 按设置 键 s 退出设置 按 3 进入系统设置 再按 1 进入切换安全模式 3 系统设置 1 切换为安全模式 按下设置键 s 输入用户密码后 按 确认 语言设置 3 或 或 2 1 选择您需要的语言 中文 请按 1 英语 请按 2 语音提示设置成功后 按设置键 s 退出 设置 按 3 进入系统设置 再按 3 进入语言设置 3 3 或 2 1 按下设置键 s 输入用户密码后 按 确认 按 5 进入系统查询 系统将会自动语音播报产 品序列号 5 系统查询 注意 系统查询快捷方式 直接输入400 开启系统 查询 ...

Страница 20: ... 语音提示 已开门 后 下压 执手 完成开锁 易锁采用室内快开锁体 直 接下压手柄即可室内开锁 注意 室内开门时 请将防猫眼开关 拨至绿色档位置 关闭掉防 1 直接将已经添加指纹的手 指放到指纹传感器上 2 语音提示 已开门 后 下 压执手开锁 1 将已经添加的卡片以正确 的方式放在卡片识别区 2 语音提示 已开门 后 下 压执手开锁 卡 片 识 别 区 密码开门 执手开门 指纹开门 卡片开门 2 1 2 2 下 压 执 手 下 压 执 手 下 压 执 手 输 入 密 码 3 1 触 摸 数 字 键 区 域 指 纹 识 别 区 1 ...

Страница 21: ...19 上锁 室外 室内上锁 关门 后 上 提 执 手 锁 舌 弹 出 完成上锁 关门 后 上 提 执 手 锁 舌 弹 出 完成上锁 室外上锁 室内上锁 室内反锁 在易锁处于已上锁状态时 扭动旋钮至红 色刻度处 如左图所示 启用室内反锁 反之 扭动旋钮至绿色刻度处 解除室内反 锁 ...

Страница 22: ... 当电池电量耗尽 忘记密码或系统无法正常运作等紧急情况下采 用机械钥匙开锁 把机械钥匙插入锁孔 钥 匙套与钥匙成垂直90 钥 匙 套 向执 手方向旋 转 90 直至靠近门面 将钥匙套向下旋转180 使钥匙套平 行 于水平 面 向执手方向水平旋转 钥匙套 即可开锁 防猫眼功能 内部锁定执手 功能 开启此功能 可以实现从内部锁定执手 室内 不能开启门锁 使用 1 防猫眼功能开启 将防猫眼开关拨至红色 档位置 2 防猫眼功能关闭 将防猫眼开关拨至绿色 档位置 6 其他功能 防猫眼开关 推扭 1 2 3 注意 ...

Страница 23: ...初始状态 功能 清空所有用户信息 恢复到出厂状态 使用 长按恢复出厂设置键 RES 5秒 门锁系统内的 所有信息将被清空 恢复到出厂设置状态 一键静音功能 静音键 功能 可一键快捷启用静音模式 开门时屏蔽掉语音提 示 适用于不打扰家人休息的场景 使用 1 语音切换为静音 系统唤醒情况下 长按 静音 键 2秒 进入一次性静音模式 呈现绿色灯光 2 静音切换为语音 系统唤醒情况下 长按 静音 键 2秒 恢复系统语音模式 呈现白色灯光 ...

Страница 24: ...状态提示灯呈 现蓝色 表示您可以进行门锁操作 绿色 当门锁成功开锁后 门锁状态提示 灯呈现绿色 表示已开门 红色 当门锁成功上锁后 门锁状态提示灯 呈现红色 表示已关门 灯光颜色与所代表的含义 红色 门锁系统唤醒时 系统自动检测电池 电压 当电池电压过低时 低电量提示灯亮 起 闪烁红色灯光 语音提示电量低 请更 换电池 低 电 量 提 示 灯 门锁状态提示灯 低电量提示灯 7 提示灯光的含义与使用 门 锁 状 态 提 示 灯 门 锁 状 态 提 示 灯 ...

Страница 25: ...23 灯光颜色与所代表的含义 1 白色 表示为静音模式已关闭 2 绿色 表示为静音模式已开启 静音状态提示灯 静 音 状 态 提 示 灯 系统锁定提示灯 3次闪烁 2次闪烁 1次闪烁 指纹或密码或卡任意一种 验证方式连续输入10次错 误后 该验证方式将被锁 定3分钟 可更换为其它2 种验证方式进行解锁 1分钟 3分钟 钟 2分 再次验证此方式时 才会出 现提示 注意 ...

Страница 26: ...能的种类与报警方式 触发 当系统唤醒后 将自动检测电池电压 当电池电 压不足时 发出警报 提示您及时更换电池 警报方式 开门时语音提示电量低 请更换电池 关闭方式 自动关闭 如何触发 插入机械钥匙开锁操作时 警报方式 连续反复报警 关闭方式 自动关闭或秘钥验证成功关闭 8 故障排除 机械钥匙使用报警 低电量报警 提示您及时更换电池 防拆报警 如何触发 前后板连接线断开 警报方式 连续反复报警 关闭方式 断开电源 ...

Страница 27: ...25 如何使用紧急电源 如何更换电池 当电池电压不足 无法从外部开启时 您可以通 过使用5V充电宝作为应急电源通过Micro USB 接口给门锁上电 打开门锁后 请立即更换电池 飞利浦智能锁基础工作电源为4节5号碱性电池 电 池盒内设两组工作电源 可安装8节电池 延长续航 时间 减少更换电池次数 电池盒位于内面板上端 按住内面板顶部按钮 轻轻 扣出电池盖 即可取下电池 应急电源接口 ...

Страница 28: ...Philips和Philips盾牌图形是皇家飞利浦有限公司的注册商标 其使用需遵循皇家飞利浦有限 公司的许可 2017 深圳市柯尼斯智能科技有限公司 保留所有权利 本产品由深圳市柯尼斯智能科技有限公司负责销售与售后 深圳市柯尼斯智能科技有限公司是 本产品的担保人 规格如有变更 恕不另行通知 版本 3 0 ...

Страница 29: ......

Страница 30: ......

Страница 31: ... System lock indicator light Alarm types and alarm modes How to apply an emergency power How to replace batteries Pre setup instructions How to set up your EasyKey under Safe mode Modify Master PIN code User settings Delete a user System settings Extended functions System query How to set up your EasyKey under Normal mode User settings Delete a user System settings Extended functions System query ...

Страница 32: ...atteries immediately if there is a low battery alarm Please make sure the batteries are installed correctly Caution Do not place the battery near a fire to avoid an explosion Do not use any emergency power supply that does not meet the safety requirements to power the product Do not connect the 2 poles of the batteries with metals to avoid short circuit which may lead to an explosion Please make s...

Страница 33: ...utcheon including silicone pad Mounting plate Certificate Installation kit Inside escutcheon including silicone pad User manual Smart door card x2 Scouring pad Drilling template Quick start guide Mechanical key x2 Mortise Warranty card Batteries EasyKey易锁 User Manual Quick Start Guide EasyKey易锁 EasyKey易锁 Warranty Card EasyKey易锁 合格证 Striker ...

Страница 34: ...ng x2 5 Square shaft x2 6 Cotter pin x2 7 Cylinder key tailpiece x1 8 Mortise x1 9 Mortise anchor screw x4 10 Mounting plate x1 11 Mounting place anchor screw x2 12 Inside escutcheon silicone pad x1 13 Inside escutcheon x1 14 Inside escutcheon anchor screw x4 15 Battery cover x1 16 Inside escutcheon lower cover x1 17 Rotary knob tailpiece x1 4 5 6 7 8 ...

Страница 35: ...ighten them 3 Lock screw back Pre installation instructions Step 1 Check the door opening direction This product can be installed on doors of 4 types of opening directions left out pull right in push right out pull and left in push Left in push Right in push Indoor Indoor Indoor Indoor Outdoor Outdoor Outdoor Outdoor Left out pull Right out pull Left handle open Right handle open ...

Страница 36: ...e top 2 Press the latch bolt into the mortise and rotate it 180 degrees Then pull it out 3 Push the tailpiece downwarads to the bottom 4 Change the direction of the screws depending on your needs The directional screws must be fixed on the inside of the door namely towards the inner unit of the lock 1 Use the drilling template to drill the needed holes on the door and mount the mortise into the do...

Страница 37: ...tside of the door Tighten the 4 anchor screws in the mortise You may need to cut the cylinder key tailpiece according to the door thickness Please use suitable lengths of square shaft connecting screw and anchor screw Arrange the connecting screws and the cylinder key tailpiece properly Place the spring and square shaft in the handle hole 3 4 Attach the mounting plate tightly to the inside of the ...

Страница 38: ... the inner unit into the two rotary holes on the mortise to let the inner unit tightly attach to the inside of the door Tighten the 4 anchor screws Install the batteries and close the battery cover and the lower cover of the inner unit Then the installation is completed Try out the inner and outer handles the rotary knob Try out the mechanical key Check if all parts are properly connected 7 8 9 10...

Страница 39: ...3 4 5 6 Fingerprint sensor Card reader area Hollow square shaped lever handle Door status indicator light Low battery indicator light Emergency power interface Mechanical key hole Mute button Keypad Battery case Safe handle switch Hollow square shaped lever handle Reset button Rotary knob Extension module Settings button S ...

Страница 40: ...the following table for future query When switching between Safe mode and Normal mode all registered user data will be empited Please be cautious Master PIN code User PIN code How to enter Master mode One time user PIN code Visitor PIN code Number of fingerprints Number of smart cards Safe mode Yes Default 12345678 10 6 12 digits Numbered 00 09 Enter master PIN code 1 None 100 Numbered 00 99 100 N...

Страница 41: ...u Attention Enter the new Master PIN code and press to confirm Re enter the new Master PIN code and press After hearing a voice prompt of Succeeded press S to exit Press 1 to modify Master PIN code 1 Press the Settings button S enter Master PIN code and press to confirm How to set up your EasyKey under Safe mode User settings Press S enter Master PIN code and press to confirm Press 2 to enter user...

Страница 42: ... to enter user settings then press 2 again to enter fingerprint registration Press 2 to enter user settings then press 3 to enter card registration Press 2 to enter user settings then press 4 to enter one time PIN code registration 2 2 2 2 3 Hold the card close to the card reader until you hear a beep After hearing a voice prompt of Succeeded press S to exit 4 Register a fingerprint Register a car...

Страница 43: ...nter user deletion then press 4 to enter one time user PIN code deletion Press S enter Master PIN code and press to confirm When hearing the voice prompt of Enter a user number you can enter Master PIN code to delete all user cards 3 4 Press S enter Master PIN code and press to confirm Press 3 to enter user deletion then press 5 to enter user information emptying 3 Delete a card Press S enter Mast...

Страница 44: ...igher volume The extended functions are optional 4 Volume Settings 3 Or Or Or 2 1 or 2 1 5 Press 5 to enter extended functions Press S enter Master PIN code and press to confirm To join a network press 1 To exit a network press 2 Before setting up the extended functions please download the Philips EasyKey APP open the APP and enable Bluetooth function on your mobile phone or 2 1 Extended Functions...

Страница 45: ...sor Repeat the operation for 4 times in total After hearing a voice prompt of Succeeded press S to exit Press 1 to enter user settings then press 2 to enter fingerprint registration 1 2 Press S enter Master PIN code and press to confirm Register a fingerprint Press S enter Master PIN code and press to confirm Press 1 to enter user settings then press 3 to enter card registration 1 3 Register a car...

Страница 46: ...n to enter card emptying Press S enter Master PIN code and press to confirm Delete all one time user PIN codes Enter User PIN code and press to confirm After hearing a voice prompt of Succeeded press S to exit Delete User Information 2 Press S enter Master PIN code and press to confirm Press 2 to enter user deletion then press 1 to enter fingerprint emptying 1 Delete all fingerprints Attention 4 P...

Страница 47: ... Succeeded press S to exit Press 2 to enter user deletion then press 3 to enter one time user PIN code deletion 3 Press S enter User PIN code and press to confirm Enter Master PIN code and press to confirm Re enter Master PIN code and press to confirm After hearing a voice prompt of Succeeded press S to exit Press 3 to enter system settings then press 1 to enter mode switch 3 System Settings 1 Swi...

Страница 48: ...ress 2 Before setting up the extended functions please download the Philips EasyKey APP open the APP and enable Bluetooth function on your mobile phone 2 1 The extended functions are optional Attention Attention Extended Functions Press S enter User PIN code and press to confirm Adjust the language to your need For Chinese press 1 for English press 2 After hearing a voice prompt of Succeeded press...

Страница 49: ...disable the safe handle function by toggling the switch to green 1 Place the finger of which the fingerprint has been registered on the sensor 2 After hearing a voice prompt of Door opened push the lever handle to finally open the door 1 Place the card that has been successfully registered properly in the card reader area 2 After hearing a voice prompt of Door opened push the lever handle to final...

Страница 50: ...ed Lift the lever handle after closing the door then the bolts will pop up and the door will be locked Lock from outside Lock from inside Deadlock from inside When the door is locked rotate the knob to the red scale as shown below to enable inside deadlock You can also rotate the knob to the green scale to disable inside deadlock ...

Страница 51: ...and key shell vertical to each other Rotate the key shell towards the handle for 90 until it becomes close to the door surface 3 Rotate the key shell downwards for 180 to make the key shell parallel to the ground Then rotate the key shell horizontally towards the handle to unlock the door Safe handle function Fix the inner handle Function Fix the inner handle and forbid unlocking from inside How t...

Страница 52: ...ory settings One button mute function Function Use only one button to mute the lock by turning off the voice guide Applicable to the scenes where you don t want to disturb your family How to use 1 Mute When the system is awake long press the Mute button for 2 seconds to enter one time mute mode The button will glow green 2 Unmute When the system is awake long press the Mute button for 2 seconds to...

Страница 53: ...light will glow red indicating that the door has been closed Colors of the light and the corresponding meanings Red After waking up the system will run an automatic examination on the battery voltage If the voltage is too low the light will flash in red and there will be a voice prompt of Low battery Please replace all batteries Lock status indicator light Low battery indicator light 7 Use of the ...

Страница 54: ...light 3 flashes 2 flashes 1 flash If there are 10 consecutive inputs of any of the 3 types of verification information fingerprint PIN code card this type of verification will be locked for 3 minutes You can unlock with the other 2 types of verification information The prompt only appears after the system wakes up Attention 3 minutes 2 minutes 1 minute Mute mode indicator light ...

Страница 55: ...ill be automatically turned off Triggering The mechanical key is inserted for unlocking Alarm mode Continuous repeated alarms Turning off The alarm can be turned off automatically or by a successful verification of any type 8 Troubleshooting Mechanical key opening alarm Low battery alarm prompting you to replace the batteries in time Anti dismantling alarm Triggering The connection wire of the out...

Страница 56: ...fter opening the door lock please replace the batteries immediately The lock is powered by four 1 5V alkaline batteries There are two sets of working power inside the battery case Eight batteries can be put in to extend the battery life and reduce battery replacement frequency The battery case is located at the upper end of the inner unit By pushing the battery cover upwards you can remove the bat...

Страница 57: ...27 ...

Страница 58: ... Shenzhen Conex Intelligent Technology Co Ltd All rights reserved This product is sold and serviced under the responsibility of Shenzhen Conex Intelligent Technology Co Ltd and Shenzhen Conex Intelligent Technology Co Ltd is the warrantor in relation to this product Specifications are subject to change without notice Version 1 1 ...

Отзывы: