


10
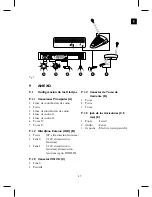
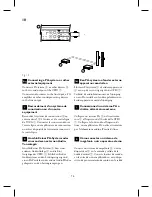
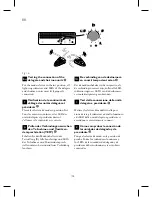
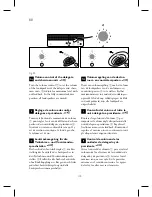
Connecting a telephone coupler
Connect the telephone coupler
2
to the
telephone input
and
output
of the CPSU
1
. The telephone coupler is further con-
nected to the telephone wall socket
4
and a
telephone
3
for dialing.
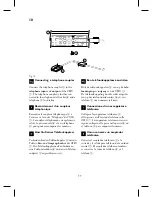
Raccordement d’un coupleur
téléphonique
Raccordez le coupleur téléphonique
2
à
l’entrée et à la sortie "Téléphone" de l’UCA
1
. Le coupleur téléphonique est également
relié à la prise murale
4
et à un téléphone
3
pour pouvoir composer les numéros.
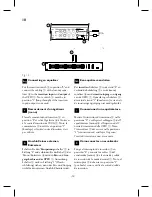
Anschluß eines Telefonkopplers
Verbinden Sie den Telefonkoppler
2
mit der
Telefon
Ein-
und
Ausgangsbuchse
der CPSU
1
. Der Telefonkoppler muß außerdem an
eine Telefonsteckdose
4
und an ein Telefon-
endgerät
3
angeschlossen sein.
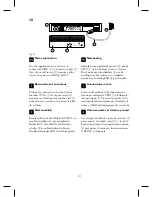
Een telefoonkoppelaar aansluiten
Sluit de telefoonkoppelaar
2
aan op de
tele-
fooningang
en
-uitgang
van de CPSU
1
.
De telefoonkoppeling wordt verder aangeslo-
ten op het telefoonwandcontact
4
en een
telefoon
3
om nummers te kiezen.
Connessione di un accoppiatore
telefonico
Collegare l’accoppiatore telefonico
2
all’ingresso ed all’uscita del telefono sulla
CPSU
1
. L’accoppiatore telefonico viene in
seguito collegato alla presa nella parete
4
ed
al telefono
3
per comporre il numero.
Cómo conectar un acoplador
telefónico
Conecte el acoplador telefónico
2
a la
entrada y la salida para teléfono de la unidad
central
1
. El acoplador telefónico también
se conecta a la toma de teléfono
4
y al
teléfono
3
.
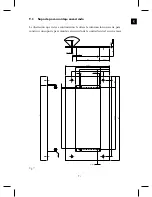
2
3
4
Gain
Gain
Recorder
Line
Telephone
Insertion
In
Out
1
Fig. 13
99
Содержание CCS 800
Страница 20: ...22 ...
Страница 34: ...36 ...
Страница 48: ...50 ...
Страница 62: ...64 ...
Страница 76: ...78 ...
Страница 90: ...92 ...
Страница 91: ...10 INSTALLATION INSTALLATION INSTALLATION INSTALLATIE INSTALLAZIONE INSTALACIÓN 93 ...
Страница 100: ...102 ...
Страница 101: ...11 OPERATION FONCTIONNEMENT BETRIEB BEDIENING FUNZIONAMENTO FUNCIONAMIENTO 103 ...