12
BDL5531EL LCD
On-Screen Display
ʳ
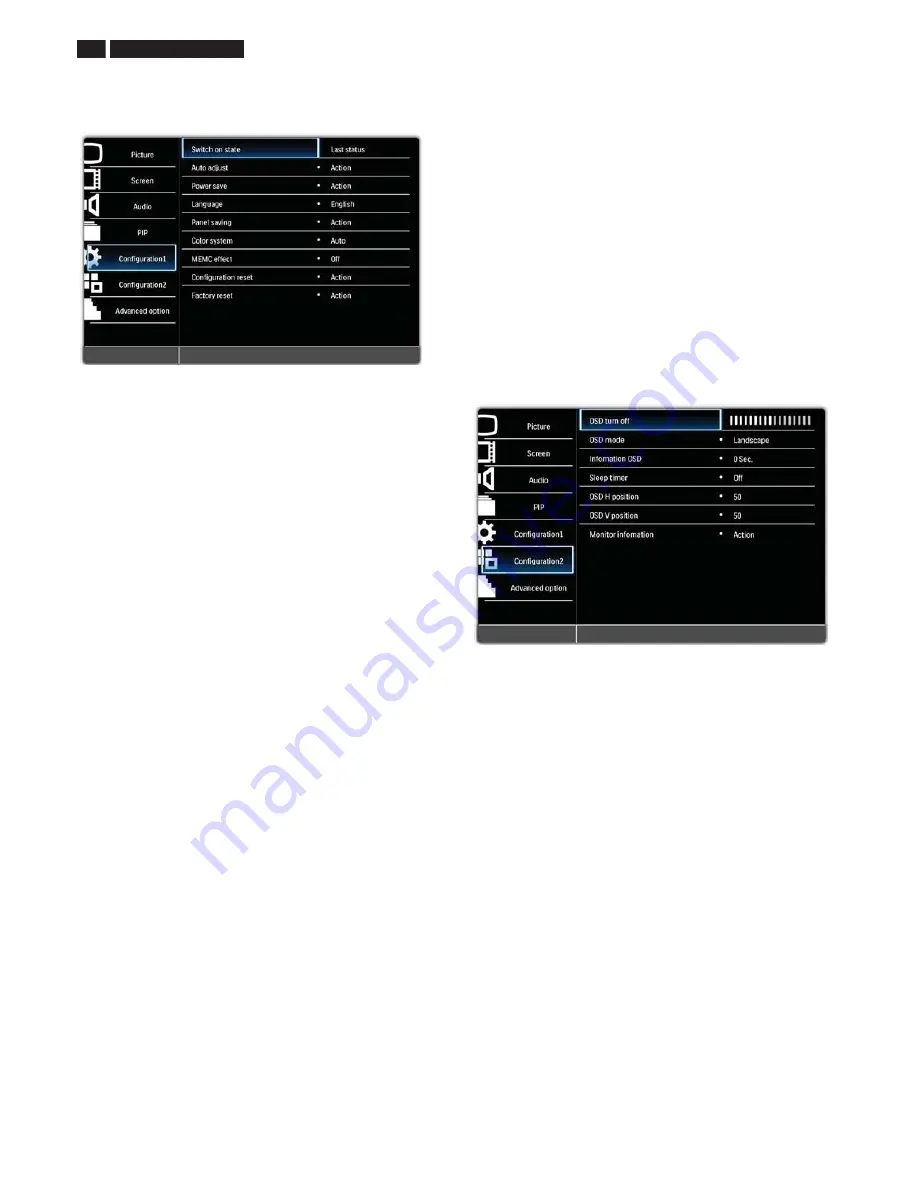
CONFIGURATION 1 MENU
CONFIGURATION
Switch on state
Set the display to turn on or remain off when the power cord is connected
to a wall outlet.
Use the
UP
/
DOWN
button to toggle between
•
Last status
- The display will not be affected by the power cord
connection.
•
Forced on
- The display will turn on when the power cord is connected
to a wall outlet.
•
Power off
- The display will remain off when the power cord is
connected to a wall outlet.
Auto adjust
Note: For VGA input only.
Use this function to automatically optimize the display of the VGA image.
Press the
SET
button to adjust.
Power save
Set the display to reduce the power automatically. Use the
UP
/
DOWN
button to toggle between
•
RGB
- Select
On
to let the display enter DPMS (Display Power
Management Signaling) mode when no signal can be detected from the
HDMI, DVI-D, and VGA inputs after three successive cycles. Use the
PLUS
/
MINUS
button to make selection.
•
Video
- Select
On
to let the display enter power saving mode when no
signal is detected from the Video, S-Video, and Component inputs after
three successive cycles. Use the
PLUS
/
MINUS
button to make your
selection.
Language
Select the language for the OSD menu.
Use the
UP
/
DOWN
button to select a language.
Panel saving
Choose to enable the panel saving functions to reduce the risk of the
"image persistence”. Use the
PLUS
/
MINUS
button to toggle between
•
Brightness
- Select
On
and the brightness of the image will be
reduced to an appropriate level, and the
Brightness
setting in the
Picture
menu will become unavailable. Use the
PLUS
/
MINUS
button
to make selection.
•
Pixel shift
- Select the time interval for the display to slightly expand the
image size and shift the position of pixels in four directions (up, down,
left, and right). Use the
PLUS
/
MINUS
button to make selection
(
Off
-
900
seconds from current time). This helps to alleviate the issues
of ghost imaging.
IMPORTANT
:
It is not recommended to keep a single static image displayed on your
unit for long periods of time. This can cause image sticking, or ghost
images, which will decrease the quality of your images. In
some instances, ghost image damage can be permanent. To avoid such
issues, we strongly recommend one of the
ʳ
following actions:
• Change the picture periodically
• Enable
Pixel shift
(See Pixel shift under Section CONFIGURATION 1
MENU)
• Use a screen saver with changing images
COLOR SYSTEM
Note: For Video and S-Video inputs only.
Select the color system depending on the input video format.
Use the
UP
/
DOWN
button to make selection.
•
AUTO
•
PAL 4.43
•
PAL 3.58
•
SECAM
•
NTSC 4.43
•
NTSC 3.58
MEMC Effect
To turn the Motion Estimation, Motion Compensation (MEMC) effect
on/off. Use the
UP
/
DOWN
button to make selection.
CONFIGURATION RESET
Reset all settings in the
Configuration 1
menu. Use the
PLUS
/
MINUS
button to make selection. Select
Reset
and press the
SET
button to
restore settings to factory preset values. Press the
EXIT
button to cancel
and return to the previous menu.
FACTORY RESET
Reset all settings in the
Picture
,
Screen
,
Audio
,
PIP
,
Configuration 1
,
Configuration 2
, and
Advanced option
menus. Use the
PLUS
/
MINUS
button to make selection. Select
Reset
and press the
SET
button to
restore settings to factory preset values. Press the
EXIT
button to cancel
and return to the previous menu.
CONFIGURATION 2 MENUCONFIGURATION
ʳ
OSD TURN OFF
Set the period of time the OSD menu stays on the screen (from
5
to
120
seconds) Use the
PLUS
/
MINUS
button to adjust.
OSD MODE
Select the orientation of the OSD according to the orientation the display
is installed. Use the
UP
/
DOWN
button to toggle between
•
PORTRAIT
•
LANDSCAPE
INFORMATION OSD
Set the period of time the information OSD stays on the screen. The
information OSD will display when input signal is changed.
Use the
UP
/
DOWN
button to adjust. The information OSD will not appear
when
Off
is selected. If
0
is selected, the information OSD will remain on
the screen..
SLEEP TIMER
Set the display to turn itself off to standby mode within a user-specified
amount of time. (
Off
-
24
hours from current time)
Use the
UP
/
DOWN
button to adjust.
Note: When the Sleep timer is activated, Schedule settings will be
disabled.
OSD H POSITION
Adjust the horizontal position of the OSD menu.
Use the
UP
/
DOWN
button to adjust.
OSD V POSITION
Adjust the vertical position of the OSD menu.
Use the
UP
/
DOWN
button to adjust.
MONITOR INFORMATION
Shows the information about your display, including model name, serial
number, operating hours and software version.
Press the
PLUS
button to view the information. Press the
EXIT
button to
return to the previous menu.
Содержание BDL5531EL/00
Страница 22: ...22 BDL5531EL LCD OHFWULFDO QVWUXFWLRQV Electrical characteristics In Out Terminals General Internal Speaker ...
Страница 34: ...34 BDL5531EL LCD DDC Instructions Serial Number Definition ...
Страница 41: ...BDL5531EL LCD 41 Wiring Diagram Power wire system Main BD AC 100 220V IN B301 B401 B402 B403 J25 Panel ...
Страница 43: ...BDL5531EL LCD 43 Block Diagram ...
Страница 44: ...44 BDL5531EL LCD Block Diagram ...
Страница 52: ...Scalar Diagram C B A 52 BDL5530EL LCD ...
Страница 53: ...Scalar Diagram C B A BDL5531EL LCD 53 ...
Страница 54: ...54 BDL5531EL LCD Power Diagram C B A ...
Страница 55: ...BDL5531EL LCD 55 Power Diagram C B A ...
Страница 56: ...56 BDL5531EL LCD Power Diagram C B A ...
Страница 58: ...Control Diagram C B A 58 BDL5531EL LCD ...
Страница 71: ...BDL5531EL LCD 71 General Product Specification ...
Страница 73: ...BDL5531EL LCD 73 General Product Specification ...
Страница 76: ...76 BDL5531EL LCD General Product Specification PICTURE MENU OVERVIEW ...
Страница 77: ...BDL5531EL LCD 77 General Product Specification ...
Страница 78: ...78 BDL5531EL LCD General Product Specification SCREEN MENU ...
Страница 79: ...BDL5531EL LCD 79 General Product Specification ...
Страница 80: ...80 BDL5531EL LCD General Product Specification AUDIO MENU ...
Страница 82: ...82 BDL5531EL LCD General Product Specification CONFIGURATION 1 MENU ...
Страница 83: ...BDL5531EL LCD 83 General Product Specification ...
Страница 84: ...84 BDL5531EL LCD General Product Specification ...
Страница 85: ...BDL5531EL LCD 85 General Product Specification CONFIGURATION 2 MENU ...
Страница 86: ...86 BDL5531EL LCD General Product Specification ADVANCED OPTION MENU ...
Страница 87: ...BDL5531EL LCD 87 General Product Specification ...
Страница 88: ...88 BDL5531EL LCD General Product Specification ...
Страница 98: ...98 BDL5531EL LCD General Product Specification ...
Страница 99: ...BDL5531EL LCD 99 General Product Specification ...
Страница 118: ...Exploded View BDL5531EL 118 BDL5531EL LCD ...


