background image

Great user manuals database on 

UserManuals.info

9

How to Use the On Screen Display (OSD)

A d v a n c e d   C o n t r o l s   w i n d o w

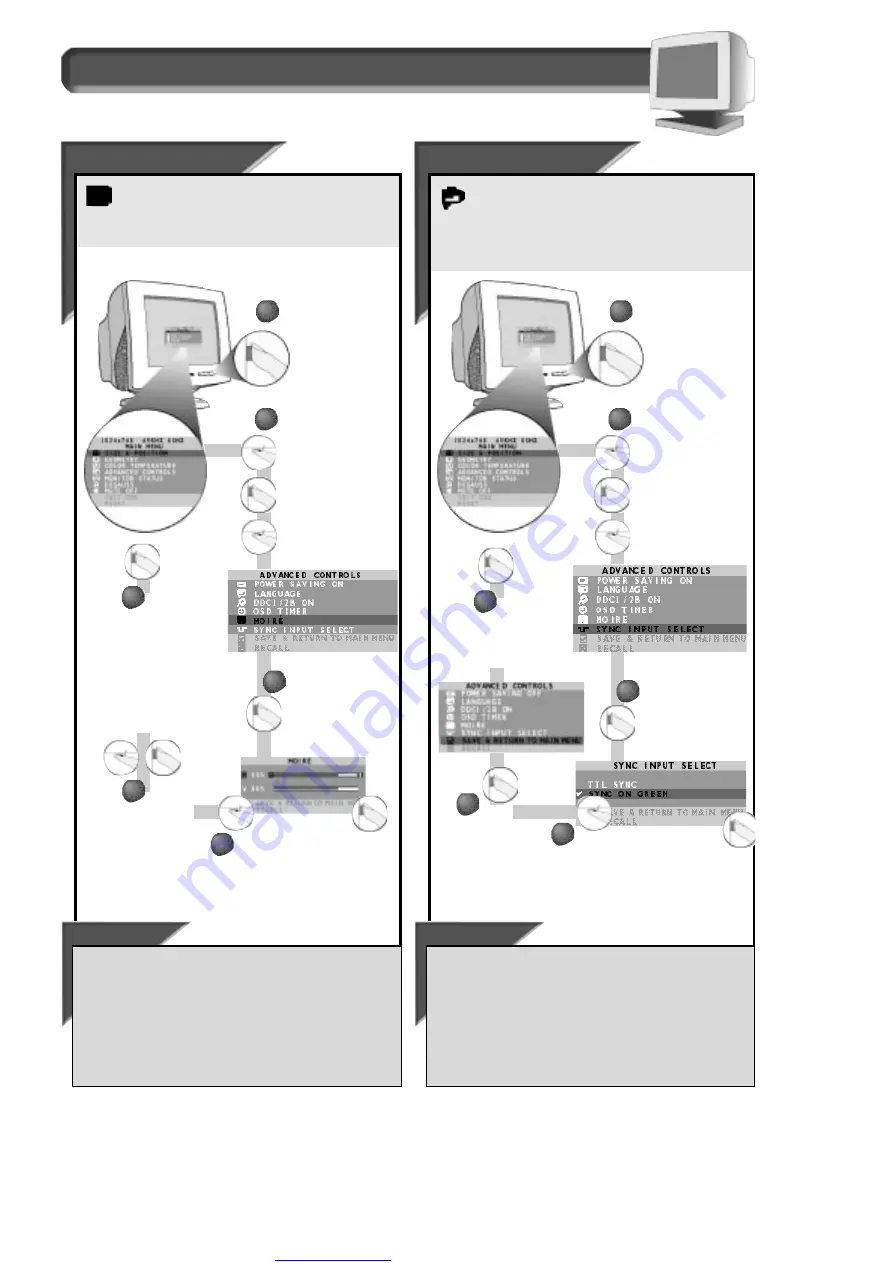
Moire

Moire

Moire is a fringe pattern arising from the interference between
two superimposed line patterns. To adjust your Moire, follow

the steps below.

Note: Use only if necessary. Activating Moire can

affect sharpness.

Smart Help

Press the O

N

S

CREEN

D

ISPLAY

button.

3

3

Press the O

N

S

CREEN

D

ISPLAY

button twice to

bring up M

OIRE

screen

and highlight
H(

ORIZONTAL

) M

OIRE

.

4

4

Turn the R

OTARY

knob until the

desired H

ORIZONTAL

M

OIRE

is

selected. Then, press the O

N

S

CREEN

D

ISPLAY

button.

Once you

have made

the adjustments, press

the O

N

S

CREEN

D

ISPLAY

button once to save your

changes, then again to

exit the Advanced

Controls window, and a

third time to exit the Main

Menu.

6

6

1

1

Turn the R

OTARY

knob

until the A

DVANCED

C

ONTROLS

window is

highlighted. Next,
press the O

N

S

CREEN

D

ISPLAY

button. Then,

turn the R

OTARY

knob

until M

OIRE

is

highlighted.

To make other changes in the A

DVANCED

C

ONTROLS

window . . .

. . .

after returning to A

DVANCED

C

ONTROLS

window [but before pressing

the O

N

S

CREEN

D

ISPLAY

(OSD) button a third time in 

STEP

6], turn the

R

OTARY

knob until another feature – for example, S

YNC

I

NPUT

S

ELECT

– is

highlighted. Next, follow steps 2 - 6 under S

YNC

I

NPUT

S

ELECT

.

. . . after you have exited completely, press the OSD button and follow
the steps under that feature, for example, S

YNC

I

NPUT

S

ELECT

.

2

2

To adjust

the V

ERTICAL

M

OIRE

, turn

the Rotary knob until

V(

ERTICAL

) M

OIRE

is

highlighted. Then, press

the O

N

S

CREEN

D

ISPLAY

button again and repeat

step 4.

5

5

Sync Inp

Sync Inp

ut Select

ut Select

S

YNC

I

NPUT

S

ELECT

synchronizes your monitor with the video

card in your computer. In most cases you will not need to use

this feature. To adjust your S

YNC

I

NPUT

S

ELECT

, follow the steps below.

Note: Use only if necessary. If your screen has a greenish cast to it that
cannot be adjusted for with the Color Temperature controls on pages
10 and 11, then try this.

Smart Help

Press the O

N

S

CREEN

D

ISPLAY

button.

3

3

Press the O

N

S

CREEN

D

ISPLAY

button to

bring up S

YNC

I

NPUT

S

ELECT

screen.

Turn the R

OTARY

knob until either

TTL S

YNC

or S

YNC ON

G

REEN

is

selected. Then, press the O

N

S

CREEN

D

ISPLAY

button.

Note: a checkmark

appears beside the current S

YNC

I

NPUT

selected.

Press the 

O

N

S

CREEN

D

ISPLAY

button to

exit the Main

Menu.

6

6

1

1

Turn the R

OTARY

knob

until the A

DVANCED

C

ONTROLS

window is

highlighted. Next,
press the O

N

S

CREEN

D

ISPLAY

button. Then,

turn the R

OTARY

knob

until S

YNC

I

NPUT

S

ELECT

is highlighted.

To make other changes in the Main Menu window . . .

. . .

after returning to 

THE

Main Menu [but before pressing the O

N

S

CREEN

D

ISPLAY

(OSD) button in 

STEP

6], turn the R

OTARY

knob until another

feature – for example, C

OLOR

T

EMPERATURE

– is highlighted. Next, press

the OSD button, turn to the next page and follow steps 2 - 7 under
C

OLOR

T

EMPERATURE

.

. . . after you have exited completely, press the OSD button and use the
R

OTARY

knob to select that feature, for example, C

OLOR

T

EMPERATURE

.

2

2

Press

the O

N

S

CREEN

D

ISPLAY

button

again to save

your selection.

5

5

4

4

Содержание 105MB

Страница 1: ... WINDOW Rotation 12 Pincushion 12 Trapezoid 12 Balanced Pincushion 12 Parallelogram 12 MAIN MENU SIZE POSITION WINDOW Zoom 13 Horizontal Position 13 Horizontal Size 13 Vertical Position 14 Vertical Size 14 MAIN MENU SAVE CANCEL 15 MAIN MENU EXIT OSD RESET 15 ADDITIONAL INFORMATION AUDIO USB SET UPS 16 POWER SAVING FEATURE 17 GLOSSARY 17 PIN ASSIGNMENT 18 SPECIFICATIONS 18 INDEX 18 TROUBLESHOOTING ...

Страница 2: ...cation that demands a large screen size and high resolutions The monitor automatically scans horizontal frequencies from 30KHz to 70KHz and vertical frequencies from 50Hz to 160Hz With microprocessor based digital controlled circuitry and On Screen Display OSD controls the monitor can automatically adjust itself to the video card s scanning frequency and can display an image with the precise param...

Страница 3: ...d Contrast REAR VIEW VIDEO IN Jack One end of the cable is already connected here The other end connects to the computer See foldout for details MICROPHONE OUT Jack Connect the supplied microphone cable to transmit sound from the monitor to a computer or amplifier POWER Plug Plug the power cord in here See foldout for details USB Connector under the edge optional Slot for plugging in the USB Hub o...

Страница 4: ...through the On Screen Display OSD Below is a brief description of the seven On Screen Display windows ADVANCED CONTROLS This menu item has six features POWER SAVING LANGUAGE DDC1 2B OSD TIMER MOIRE and SYNC INPUT SELECT To adjust these features turn to pages 7 9 Note LANGUAGE allows you to change the On Screen Display from English to French Spanish German or Italian See page 7 for details PEDESTAL...

Страница 5: ...ps 2 3 under VOLUME If you do not press the BRIGHTNESS button a second time the Contrast window will time out disappear after five seconds You can change this time See page 8 for time out options Press the Brightness button second one from the left on the front of the monitor 1 1 Front Panel Controls To adjust your screen s brightness follow the steps below Brightness is the overall intensity of t...

Страница 6: ...s 2 3 once you have exited the OSD press the OSD button and turn the Rotary knob until DEGAUSS is highlighted Next press the OSD button Turn to the next page and follow steps 2 3 If you do not press the OSD button a third time the OSD window will time out disappear after five seconds You can change this time See page 8 for time out options 2 2 Press the ON SCREEN DISPLAY button 3 3 Press the ON SC...

Страница 7: ...erial number of your monitor Note This screen is for review only Smart Help After returning to the Main Menu to continue to ADVANCED CONTROLS turn the ROTARY knob until ADVANCED CONTROLS is highlighted Next follow steps 2 3 under ADVANCED CONTROLS on the next page to exit completely press the OSD button Note Neither the scanning frequencies nor the serial number can be changed at this screen The s...

Страница 8: ...ext press the ON SCREEN DISPLAY button Advanced Controls window L Langu anguage age The On Screen Display shows its settings in one of five languages The default is English but you can select French Spanish German or Italian To select LANGUAGE follow the steps below Smart Help Press the ON SCREEN DISPLAY button 3 3 Press the ON SCREEN DISPLAY button to bring up LANGUAGE screen 4 4 Turn the ROTARY ...

Страница 9: ...imer With OSD TIMER you can set the time for the On Screen Display to time out Your choices range from 5 to 50 seconds To select OSD TIMER follow the steps below Note Ten seconds is the default setting Smart Help Press the ON SCREEN DISPLAY button 3 3 Press the ON SCREEN DISPLAY button to bring up OSD TIMER screen 4 4 Turn the ROTARY knob until the desired time out period is selected Then press th...

Страница 10: ...TICAL MOIRE turn the Rotary knob until V ERTICAL MOIRE is highlighted Then press the ON SCREEN DISPLAY button again and repeat step 4 5 5 Sync Inp Sync Input Select ut Select SYNC INPUT SELECT synchronizes your monitor with the video card in your computer In most cases you will not need to use this feature To adjust your SYNC INPUT SELECT follow the steps below Note Use only if necessary If your s...

Страница 11: ... 2 turn the ROTARY knob until COLOR TEMPERATURE is highlighted Next follow steps 2 7 under COLOR TEMPERATURE on the next page to select the other preset setting 9300 K or 6500 K press the OSD button and repeat steps 2 5 Press the ON SCREEN DISPLAY button 1 1 Turn the ROTARY knob until the COLOR TEMPERATURE window is highlighted Then press the ON SCREEN DISPLAY button Press the ON SCREEN DISPLAY bu...

Страница 12: ...REEN DISPLAY button twice more after completing step 7 above Press the ON SCREEN DISPLAY button Turn the ROTARY knob until the COLOR TEMPERATURE window is highlighted Next press the ON SCREEN DISPLAY button Turn the Rotary knob until User 1 is highlighted Note a checkmark appears beside the current selection First press the ON SCREEN DISPLAY button RED will be highlighted Next to adjust the red pr...

Страница 13: ...s the ON SCREEN DISPLAY button Turn the ROTARY knob until the GEOMETRY window is highlighted Next press the ON SCREEN DISPLAY button Then if necessary turn the ROTARY knob until ROTATION icon is highlighted Press the ON SCREEN DISPLAY button Then turn the ROTARY knob to adjust the rotation To select PINCUSHION turn the ROTARY knob until PINCUSHION is highlighted Next press the ON SCREEN DISPLAY bu...

Страница 14: ...OSD button and follow the steps under that feature for example HORIZONTAL POSITION 3 3 4 4 2 2 1 1 5 5 6 6 Horizont Horizontal al Position Position HORIZONTAL POSITION shifts the image on your screen either to the left or right Use this feature if your image does not appear centered Press the ON SCREEN DISPLAY button Turn the ROTARY knob until SIZE POSITION window is highlighted Next press the ON ...

Страница 15: ...utton and follow the steps under that feature for example VERTICAL POSITION 3 3 4 4 2 2 1 1 5 5 6 6 V Ver ertic tical Position al Position V Ver ertic tical Size al Size VERTICAL POSITION adjusts the image on your screen either up or down Use this feature if your image does not appear centered VERTICAL SIZE expands or contracts the image on your screen pushing it out toward the top and bottom of p...

Страница 16: ...4 for details You can also let the display time out and the change will be saved To cancel a change made in the SIZE POSITION window you can select CANCEL from the On Screen Display If you have made a change to only one item for example ZOOM then only ZOOM will be changed back to the previous setting If more than one item has been changed but not saved individually then all the items changed will ...

Страница 17: ...connect specially made peripherals to the monitor Refer to the Setting Up your Philips monitor foldout for a more detailed guide to setting up your monitor Microphone and Microphone and Earphones j Earphones jacks acks In addition to built in speakers and microphone you can connect this monitor to optional earphones and a microphone The jacks are on the left side of the monitor To use the micropho...

Страница 18: ...allelogram rotation and trapezoid Moire A fringe pattern caused by the interference between two superimposed line patterns Noise Term used to refer to interference with the monitor s picture USB Universal Serial Bus A way to connect your IBM compatible computer monitor and peripherals for true Plug and Play functions This is an emerging technology A Automa utomatic Power Sa tic Power Savings vings...

Страница 19: ...l Tilt 5 forward 11 backward Swivel 90 left 90 right Physical Unit dimension WxHxD 382 x 392 x 424 mm 15 04 x 15 43 x 16 69 Net weight 14 0 kg 39 6 lbs Operating conditions Temperature 0 C 40 C Humidity 10 90 Storage conditions Temperature 25 C 65 C Humidity 5 95 Specifications subject to change without notification Index Index 6500 K 10 9300 K 10 Audio Controls 5 Audio in jack 2 16 Automatic Powe...

Страница 20: ...ove any nearby magnetic objects Face the monitor East for best picture quality Missing one or Check user settings of Color Temperature See pages 10 and 11 for details more colors Make sure the monitor cable is properly connected to your computer Check to see if the monitor cable has bent pins Adjust Sync Input Select See page 9 for details Dim Picture Adjust the Brightness and Contrast controls Se...

Отзывы: