INSTALLATION INSTRUCTION
35
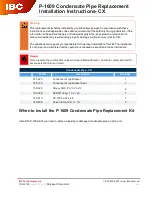
3.12 2 Pipes Venting system Pictures & Illustrations
The two pipes direct vent system can be installed in one of the following configurations.
1. Air Intake & Exhaust Pipes on an outside horizontal wall (intake and vent adjacent)
2. Air Intake & Exhaust Pipes on an outside vertical wall / roof (intake and vent adjacent)
Exhaust piping material
Polypropylene Pipe (UL 1738) rated for a maximum temperature of 230°F
Combustion air piping material
Polypropylene (UL 1738)
PVC (Schedule 40, ANSI/ASTM D2661, ULC S102.2)
CPVC (Schedule 40, ANSI/ASTM D2661, ULC S102.2)
Installation Guidelines
•
Do not allow any low points in the exhaust vent system unless a proper drain fitting is used to allow
condensate to be removed.
•
Install exhaust vent pipe directly as possible with as few elbows as possible.
•
Condensate must drain from the exhaust pipe back to the boiler.
•
Pitch the exhaust pipe approximately 1/4” per linear foot back towards the boiler.
•
A hacksaw or equivalent can be used to cut the vent pipe if necessary. Once cut be sure to file the cut
edges to remove all burs. Be sure not to deform the pipe.
•
All piping must be securely supported. Use approved vent pipe hangers at a minimum of 48” intervals to
prevent pipes from sagging. When utilizing a vertical exhaust system install the approved vent pipe
hangers to support the entire weight, the boiler is not designed to support the weight of any venting
system. (Contact your local vent material supplier for more specific installation information).
•
Assemble all vent materials in a way that prevents the accumulation of condensate.
•
Be sure not to exceed the maximum total equivalent length of the direct vent system as indicated in this
manual. See table below.
•
A maximum of 7 90° elbows may be installed in the complete intake air / exhaust vent system.
•
When using PVC or CPVC fittings long sweep elbows are recommended.
•
The venting system must be installed by a licensed, professional heating contractor who is familiar with
the installation and operation of heating appliances and venting systems.
•
The venting system must be installed in accordance with all local, state and national codes.
•
To ensure continued safe operation of the boiler, the venting system must be accessible for inspection
once a year by a qualified technician.
•
The air intake and flue exhaust terminations should be located on a wall that is least affected by
prevailing winds (high winds may affect boiler operations).
•
Do not use adhesives of any kind with polypropylene vent materials. All venting must be secured using
the manufacturer’s flue pipe clamps.
•
If using PVC or CPVC for combustion air piping an approved solvent and cement must be used
(ANSI/ASTM D2564). Only use in well ventilated areas.
Vent Termination Requirements
•
The vent system must be installed according to all local, state and national regulations. Including ANSI-
Z223.1 or NFPA 54.
•
The vent must not terminate less than 7 feet above a paved sidewalk or driveway located on public property.
The vent pipe must not terminate within 4 feet horizontally of a gas regulator vent, electrical meter, gas meter
or any relief equipment.
•
The vent must not terminate less than 1 foot grade level or anticipated snow level.
•
The vent must not terminate within 1 foot of any window or door which can be opened, any non-mechanical
air supply inlet.
•
The vent must not terminate where condensate will cause problems.
•
The vent must not terminate in a location where ice formation could cause a hazard.
•
The vent must not terminate so that flue gases are directed towards structures in such a manner that it may
cause property damage or personal injury.
•
The vent must not terminate within 3 feet of a property line (check with local authorities in your area).
•
The vent pipe must terminate at least 3 feet above any forced air inlet within 10 feet.
•
The vent pipe must terminate at least 3 feet from any non-mechanical air supply inlet or the combustion air
inlet to any other appliance.
•
The vent must not terminate within 3 feet from an inside corner on an outside wall.
Содержание PCH 50B-H
Страница 8: ...GENERALINFORMATION 5 ...
Страница 9: ...GENERALINFORMATION 6 ING ...
Страница 10: ...GENERALINFORMATION 7 ...
Страница 11: ...GENERALINFORMATION 8 ...
Страница 14: ...TECHNICALCHARACTERISTCS 11 2 2 Dimensions ...
Страница 35: ...INSTALLATION INSTRUCTION 32 Venting Pictures Illustrations ...
Страница 36: ...INSTALLATION INSTRUCTION 33 Part No PAHVK Horizontal Vent Kit ...
Страница 40: ...INSTALLATION INSTRUCTION 37 ...
Страница 41: ...INSTALLATION INSTRUCTION 38 Follow all venting manufacturers guidelines for low profile terminations ...
Страница 75: ...73 6 12 Sequence of operations ...
Страница 76: ...74 ...
Страница 77: ...75 ...
Страница 78: ...76 ...
Страница 79: ...77 ...