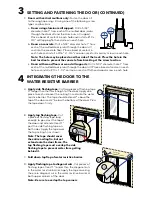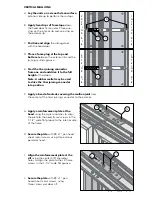
A.
Apply side flashing tape.
Cut two pieces of flashing tape
4" longer than the frame height of the door. Apply one
piece to each side over the nailing fin and onto the water
resistive barrier. The tape should extend 2" above the
top of the door and 2" below the bottom of the door. Press
the tape down firmly.
B.
Apply top flashing tape.
Cut
a piece of flashing tape long
enough to go across the top of
the door and extend at least 1"
past the side flashing tape on
both sides. Apply the tape over
the top nailing fin as shown.
Note: The tape should cover
the entire nailing fin, but not
extend onto the door frame. The
top flashing tape must overlap the side
flashing tape to prevent water from getting
behind it.
C.
Fold down top flap of water resistive barrier.
D.
Apply flashing tape to diagonal cuts.
Cut pieces of
flashing tape at least 1" longer than the diagonal cuts
in the water resistive barrier. Apply the tape covering
the entire diagonal cut in the water resistive barrier at
both upper corners of the door.
Note: Be sure to overlap the top corners.
&YUFSJPS
#
&YUFSJPS
%
$
&YUFSJPS
"
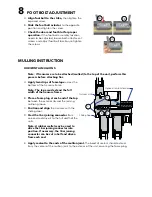
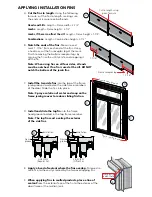
F.
Doors with vertical mullions only:
Fasten the door sill
to the rough opening sill using one of the following screw
types and locations.
a.
Doors using aluminum sill support:
Drill a 5/32"
diameter hole 1" from each of the mulled door jambs
through the door sill and the aluminum sill support.
Place a bead of sealant in each hole and install a #10 x
3/4" self tapping flat head screw in each hole.
b.
Doors on concrete:
Drill a 5/32" diameter hole 1" from
each of the mulled door jambs through the door sill
and into the concrete floor. Place a bead of sealant in
each hole and install a 3/16" x 1-3/4" corrosion resistant masonry screw in each hole.
Note: The hole may be placed on either side of the track. Place the hole in the
best location to prevent the concrete from breaking at the screw location.
c.
Doors with wood floors or wood sill supports:
Drill a 5/32" diameter hole 1" from
each of the mulled door jambs through the door sill. Place a bead of sealant in each
hole and install a #10 x 1-1/2" corrosion resistant flat head wood screw in each hole.
3F
a
3F
b,c
3
SETTING AND FASTENING THE DOOR (CONTINUED)
4
INTEGRATING THE DOOR TO THE
WATER RESISTIVE BARRIER
4A
4B
4C
4D
Содержание 803V0102
Страница 12: ...This page left blank intentionally ...

