background image

P a y R a n g e   |   B l u K e y   P r o   |   U s e r   M a n u a l


P a g e  

8 | 23


1.


Using Coin Inputs  

For harnesses connecting to coin inputs and using pulse mode (e.g. C7/L7 and C8/L8) – if machine has 
Coin Acceptor connector, but Coin Acceptor is not installed, enable Coin Acceptor input to receive 
mobile payments. Follow these steps: 

a.


Locate programming guide for the machine 

b.


Open machine service door with operator key 

c.


Consult the guide and follow the steps to enable Coin Acceptor  

d.


Set coin payment value to match BKPro pulse settings 

e.


Close the service door 

2.


Using Debit Inputs 

For harnesses connecting to debit inputs and using pulse mode (e.g. C1/L1, C2/L2, C3/L3 and C4/L4) – if 
machine has Debit connector, enable Debit input to receive mobile payments. Follow these steps: 

a.


Locate programming guide for the machine 

b.


Open machine service door with operator key 

c.


Consult the guide and follow the steps to enable Debit connector  

d.


Set Pulse mode (turn off serial mode) 

Note: some machines require jumper plug to enable serial mode. Remove the plug to turn off 
serial mode. 

e.


Set debit payment value to match BKPro pulse settings 

f.


Close the service door 

3.


Using Serial Mode 

For harnesses connecting to debit inputs and using serial mode (e.g. C1/L1, C2/L2, C3/L3 and C4/L4) – if 
machine has Debit connector, enable Debit input and serial mode to receive mobile payments. Follow 
these steps: 

a.


Locate programming guide for the machine 

b.


Open machine service door with operator key 

c.


Consult the guide and follow the steps to enable Debit connector  

d.


Set Serial mode (turn on serial mode) 

Note: some machines require jumper plug to enable serial mode. 

e.


Close the service door 

BluKey Pro Device Configuration  

1.


Register BluKey Pro device (using website) 

Note: This can be prepared off‐site, before installation. 

a.


Login with your operator account to the Manage website at 

https://manage.payrange.com


Содержание BluKey Pro 12cd

Страница 1: ...ess Selection Guide 5 Installation Steps 6 Machine Controller Programming 7 BluKey Pro Device Configuration 8 Card Reader Harnesses Reference 11 Troubleshooting Light Codes 11 Regulatory Approval Warn...

Страница 2: ...al time clock enabled models support timekeeping in case of power outage Installing BluKey Pro takes just 2 3 minutes and requires only plugging in an appropriate cable harness into the machine Interf...

Страница 3: ...bile Payment System consists of BluKey Pro accepts payments from PayRange mobile app Cable Harness connects BluKey Pro to Laundry Machines Optional Card Harness connects BluKey Pro to Card reader inst...

Страница 4: ...ge app b Load funds to the app with a credit debit card or issue free vend code c Prepare additional point of sale material such as table tents location flyers and location posters These can be downlo...

Страница 5: ...uding MGD If machine has black plastic case holding the control board and the control board has 7 pin cashless connector 7 pin connector is not used no card reader Use C2 D2 harness 7 pin connector is...

Страница 6: ...propriate card reader harness b ADC type without 6 pin connector If machine has control board without 6 pin cashless connector If machine has no card reader Use C6 D6 harness If machine has card reade...

Страница 7: ...s not power up or does not turn on solid blue LED 7 Configure BluKey Pro See section BluKey Pro Device Configuration on page 8 8 Configure machine See section Machine Controller Programming on page 7...

Страница 8: ...r with operator key c Consult the guide and follow the steps to enable Debit connector d Set Pulse mode turn off serial mode Note some machines require jumper plug to enable serial mode Remove the plu...

Страница 9: ...ation on the screen click Next button to advance Use Back button if need to return and correct any information a Open PayRange app Sign In with your operator account if not logged in b Click on the ha...

Страница 10: ...imings required for the machine controller see machine documentation g Add Credits Pulse Amount in Configure Multi Credit section match machine prices h Configure harness Select harness from the list...

Страница 11: ...ed Using incorrect harness may damage BKPro device and Card Reader R3 11 01215 00 Greenwald Card Reader Harness R3 harness supports Greenwald card readers with 8 pin Molex Micro Fit connector Attentio...

Страница 12: ...il done BKPro LED quickly flashes red BluKey Pro hardware error Replace BluKey Pro BKPro LED quickly flashes purple Uploading transactions Downloading upgrades Normal operation Mobile payment does not...

Страница 13: ...ck if machine accepts coins if BluKey Pro harness is disconnected from the machine s coin harness can disconnect harness from BluKey Pro If not replace coin acceptor and its harness 2 Check machine s...

Страница 14: ...nada license exempt RSS standard s Operation is subject to the following two conditions 1 This device may not cause interference and 2 This device must accept any interference received including inter...

Страница 15: ...e y P r o U s e r M a n u a l P a g e 15 23 1 For Technical Support Phone 1 855 856 6398 menu option 1 Email support payrange com 2 For Sales and Marketing Support Phone 1 855 856 6398 menu option 2 E...

Страница 16: ...up the price Here are some guidelines Price per credit is the total price to play the machine Cash value per pulse is how much money each pulse is worth Pulses per credit is how many pulses it takes...

Страница 17: ...icing harness wires directly to machine wires do this procedure for both wires Insert one of the machine wires leading into the control board into the pass through of the splice Note Photo shows splic...

Страница 18: ...he wires with pliers until brace is flush with the splice case Close the cover Check that wire cannot be pulled out with slight tug The linked image cannot be displayed The file may have been moved re...

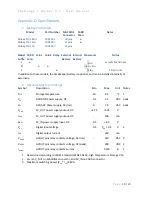
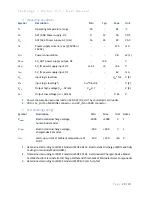
Страница 19: ...ximum Ratings Symbol Description Min Max Unit Notes TSTG Storage temperature 40 85 C 1 VCC AC1 GND Power supply DC 0 3 55 VDC peak VCC AC1 AC2 Power supply AC rms 0 39 VAC peak VDDO 5V_OUT power suppl...

Страница 20: ...voltage IO 32mA 0 55 V 1 Power consumption excludes load on AC1 AC2 DC_OUT by connected card reader 2 VDD is 5V_OUT on MACHINE connector and 5V_IN on CARD connector 5 ESD handling ratings Symbol Descr...

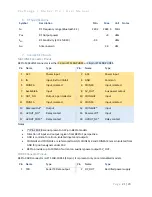
Страница 21: ..._NO Output open collector 10 COIN1HiZ Input 11 COIN1A Input isolated 12 COIN1K Input isolated 13 ReservedOut Output 14 COIN2HiZ Input 15 HVOUT_NO Relay contact 16 ReservedIn Input 17 HVOUT_COM Relay c...

Страница 22: ...Do not connect CARD connector AC1 AC2 to devices that have only half wave rectifier one of AC1 AC2 is connected to GND and another is connected to single diode Doing so will damage BKPro and card read...

Страница 23: ...P a y R a n g e B l u K e y P r o U s e r M a n u a l P a g e 23 23...

Отзывы: