background image

iv

CHAPTER 3 UPGRADING COMPONENTS ............................... 39

Safety and Precautions  ...............................................................................39

Before You Begin  ........................................................................................40

Installing a hard disk drive ...........................................................................40

Installing a CompactFlash card (PT-6910 / PT-6915F) ................................42

APPENDIX .................................................................................. 44

Troubleshooting ...........................................................................................44

Tips for Troubleshooting ...............................................................................44

The Power-On Self Test ...............................................................................44

Beep Errors at POST ...................................................................................44

Beep Message Errors at POST  ...................................................................45

General Problems  .......................................................................................46

Having the PT-6910 Series Serviced  ..........................................................47

Specifications

 ...............................................................................................48

Содержание PT-6910 Series

Страница 1: ...PT 6910 Series User Manual...

Страница 2: ......

Страница 3: ...ipment generates uses and can radiate radio frequency energy and if not installed and used in accordance with the instructions may cause harmful interference to radio communications However there is n...

Страница 4: ...not push objects in the ventilation slots as they may touch high voltage components and result in shock and damage to the components The unit uses a three wire ground cable which is equipped with a t...

Страница 5: ...Setup Considerations 10 Connecting Peripheral Devices 11 Connecting a Cash Drawer 12 Powering the PT 6910 Series On and Off 13 CHAPTER 2 BIOS SETUP 15 About the Setup Utility 15 Entering the Setup Uti...

Страница 6: ...ing a hard disk drive 40 Installing a CompactFlash card PT 6910 PT 6915F 42 APPENDIX 44 Troubleshooting 44 Tips for Troubleshooting 44 The Power On Self Test 44 Beep Errors at POST 44 Beep Message Err...

Страница 7: ...g the package contents on page 2 Identifying components on page 3 Removing the rear cover on page 7 Attaching the customer display on page 8 Adjusting display angles o n page 8 Connecting peripheral d...

Страница 8: ...ems are included If any item is missing or appears damaged contact your dealer immediately PT 6910 Series Some units ship with customer display and MSR installed Power Adapter Power Cable MSR optional...

Страница 9: ...s the parts and connectors on the machine Front right view Figure 1 2 Front right view Component Description 1 15 inch TFT LCD touch screen 2 Power Button 3 USB Cover 4 Green Power indicator LED 5 Amb...

Страница 10: ...E R 1 G E T T I N G S TA R T E D Rear view Figure 1 3 Rear view Component Description 1 Heat sink rear cover PT 6915 2 CompactFlash card cover 3 Rear cover 4 Rear cover latches PT 6915 PT 6910 PT 691...

Страница 11: ...detected 3 RJ 45 LAN connector 4 Link LED orange lights when the network is found 5 PS 2 mouse connector 6 COM3 connector 7 Parallel connector 8 COM2 connector 9 Power connector 10 RJ 11 cash drawer c...

Страница 12: ...A P T E R 1 G E T T I N G S TA R T E D CAUTION Do not plug a phone line into the RJ 45 ADSL or router connector Doing so can damage the connector COM6 is reserved for the optional customer display NOT...

Страница 13: ...7 Removing the rear cover Refer to the following to remove the rear cover Tilt the display to its full vertical orienta 1 tion Release the rear cover latches 2 Remove the rear cover 3...

Страница 14: ...refer to the following to attach it 1 Remove the customer display cover by sliding it in the direction shown by the arrow 2 Connect the customer display cable 3 Align the groove on the customer displ...

Страница 15: ...ed If you ordered the display separately refer to the following to attach it 1 Connect the customer display cable 2 Line up the bracket with the holes in the rear of the housing and secure with two sc...

Страница 16: ...ustomer display for the PT 6915 is fixed and cannot be adjusted Figure 1 5 Adjusting the display Figure 1 6 Adjusting the customer display Setup Considerations When setting up the PT 6910 Series consi...

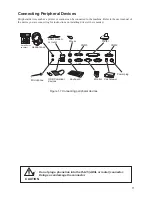
Страница 17: ...the device you are connecting for instructions on installing drivers where needed CAUTION Do not plug a phone line into the RJ 45 ADSL or router connector Doing so can damage the connector USB Compli...

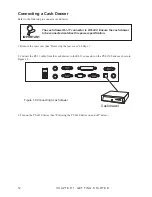
Страница 18: ...h drawer RJ 11 connector is DC 24V Ensure the cash drawer to be connected matches this power specification 1 Remove the rear cover See Removing the rear cover on Page 7 2 Connect the RJ 11 cable from...

Страница 19: ...adapter to an 3 electrical outlet Adapter Press the power button on the 4 underside of the display panel The power LED turns on To turn off the PT 6910 Series shut 5 down the operating system The mai...

Страница 20: ...14 C H A P T E R 1 G E T T I N G S TA R T E D...

Страница 21: ...anagement Setup on page 2 6 PnP PCI Configurations on page 2 8 PC Health Status on page 3 0 Frequency Voltage Control on page 3 1 Other BIOS Options on page 3 2 About the Setup Utility The BIOS Setup...

Страница 22: ...Esc Exits the current menu F1 Displays a screen that describes all key functions F5 Loads previously saved values to CMOS F6 Loads a minimum configuration for troubleshooting F7 Loads an optimum set o...

Страница 23: ...the highlight to other options When an option is highlighted execute the option by pressing Enter Some options lead to pop up dialog boxes that prompt you to verify that you wish to execute that opti...

Страница 24: ...t start up time These are display only fields You cannot make changes to these fields Base Memory This field displays the amount of conventional memory detected by the system during boot Extended Memo...

Страница 25: ...d displays the number of heads in the HDD A head is a device that reads and writes data on the hard disk Precomp displays the track where precompensation is initiated Precompensation is a feature wher...

Страница 26: ...APIC Mode This item is used to activate the ACPI Advanced Configuration and Power Management Interface Mode The default setting is Enabled IMPORTANT ACPI is a power management specification that makes...

Страница 27: ...s F6 Fail Safe Defaults F7 Optimized Defaults CPU Feature Figure 2 5 submenu Delay Prior to Thermal The Delay Prior To Thermal BIOS feature controls the activation of the Thermal Monitor s automatic m...

Страница 28: ...riority 1 Ch2 M ST380815AS 2 Bootable Add in Cards Item Help Move Enter Select PU PD Value F10 Save ESC Exit F1 General Help F5 Previous Values F6 Fail Safe Defaults F7 Optimized Defaults Hard Disk Bo...

Страница 29: ...d manufacturer The default value is By SPD CAS Latency Time When the DRAM Timing Selectable is set to Manual this field is adjustable When synchronous DRAM is installed the number of clock cycles of C...

Страница 30: ...memory for faster execution We recommend that you leave these items at the default value The default setting is Enabled Disabled VGA Setting The following items allow you to configure the settings fo...

Страница 31: ...tting is None IMPORTANT The voltage for the COM ports is set at None at the factory However for example to provide power to an installed customer display this setting must be set at 12V for the corres...

Страница 32: ...mainboard The default setting is Enabled IDE Primary Master Slave PIO Each IDE channel supports a master device and a slave device These four items let you assign which kind of PIO Programmed Input O...

Страница 33: ...n order to use an UltraDMA device The default setting is Auto SATA Mode This feature allows users to select SATA mode The options are IDE RAID and ACHI The default is IDE On Chip Serial ATA This featu...

Страница 34: ...rt in a legacy operating system such as DOS that does not support Plug and Play The default setting is Enabled Azalia AC97 Audio Select Enables and disables the onboard audio chip Disable this item if...

Страница 35: ...ou to connect with an advanced printer via the port mode it supports The options are SPP ECP EPP EPP ECP PWRON After PWR Fail This feature allows you to set the power on action to be taken when the sy...

Страница 36: ...e a master switch f or the power saving modes and hard disk timeouts If this item is set to Max Saving power saving modes occur after a short timeout If this item is set to Min Saving power saving mod...

Страница 37: ...to turn on your system When set to 0 zero for the day of the month the alarm will power on your system every day at the specified time The default setting is Disabled Date of Month Alarm When set to...

Страница 38: ...g the system dynamically allocates resources to plug and play devices as they are required If you cannot get a legacy ISA Industry Standard Architecture expansion card to work properly you might be ab...

Страница 39: ...vice IRQ 15 assigned to PCI Device Item Help Move Enter Select PU PD Value F10 Save ESC Exit F1 General Help F5 Previous Values F6 Fail Safe Defaults F7 Optimized Defaults IRQ Resources This menu can...

Страница 40: ...133 F 60 C 140 F 63 C 145 F 66 C 151 F 70 C 158 F Shutdown Temperature This item allows setting the shutdown temperature Once enabled the machine will automatically shutdown when the temperature reac...

Страница 41: ...function reduces the EMI generated by modulating the pulses so that the spikes of the pulses are reduced to flatter curves If you do not have any EMI problem leave the setting at Disabled for optimal...

Страница 42: ...ad optimized defaults for all appropriate items in the Setup Utility The optimized defaults place demands on the system that may be greater than the performance level of the components such as the CPU...

Страница 43: ...ess any key to continue 4 Press any key You are prompted to confirm the password Confirm Password 5 Type the password again and press Enter or press Enter if you are deleting a password that is alread...

Страница 44: ...38 C H A P T E R 2 B I O S S E T U P...

Страница 45: ...ctrical shorts If the LCD breaks and fluid gets onto your hands or into your eyes immediately wash with water and seek medical attention WARNING CAUTION Only qualified personnel should perform repairs...

Страница 46: ...ost of the electrical and mechanical connections can be disconnected by using your fingers It is recommended that you do not use needle nosed pliers to disconnect connectors as these can damage the so...

Страница 47: ...ecure the new hard disk onto the HDD tray and then secure the tray to the chassis 6 Reconnect the SATA power cable NOTE You may need to force power off the machine for example if the operating system...

Страница 48: ...lash card replace the cover to prevent the card from being accidently removed while power is on Refer to the following instructions to install a CompactFlash card 1 Remove the screw and the card reade...

Страница 49: ...43...

Страница 50: ...pport or for passing the issue on to service personnel Use another electrical device to confirm that the electrical outlet is working Ensure all connections are securely attached The Power On Self Tes...

Страница 51: ...eset failed Have the PT 6910 Series serviced HARD DISK S FAIL 40 HDD controller diagnostics failed Have the PT 6910 Series serviced HARD DISK S FAIL 20 HDD initialization error Have the PT 6910 Series...

Страница 52: ...ter and run the BIOS Setup Utility Confirm the Setup Utility parameters If the same message is displayed after booting up again have the PT 6910 Series serviced You cannot use a mouse or keyboard Chec...

Страница 53: ...serviced Pack the terminal in the original carton See Unpacking the PT 6910 Series on page 1 Include a description of the problem and a checklist of the steps you took when trying to fix the problem...

Страница 54: ...support dual view dual contents default value 16MB Ethernet Realtek Gigabit Ethernet controller Audio AC 97 2 2 VSR Audio Codec HDD Internal 3 5 type SATA HDD 80GB I O Interface 6 COM ports COM 1 4 at...

Страница 55: ...V DC19V 4 75A 90 watt power adaptor 3P Dimensions Physical 344 W x331 H x259 D mm Operating Temperature 0 40 C Storage Temperature 20 C 60 C Operating Storage Humidity 10 80 Color Dark Charcoal Certif...

Страница 56: ...50 A P P E N D I X...

Отзывы: