Page 14
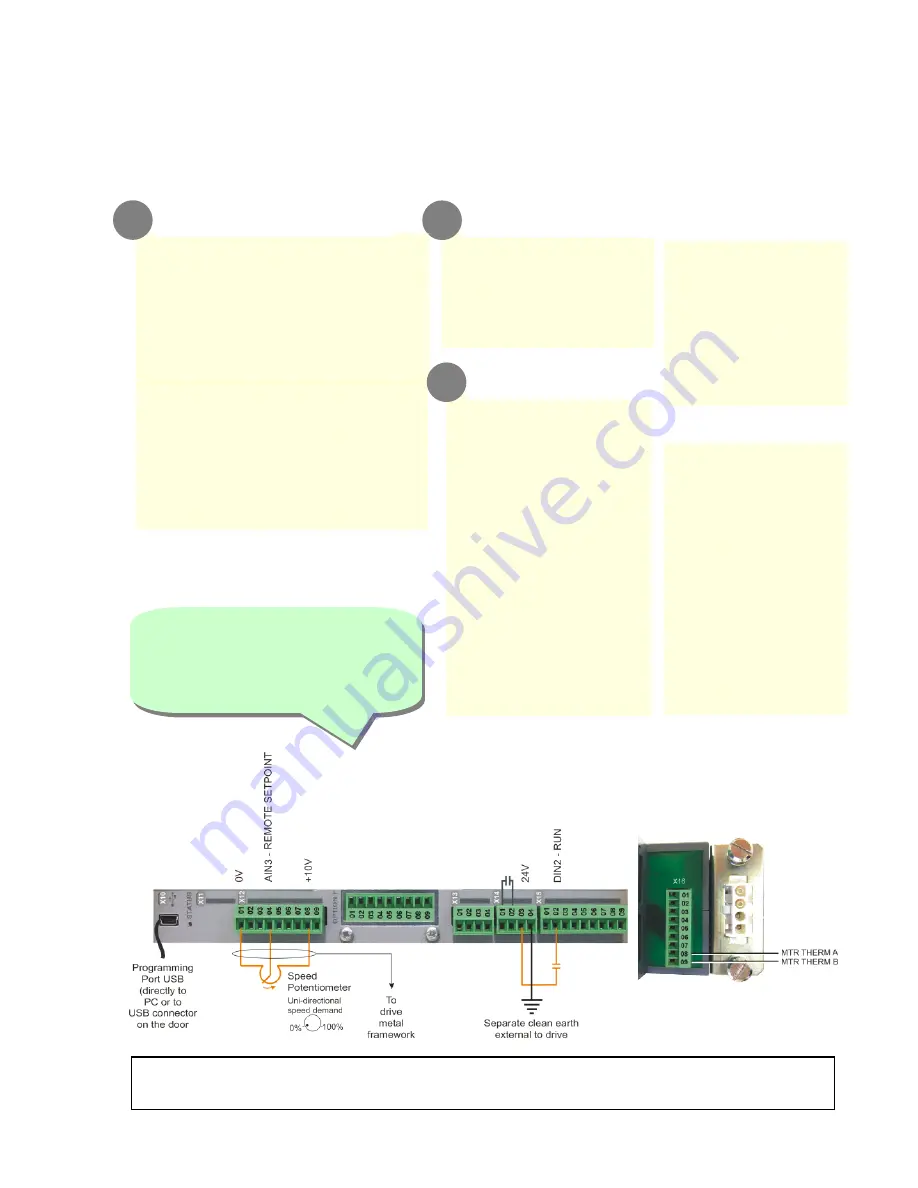
AC890PX Control Connections
•
Connect volt-free
contacts as required
•
RUN (maintained contact)
terminal X14/03 and
terminal X15/02
B
Sequencing
•
Connect a 10k
Ω
potentiometer at
terminal block X12 (Analog I/P 3)
High (CW):
terminal X12/08
Wiper: terminal
X12/04
Low (CCW):
terminal X12/01
•
Connect the shield to earth/ground
on the drive's metal framework.
A
Speed Reference
OR
•
External 2-wire speed reference
between
terminals X12/01(-) and X12/04(+)
•
Connect the shield to earth ground
on the drive's metal framework.
•
SPEED FEEDBACK
10V = ±100% speed
at terminal X12/0 6
•
TORQUE FEEDBACK
10V = ±200% torque
at terminal X12/07
•
ANALOG COMMON
0V at terminal X12/0 1
Analog
This is a basic connection diagram.
For more detailed information on control connections, refer to Appendix B.
•
DRIVE HEALTH
Relay dry contact
(24V rated) at
terminal X14/01 and
terminal X14/02
•
RUNNING
24V sourcing output
at terminal X15/08
•
ZERO SPEED
24V sourcing output
at terminal X15/09
•
DIGITAL COMMON
0V at terminal X14/04
Digital
The control terminals will accept a
single wire of size 1.5mm
2
/16AWG.
For two wires per terminal, use
smaller gauge wire such as
0.5mm
2
/22AWG.
•
Connect motor thermal
switch or thermistor to
terminals X16/08 &
X16/09. Drive will trip
when the thermal switch
opens, or when the
thermistor resistance
exceeds 4k
Ω
maximum
(PTC Type A : IEC 34-11
Part 2)
•
If the motor does not
have a protective device
(thermistor), jumper
these terminals. The
drive needs the
thermistor inputs
connected for it to run.
C
Thermistor
Содержание AC890PX Series
Страница 6: ...Page 6 Overview AC890PX top wire entry...
Страница 7: ...Page 7 AC890PX bottom wire entry...
Страница 12: ...Page 12 Wiring Diagram Bottom Wire Entry...
Страница 23: ...Page 23...
Страница 24: ...Page 24 Appendix C Electrical Ratings...
Страница 25: ...Page 25...
Страница 26: ...Page 26...


