Parallax ELEV-8 Y-6 Скачать руководство пользователя страница 2


READ THIS FIRST – IMPORTANT SAFETY INFORMATION!


READ ALL WARNINGS AND PRECAUTIONS ON THIS PAGE BEFORE 

ASSEMBLY OR OPERATION!  


WARNING: CUTTING HAZARD.  Rotating ELEV-8 Y-6 blades can cut skin and 

underlying tissues. Stay away from a powered ELEV-8 Y-6 Multicopter  and 

never become complacent during operation.  


WARNING: ENTANGLEMENT HAZARD. Secure long hair and loose clothing 

or jewelry when building, testing, and operating your ELEV-8 Y-6 

Multicopter to avoid entanglement with motors. 


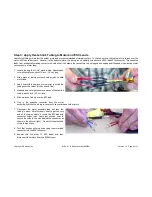
WARNING: EYE HAZARD. Always wear eye protection when assembling, 

soldering, operating, or repairing your ELEV-8 Y-6 Multicopter.  


Customer agrees to fly at Academy of Model Aeronautics (AMA) approved 

flying fields, maintaining insurance through their AMA membership. 


Inform yourself of and follow all current federal, state, and local laws 

regarding the use of hobby RC aircraft in the area where you plan to 

operate your ELEV-8 Multicopter craft. Review the FAA’s rules in entirety – 

you are responsible for following them.  


An ELEV-8 Y-6 Multicopter assembled and used as directed in this document 

is an RC hobby aircraft and does not constitute the use of an autonomous 

UAV or drone.  Modifying your ELEV-8 Y-6 Multicopter to function as an 

autonomous UAV or drone is not supported, recommended, or endorsed by 

Parallax Inc.  If you choose to modify your ELEV-8 Y-6 Multicopter to 

function as an autonomous UAV or drone, you do so entirely at your own 

responsibility and risk. 


This kit is not for beginners.  Advanced mechanical skill is required for 

building and flying an ELEV-8 Y-6 Multicopter. RC aircraft experience is 

highly recommended. 


Follow the instructions carefully; incorrect assembly of your ELEV-8 Y-6 

Multicopter could cause risk of catastrophic equipment failure, personal 

injury to you or others, and property damage. 


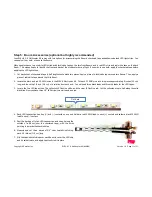
Perform initial electronic speed controller (ESC) programming before 

installing the propeller blades.  Remove propeller blades before 

reprogramming the ESCs. 


Establish and test the radio link between the RC controller and RC receiver 

before installing the propeller blades.  Remove propeller blades before 

testing a different controller.  


Always disconnect the battery when not in use. 


Store your ELEV-8 Y-6 Multicopter and its radio controller out of reach of 

children, pets, and those who do not know how to use them safely. 


Only operate your ELEV-8 Y-6 Multicopter in an area with no children, 

unsecured pets, or livestock, which can be harmed by contact with rotating 

blades.  For example, children and dogs may try to jump and catch a flying 

Y-6 Multicopter, or may run to investigate one that has just landed.  


Only operate your ELEV-8 Y-6 Multicopter outdoors and away from crowded 

areas.  All observers should stand a safe distance 

behind

  the operator. 


Only operate your ELEV-8 Y-6 Multicopter in an environment where you can 

maintain unobstructed visual contact with it.  Do not operate at night, or 

where there is fog, smoke, or dust that could limit visibility.   


Keep your ELEV-8 Y-6 Multicopter dry! Do not submerge your ELEV-8 Y-6 

Multicopter or operate it in rainy or damp conditions. Beware of sprinklers 

and of landing in wet vegetation.   


Check the wind speed before flying your ELEV-8 Y-6 Multicopter. Even a 

light breeze can make flying difficult for beginners. No one should fly in high 

winds.   


DISCLAIMER OF LIABILITY:  PARALLAX INC. IS NOT RESPONSIBLE FOR ANY SPECIAL, INCIDENTAL, OR CONSEQUENTIAL 
DAMAGES AND PERSONAL INJURIES, INCLUDING THAT TO LIFE AND HEALTH, RESULTING FROM THE CUSTOMER’S APPLICATION 
AND USE OF ANY PARALLAX INC. PRODUCTS. YOU,  THE CUSTOMER, ASSUME  FULL AND UNLIMITED RESPONSIBILITY FOR ALL 
CUSTOMER ELEV-8 Y-6 MULTICOPTER APPLICATIONS AND USES.


Copyright © Parallax Inc. 

ELEV-8 Y-6 Multicopter Kit (#80100) 

Version 1.0   Page 2 of 31  


Содержание ELEV-8 Y-6

Страница 1: ...Camera Systems Specifications Weight without battery 2 7 lbs 1 23 kg fully assembled Payload capacity excluding battery 4 lbs 1 8 kg Average assembly time 8 hours Height assembled 9 in 23 cm Rotor to...

Страница 2: ...or others and property damage Perform initial electronic speed controller ESC programming before installing the propeller blades Remove propeller blades before reprogramming the ESCs Establish and tes...

Страница 3: ...WG silicone wire stranded blk 710 00042 4 Screw 4 40 1 1 4 PH SS 750 00059 1 25 12 AWG silicone wire stranded red ELEV 8 Y 6 Airframe Kit Contents 80130 710 00006 8 Screw 4 40x1 2 PH SS 800 00021 2 16...

Страница 4: ...ell 30 C discharge rate LiPo Battery Charger PC running Windows to configure the control board firmware for Y6 operation Tools Required Soldering iron solder and flux Component vise 1 Phillips screwdr...

Страница 5: ...Copyright Parallax Inc ELEV 8 Y 6 Multicopter Kit 80100 Version 1 0 Page 5 of 31...

Страница 6: ...EC3 connectors wire cutters wire stripper ruler and soldering supplies 2 Using a ruler and wire cutters measure and cut eighteen lengths of the red 16 AWG wire each 14 inches 35 6 cm long 3 Use wire s...

Страница 7: ...Solder an opposite gender EC3 connector to the end of each speed controllers blue leads 8 Connect the male EC3 connectors to the female EC3 connectors of your speed controller to verify that they fit...

Страница 8: ...r blow dryer to shrink the tubing over the solder joint as shown top 4 Measure and cut eighteen more pieces of heat shrink tubing each 1 inch 2 5 cm long 5 Slide a piece of tubing over an ESC lead 6 P...

Страница 9: ...econd Motor Assembly to the Nylon Standoffs item 8 4 One end of each Boom item 3 has two holes spaced about one inch apart Slide an assembled Motor Mount on this end of each Boom so that the motor lea...

Страница 10: ...710 00039 Copyright Parallax Inc ELEV 8 Y 6 Multicopter Kit 80100 Version 1 0 Page 10 of 31...

Страница 11: ...AWG wire into two pieces approximately 8 inches 20 cm long and then strip 1 4 inch 0 6 cm of insulation from each end You will need three black leads and three red leads for the LED tapes 3 Locate th...

Страница 12: ...rt this end into the landing gear mount and be sure that the notch is facing the set screw hole This alignment will allow you to lock the carbon fiber rod in position 2 Apply a light coating of Loctit...

Страница 13: ...he Bottom Chassis Plate 2 Locate the correct mounting holes on the Bottom Chassis Plate to use for the rear Motor Boom assembly 3 Position the rear Motor Boom assembly item 2 in the correct place on t...

Страница 14: ...Copyright Parallax Inc ELEV 8 Y 6 Multicopter Kit 80100 Version 1 0 Page 14 of 31...

Страница 15: ...your LED tape together in the center of your chassis 2 Solder the red leads together in an EC3 connector 3 Solder the black LED tape leads into another EC3 connector 4 Cut two 3 4 inch lengths of the...

Страница 16: ...tion off of one end and inch off of the other These two wires will be used for connecting your LEDs to your power harness 3 Solder a female EC3 connector onto the ends of both 3 inch 12 AWG wires with...

Страница 17: ...both batteries together using the strap holes indicated and you can trim the leads to about 4 inches If you are going to use a custom layout to accommodate extra electronics or anything else you may...

Страница 18: ...to ensure they are properly seated and will not wiggle free 11 Reposition the harness onto the chassis Using a marker or method of your choosing mark the ESCs so you can easily identify which lead go...

Страница 19: ...r ESC For the time being the motor to ESC connections do not matter as we will address this issue in a later step Also be sure to connect your LED leads to their power harness leads so that you will h...

Страница 20: ...O Plane Mode End point adjustment Set to 50 initially If the ELEV 8 still seems too reactive reduce to 30 until you get used to flying it Dual Rates D R 100 Channel Reverse Normal Hi Tech Spektrum JR...

Страница 21: ...port and Batt port at the same time this would damage the card 3 Set the ESC card to the configuration shown in the picture and the table then push OK to program the ESC Repeat with each ESC using the...

Страница 22: ...he front of your ELEV 8 Y 6 Multicopter If you have used the checkered stickers and or the LED tapes the front edge would be between the two black checkered white LED Booms 3 Put a piece of tape on th...

Страница 23: ...ough the top oval slot as shown in the picture at right 4 Attach the Top Chassis Plate to the standoffs on top of the Booms using six inch Black Pan head Screws 5 For the Control Board Assembly refer...

Страница 24: ...Copyright Parallax Inc ELEV 8 Y 6 Multicopter Kit 80100 Version 1 0 Page 24 of 31...

Страница 25: ...31500 Copyright Parallax Inc ELEV 8 Y 6 Multicopter Kit 80100 Version 1 0 Page 25 of 31...

Страница 26: ...the Hoverfly Firmware Update Client http www hoverflytech com Software_Updates html 2 Once you have the software installed and opened connect your Control Board to your PC Follow the onscreen instruc...

Страница 27: ...e 5 8 inch Nylon Standoffs This secures the Control Board Mount Plate to the Top Chassis Plate 4 Align the Control Board Top Plate over the Control Board The small hole near the center of the Top Plat...

Страница 28: ...Copyright Parallax Inc ELEV 8 Y 6 Multicopter Kit 80100 Version 1 0 Page 28 of 31...

Страница 29: ...eiver Port with the five signal connections listed below Use the 3 wire extension cables included in the ELEV 8 Electronics Kit A Aileron T Throttle R Rudder E Elevator G Gear ON EPA value is Primary...

Страница 30: ...the Power Harness 2 Refer to the diagram on this page for the correct placement of each blade 3 Connect each blade to its motor referring to the diagram on the next page The Blade item 2 should be mou...

Страница 31: ...Copyright Parallax Inc ELEV 8 Y 6 Multicopter Kit 80100 Version 1 0 Page 31 of 31...

Страница 32: ...Mouser Electronics Authorized Distributor Click to View Pricing Inventory Delivery Lifecycle Information Parallax 80100...

Отзывы: