-
-
83
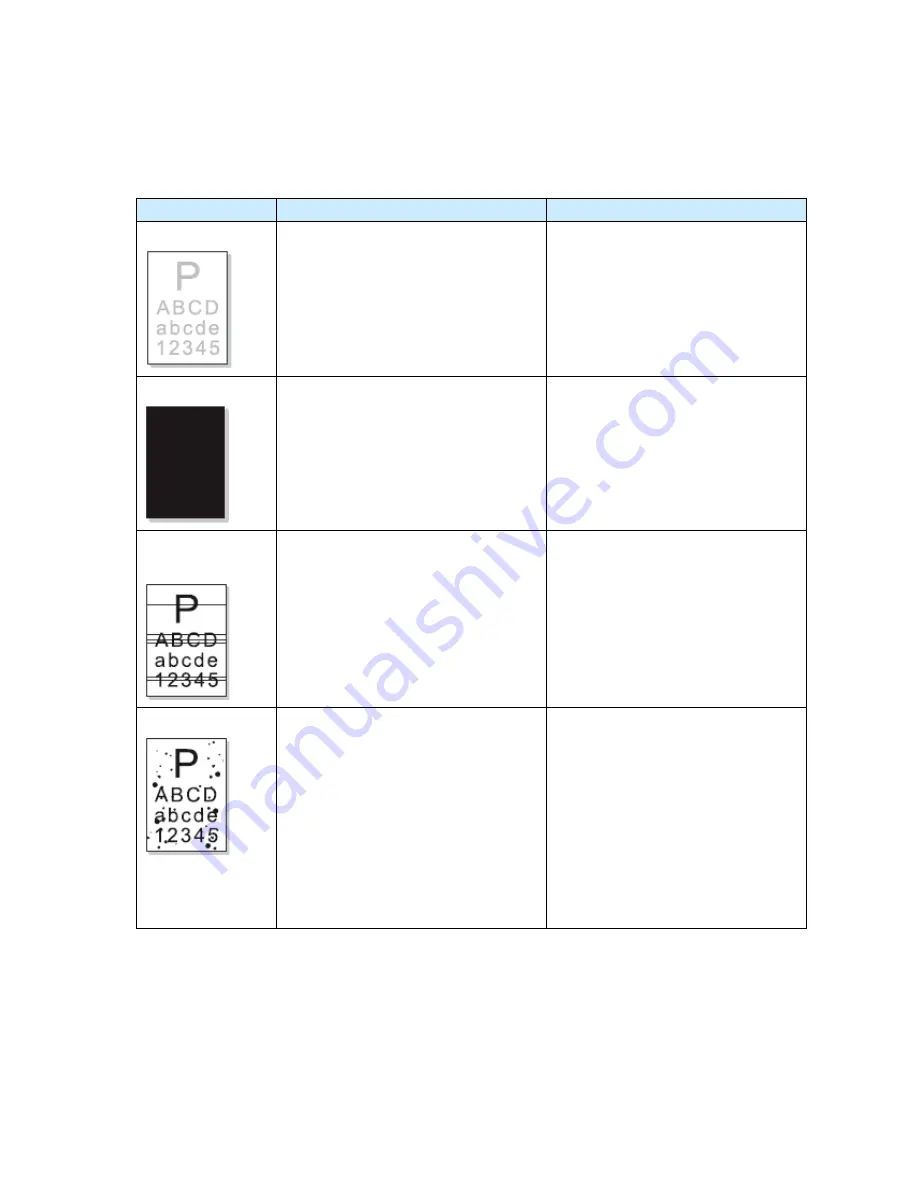
6.3.5 Image defects
Status
Check and causes
Solutions
Light image
1.
Developing roller is stained when
the toner is almost consumed.
2.
Bad contact caused by the toner
stains between the high voltage
terminal in the HVPS and the one in
the set.
3.
Abnormal output from the HVPS.
1. Replace the print cartridge
2. Check whether the Economy mode
is off.
3. Clean up HVPS terminals or replace
engine board.
Dark image
1.
Charging voltage from engine board
is abnormal.
2.
Charge roller is abnormal;
1. Clean the high voltage charge
terminal or replace engine board.
2. Replace the print cartridge.
Horizontal Black
Band
1.
Bad contacts of the voltage
terminals to developer.
2.
The developing roller may be
stained; OPC or charge roller is
damaged.
3.
The transport unit is smoothly and
slipping
1.
Clean each voltage terminal of the
charge, supplies, or replace engine
board.
2.
Replace print cartridge.
3.
Clean or replace transporting
roller.
Black/white spot
1. Some parts in Print cartridge unit may
be contaminated or OPC is damaged.
( Charge roller : 37.7 mm
Supply roller : 47.5 mm
Developing roller : 35.2 mm
OPC drum : 75.4 mm )
2. If black spots appear periodically at
45.2 mm interval, the high voltage
on transferring is abnormal or
transfer roller is damaged.
1. Replace the print cartridge.
2. Clean transfer high voltage
terminals or replace the transfer
roller.
3. Clean the inner set regularly against
the paper particles and foreign
matter in order to avoid the trouble.
Содержание P1000 Series
Страница 1: ...Pantum Monochrome Laser Printer Service Manual P1000 P2000 Series...
Страница 8: ...vii 6 3 4 Paper jam 79 6 3 5 Image defects 83...
Страница 9: ...1 Chapter 1 Product description 1 1 Features 1 2 Overview 1 3 Specification...
Страница 12: ...4 1 2 2 Rear view 1 USB interface connector 2 Power receptacle 3 Power switch Right side cover Rear cover...
Страница 39: ...31 Chapter 3 Operation Theory 3 1 Electronic Configuration 3 2 Structure...
Страница 43: ...35 3 2 Construction 3 2 1 Print engine imaging system...
Страница 52: ...44 4 2 Disassembly flow chart...
Страница 56: ...48 then release them to remove the top cover...
Страница 58: ...50 2 Release bottom screws 3 Loosen hooking tabs gently and then remove the right side cover...
Страница 69: ...61 Chapter 5 Regular maintenance 5 1 Cleaning Inside Printer 5 2 Consumables Replacement...
Страница 73: ...65 Chapter 6 Error indications and troubleshooting 6 1 Introduction 6 2 Error Indications 6 3 Trouble shooting...
Страница 89: ...81 Paper Jam at the print cartridge unit 1 Open the discharge tray 2 Release the print cartridge...


