-
-
49
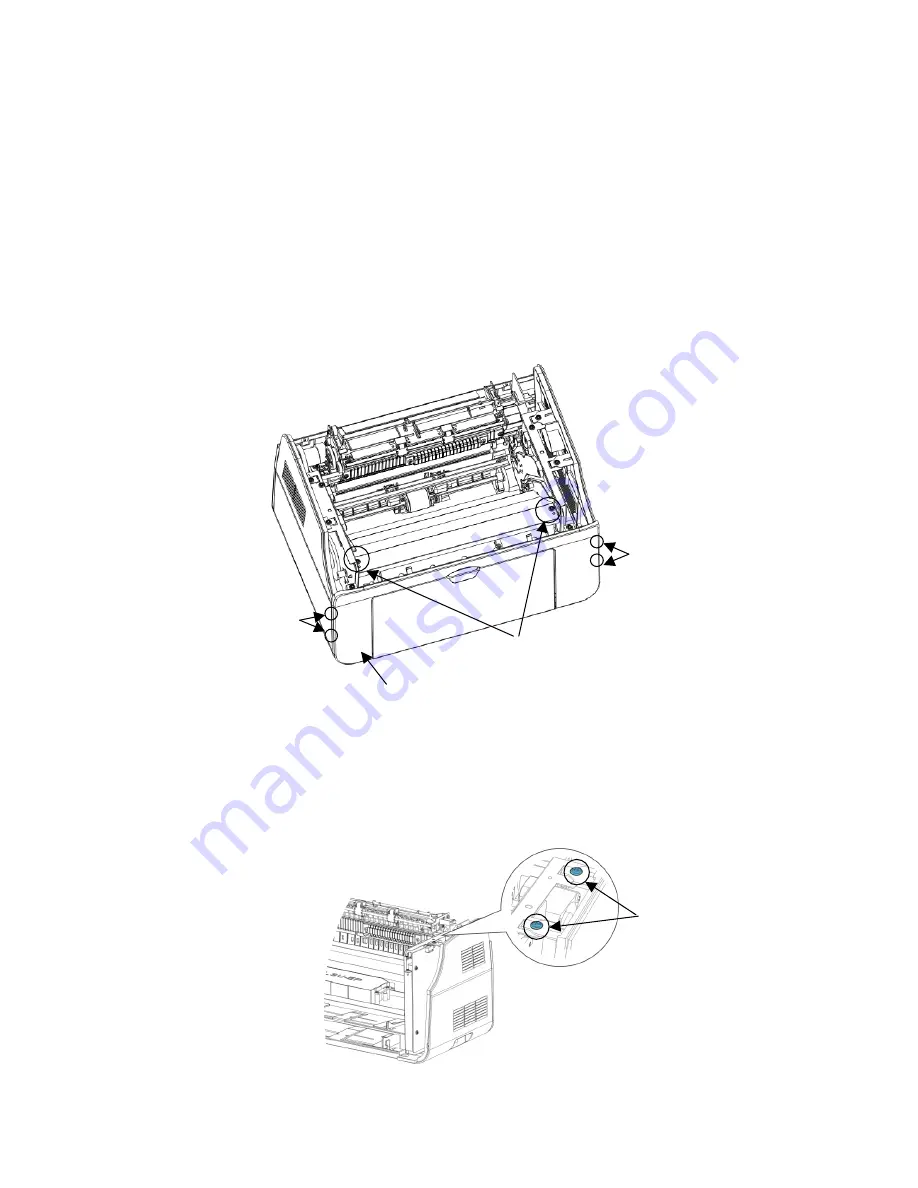
4.3.6 Front cover
(
1
)
(See section 4.3.5) hold the front cover after disassembling the top cover, then push it firmly
with both hands to release it.
(
2
)
Remove two screws
①
after releasing the front cover, then loosen four hooking tabs
②
, and
remove the front cover
③
.
Note: To avoid damaging the hooking tabs, please use a soft, rounded tool with thickness of
about 1-1.5mm instead of hard tools such as a screwdriver.
4.3.7 Disassemble right side-cover
(
1
)
(See section 4.3.6) Release two top screws
①
after removing front cover.
①
②
②
③
①
Содержание P1000 Series
Страница 1: ...Pantum Monochrome Laser Printer Service Manual P1000 P2000 Series...
Страница 8: ...vii 6 3 4 Paper jam 79 6 3 5 Image defects 83...
Страница 9: ...1 Chapter 1 Product description 1 1 Features 1 2 Overview 1 3 Specification...
Страница 12: ...4 1 2 2 Rear view 1 USB interface connector 2 Power receptacle 3 Power switch Right side cover Rear cover...
Страница 39: ...31 Chapter 3 Operation Theory 3 1 Electronic Configuration 3 2 Structure...
Страница 43: ...35 3 2 Construction 3 2 1 Print engine imaging system...
Страница 52: ...44 4 2 Disassembly flow chart...
Страница 56: ...48 then release them to remove the top cover...
Страница 58: ...50 2 Release bottom screws 3 Loosen hooking tabs gently and then remove the right side cover...
Страница 69: ...61 Chapter 5 Regular maintenance 5 1 Cleaning Inside Printer 5 2 Consumables Replacement...
Страница 73: ...65 Chapter 6 Error indications and troubleshooting 6 1 Introduction 6 2 Error Indications 6 3 Trouble shooting...
Страница 89: ...81 Paper Jam at the print cartridge unit 1 Open the discharge tray 2 Release the print cartridge...


