


BA_PH_245-100-300_EN_06-22.docx
60
18.6
Change and Tighten the Drive Belt
Switch off the machine during belt replacement and tightening and secure it against
unintentional restarting! Lock the main switch with a padlock!
The drive belt should be replaced in the event of excessive wear, frayed flanks, traces of oil, porosity or if cross-
sectional fractures are present.
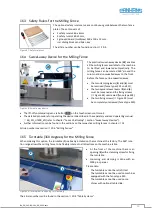
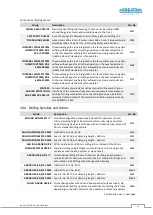
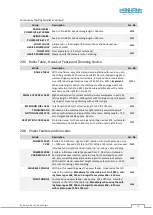
18.6.1
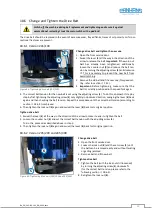
Version 245|100
Figure 64: Tightening drive belt (245|100)
Change drive belt and tighten the new one
1.
Open the front service door.
2.
Swivel the lever (
E
) all the way in the direction of the
arrow to release the belt.
Important:
If the worn out
belt has already been retightened, additionally
loosen the counter nut (
K
) and reduce the belt ten-
sion by turning the adjusting screw (
E
) anticlockwise
. This is necessary to prevent the new belt from
overstretching.
3.
Remove the old belt and fit a new one (for speed set-
ting, refer to section
4.
Important:
Before tightening, make sure that the
belt is correctly positioned in the speed fork again.
5.
The correct belt tension for the new belt is set using the adjusting screw (
S
). To do this, approach it step by
step by first tightening the adjusting screw (
S
) only slightly in clockwise direction, swinging the lever (
E
) back
again and then checking the belt tension. Repeat this procedure until the correct belt tension (according to
section
18.6.3) is achieved.
6.
Then tighten the lock nut (
K
) again and swivel the lever (
E
) back to its original position.
Tighten drive belt
1.
Swivel the lever (
E
) all the way in the direction of the arrow to make it easier to tighten the belt.
2.
Loosen the counter nut (
K
) and set the correct belt tension with the adjusting screw (
S
).
To do this, proceed as described above in step 5.
3.
Then tighten the lock nut (
K
) again and swivel the lever (
E
) back to its original position.
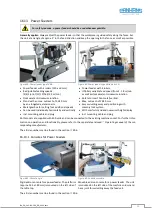
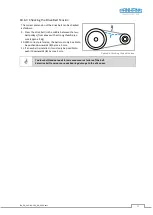
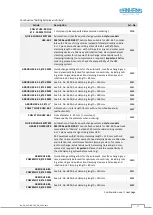
18.6.2
Version 245|200 and 245|300
Figure 65: Tightening drive belt (245|200 and 245|300)
Change drive belt
4.
Open the front service door.
5.
Loosen the lock nut (
K
) and the set screw (
S
) until
the belt can be removed easily and without twisting
or getting jammed.
6.
Remove belt and fit new belt.
Tighten drive belt
7.
Tighten the belt (with the lock nut still loosened)
by turning the adjusting screw (
S
) clockwise
(for the correct belt tension, please refer to the
following section
8.
Retighten the lock nut (
K
).
K
S
E
K
S