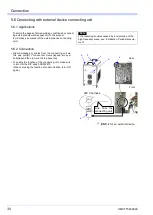
Maintenance and inspection
OMCTT5639E09
44
7.3 Precautions in performing withstand voltage test and insulation resistance
measurement
Do not perform the withstand voltage test and the
insulation resistance measurement carelessly, or failures
may be caused as the unit is equipped with semiconductor
parts including transistors.
• If your internal regulations define to carry out these test,
observe the following
test preparation procedure. (The following procedure is
explained under the condition with the top panel and the
right and left panel removed.
• Prepare jumper cables (cross section 1.25
mm
2
approx.)
with a clip to short-circuit each device.
(The figure on the following page shows the locations of
the device to be short-circuited. The numbers in the fig
-
ure agree with the numbers in the following test prepara
-
tion procedure.)
• When cables and connectors are disconnected, put tags
or take notes to return as they were.
7.3.1 Test preparation
Connection cables and signal wires
(1) Disconnect connection cable and signal wire con
-
nected to the following terminals and connectors.
Output terminals, Wire feeder connector, the Jig termi
-
nal, RS-232C connector and RS-422 connector.
(2) Before disconnecting the unit input cable from the
power box switch secondary side and the unit input
terminal, make sure to switch OFF the power box.
Primary side
(3) Short-circuit the unit input terminals collectively (total 3
terminals).
(4) Keep the power switch ON side.
(5) Short-circuit the diode D1(+)(wire #8) and (-)(wire #9).
(6) Short-circuit the capacitors: C1 (+) and (-)*.
The capacitors may still have voltage. Wait for 5 min
-
utes or more after the power is OFF before starting to
work.
(7) Short-circuit output terminal of IGBT-Q1(wire #7), and
output terminal of IGBT-Q2 (wire #11).
(8) Short-circuit output terminal of IGBT-Q3 (wire #117)
and IGBT-Q4 (wire #12).
(9) Further collectively short-circuit the above 3, 5, 6, 7
and 8.
Secondary side
(10)Short-circuit anode and cathode of Diode D2.
(11) Short-circuit anode and cathode of Diode D3.
(12)Short-circuit the (-) output terminal and (+) output ter
-
minal.
(13)Further collectively short-circuit the above 10, 11, and
12.
Primary and secondary side
(14)Further collectively short-circuit the above 9 and 13.
Case ground cable
(15)Disconnect a case ground cable near the transformer
Tr1.
(16)Disconnect two case ground cables near the DCL L2.
PC board
(17)Disconnect all the connectors put in the PC board.
Make sure to work at least 5 min
-
utes after the power is turned
off.
The capacitor may still have some
voltage left even if the power switch
is turned off. To prevent a physical
accident caused by an electric
shock or a spark,
Содержание YC-300BP2YAF
Страница 10: ...Rated Specifications OMCTT5639E09 10 2 2 1 Dimensions ...
Страница 16: ...Installation OMCTT5639E09 16 Example of extension cable connection ...
Страница 49: ...Parts list OMCTT5639E09 49 9 Parts list ...
Страница 52: ...OMCTT5639E09 52 ...
Страница 53: ...Circuit diagram OMCTT5639E09 53 10 Circuit diagram NF9 NF8 ...
Страница 54: ...Circuit diagram OMCTT5639E09 54 10 1 Enlarged left half NF8 MCB ...
Страница 55: ...Circuit diagram OMCTT5639E09 55 10 2 Enlarged right half NF9 ...
Страница 62: ...OMCTT5639E09 62 ...
Страница 63: ...OMCTT5639E09 63 ...


