Names and Functions
OMCTT5639E09
19
4.1.2
Welding conditions setting buttons section
*1: It can be used when the “welding method” is set to “DC
TIG” or “AC TIG”, the “pulse” is set to “presence”, and the
“crater control” is set to a mode other than the “spot”.
For details of the function of each button, see section
“Welding conditions” or “Operation”.
When the “mode” selection is set to “welding”, the display
lamp of the welding-condition setting button section turns on
according to the set details of the welding-condition select
-
ing section In other words, the display lamp for sections, to
which welding conditions are required to be set, is turned
on.]
The display lamp indicated above (indicated within __) nor
-
mally remains turned on. When pressing a button corre
-
sponding to the display lamp, which is turned on, that
display lamp starts flashing, the LCD display indicates the
name of that item, and the set-value display indicates a set
current value. (By turning the jog dial at this point, the set
value can be changed.)
Note
Do not turn the jog dial without discretion. (Doing so may
result in the change of the present set value.)
The above operation also applies to the welding mode. (If
the display lamp is flashing, a set value can be changed
even during the welding operation. When there is no need to
do so, press the jog dial, and the display lamp is turned on.
Then, it becomes impossible to change the set value by
means of the jog dial. Therefore, it serves the prevention of
an operation error.)
10 11 12 13 14 15 16
17 18 19
20
21
10
Pre-flow:
Sets the time required until the output
voltage is turned on (i.e. arc start) after the torch
switch is turned on.
Make sure to set it so that the shield gas covers the
welding area before the start of arc.
11
Initial current:
Sets the current required for start
-
ing the welding.
The initial current can be used only when the “cra
-
ter control” is set to “presence” or “repeat”.
12
Up-slope:
Sets the time required to increase the
welding current gradually to the set value after the
initial current.
The up-slope can be used only when the “crater
control” is set to “presence” or “repeat”.
13
Welding current:
Sets the welding current.
14
Down-slope / spot time
Down-slope:
Sets the time required for decreasing
the welding current gradually and having the crater
current started after the self-holding is turned off.
The down-slope can be used only when the “crater
control” is set to “presence” or “repeat.
Spot time:
Sets the spot time of arc spot welding,
only when the “crater control” is set to the “spot”
mode.
15
Crater current:
Sets the crater current.
The up-slope can be used only when the “crater
control” is set to “presence” or “repeat”.
16
Post-flow:
Sets the time period for the shield gas
to keep flowing for a certain period of time after the
output voltage is turned off (i.e. arc stop).
17
Pulse current
*
1
: Sets the pulse current.
18
Pulse frequency
*
1
: Sets the pulse frequency (0.8
to 500Hz).
19
Pulse width:
Pulse width
*
1
: Sets the pulse width.
20
AC TIG (AC BALANCE / AC frequency):
Sets the
AC balance* or AC frequency* (50 to 400Hz) when
the “welding method” is set to “AC TIG” or “MIX
TIG”. (To select the AC balance or AC frequency,
press this “AC TIG” button once or twice until the
applicable display lamp start flashing.)
21
MIX TIG (MIX frequency / DC ratio)
: Sets the MIX
frequency or DC ratio* when the “welding method”
is set to “MIX TIG”. (To select the MIX frequency or
DC ratio, press this “MIG TIG” button once or twice
until the applicable display lamp start flashing.)
Содержание YC-300BP2YAF
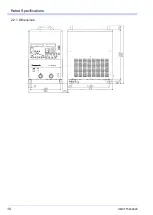
Страница 10: ...Rated Specifications OMCTT5639E09 10 2 2 1 Dimensions ...
Страница 16: ...Installation OMCTT5639E09 16 Example of extension cable connection ...
Страница 49: ...Parts list OMCTT5639E09 49 9 Parts list ...
Страница 52: ...OMCTT5639E09 52 ...
Страница 53: ...Circuit diagram OMCTT5639E09 53 10 Circuit diagram NF9 NF8 ...
Страница 54: ...Circuit diagram OMCTT5639E09 54 10 1 Enlarged left half NF8 MCB ...
Страница 55: ...Circuit diagram OMCTT5639E09 55 10 2 Enlarged right half NF9 ...
Страница 62: ...OMCTT5639E09 62 ...
Страница 63: ...OMCTT5639E09 63 ...

