background image

12

13

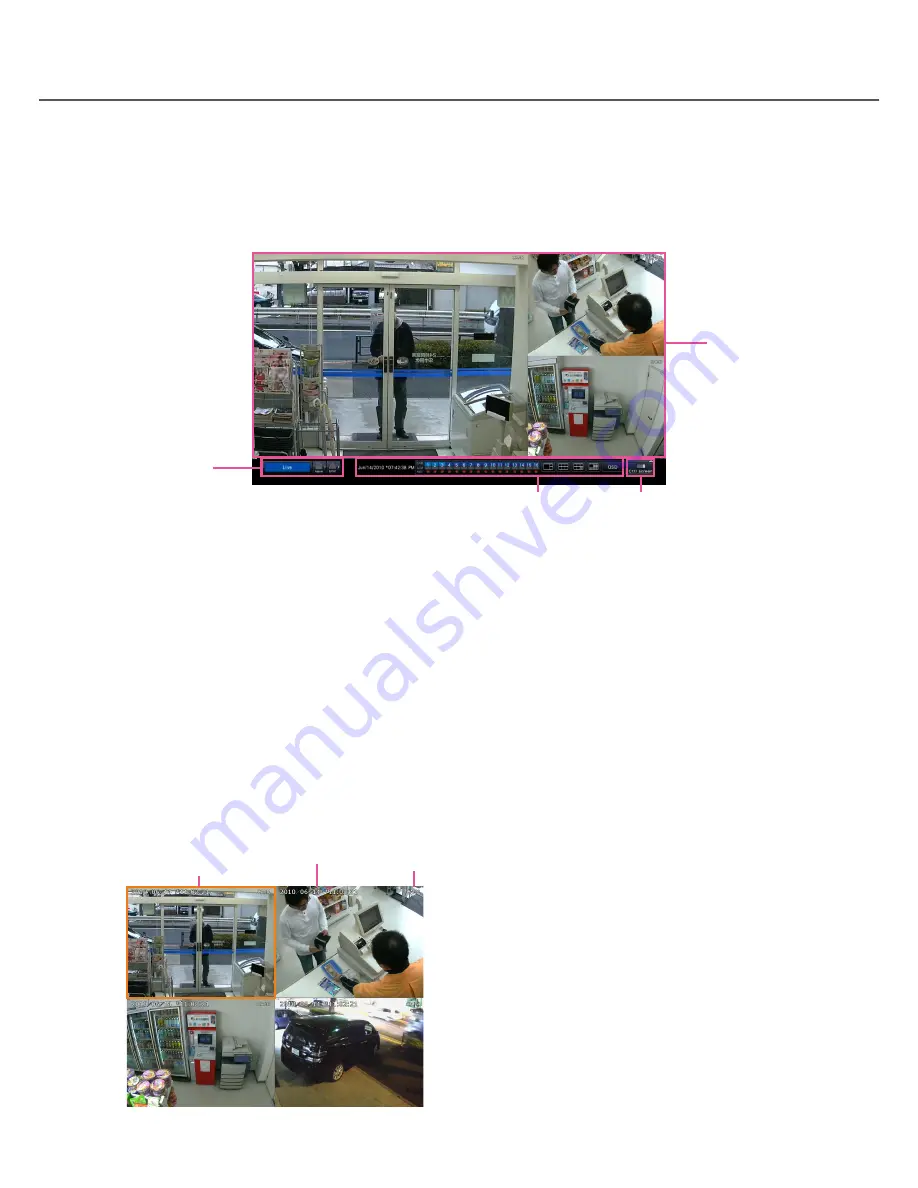
Wide view display

This view offers a large image display area, especially suited for monitoring live images. However, operations 
are restricted (no playback of recorded images).

Image display area

Displays live images and playback images on the control screen. Only live images can be displayed on the wide 
view screen.


q

  Image display area

    Displays images from the camera. (

 Page 19)


w

  Status display panel

    Displays the statuses of the recorder. Also dis-

plays alarm/error status and remedies.  
(

 Page 14)

    When clicking alarm button or error button, this 

panel may be displayed overlapped on the opera-
tion panel.

Camera title/date & time

The set camera title will be displayed. The display 
position can be selected from upper-left ("L-Upper"), 
lower-left ("L-Lower"), upper-right ("R-Upper") and 
lower-right ("R-Lower"). The default display position is 
"R-Upper". (Default: Upper right). Date & time will be 
displayed as set on the camera.

Camera selection frame

Displays the camera being operated. When using 
1-screen/4-screen display (

 pages 20 and 21), the 

cameras can be operated with the mouse. 


e

  Operation panel

    Switches between screens and screen patterns. 
    Displays the current date & time. While daylight 

saving time is activated, the time will be displayed 
with an asterisk (*).


r

  [Ctrl screen] button

    Switches the main monitor to control screen dis-

play. 


q

e

r

w

Camera title

Date & time

Camera selection 

frame

Содержание WJ-NV200VK

Страница 1: ...ad these instructions carefully and save this manual for future use The model number is abbreviated in some descriptions in this manual Operating Instructions Network Disk Recorder Model No WJ NV200K...

Страница 2: ...8 Cancel the alarm action 39 Cancel the error action 39 Copy recorded images 40 Format SD memory card 44 About the face matching function 45 Face matching alarm actions 45 Reset face matching alarm 46...

Страница 3: ...install the viewer software 86 How to use the viewer software 87 Operate the camera 90 Panning Tilting 90 Zooming 90 Focus adjustment 91 Iris brightness adjustment 91 Register preset positions 91 Move...

Страница 4: ...Contains descriptions of how to operate functions frequently used Operating Instructions of Additional Business Intelligence Kit PDF Contains descriptions of how to use WJ NVF20 option WJ NVF20E optio...

Страница 5: ...Microsoft Windows Windows Vista Internet Explorer ActiveX and DirectX are either registered trademarks or trademarks of Microsoft Corporation in the United States and or other countries Microsoft pro...

Страница 6: ...e time playback may start from a point several seconds before after the specified time or from the first frame of the next record When searching for the latest recorded images the starting point of pl...

Страница 7: ...ometimes be malfunc tioning When there is a very little difference in luminance brightness between a background and a subject When brightness of images is low such as at night When a subject moves ver...

Страница 8: ...on the hard disk drives The following recording operations are available Schedule recording Recording that is automatically performed at the designated time range on the desig nated day s of the week...

Страница 9: ...sert an SD memory card option Pull the tab down SDHC SD memory card slot cover When inserting an SD memory card confirm that the label on the SD memory card is upside and only the upper right corner o...

Страница 10: ...sh the tray to the end Click sound will be heard and the tray will be fixed Step 5 Close the DVD drive cover Important When opening closing the DVD drive tray do not apply force on the tray When not u...

Страница 11: ...ain operations of the recorder are performed from this screen q Image display area Displays images from the camera Page 19 w Status display panel Displays the statuses of the recorder Also dis plays a...

Страница 12: ...the opera tion panel Camera title date time The set camera title will be displayed The display position can be selected from upper left L Upper lower left L Lower upper right R Upper and lower right...

Страница 13: ...elected Refer to the Installation Guide for further information about the settings of the default screen Camera 1 to 16 Each camera displayed on a 1 screen 4Screen A Camera 1 to 4 displayed on a 4 scr...

Страница 14: ...d to eject 4 Formatting HDD HDD is being automatically formatted 3 In the alarm state Indicates an alarm occurrence Detailed information of the alarm will be displayed 2 In the error state Indicates t...

Страница 15: ...yed on the operation panel of the control screen Page 45 Live monitor monitor for display of live images only Important Configuration and operation of the recorder from the live monitor is not possibl...

Страница 16: ...se cursor will be displayed again when the mouse is moved It is impossible to connect a mouse to the mouse connection port if the connector from the mouse is upside down When it is hard to connect che...

Страница 17: ...letters may be displayed on the on screen keyboard instead of small letters Display the setup menu Click the Setup button The setup menu will be displayed For certain user levels the login window will...

Страница 18: ...gout button When the entered user name and password are incorrect the error window will be displayed Close the error window and log in again Note The default administrator name and password are as fol...

Страница 19: ...tallation Guide Note Depending on the camera in use or network environment the audio of live images from the camera may be delayed but that may not affect the audio output from recorded images Update...

Страница 20: ...Click the 1 screen button for the screen pattern of multiscreen The image display area will be displayed on a 1 screen Step 2 The background color of the selected camera number panel will turn aqua a...

Страница 21: ...selected camera will be output In case of 9 camera licenses cameras will be switched as follows by clicking the 4 screen but ton Camera 1 to 4 camera 5 to 8 camera 9 image displayed in the top left se...

Страница 22: ...Recording is not possible or camera is not registered Alarm display ALM The background turns red in the alarm state Recording indicator REC Lights red when recording is being performed Screen pattern...

Страница 23: ...ooted note however that initializing the settings will also reset the camera positions to the defaults The audio of the camera assigned to the top left position will be output If Mute was selected on...

Страница 24: ...l become the zoom center Step 1 Confirm that the image display area is displayed on the 1 screen or 4 screen when displaying on the 4 screen select the camera whose image is to be zoomed Step 2 Click...

Страница 25: ...of a network error the image of the camera where the communication error has occurred will not be recorded Recording starts when the network error is recovered If the status in which the communicatio...

Страница 26: ...ack with the selected refresh interval Resolution Image capture size Frame rate Display SXVGA 15 ips 30 ips 4 screen Different values selected for resolution and frame rate will cause the data size of...

Страница 27: ...p4 Approx 8x Step5 Approx 16x Step6 Approx 32x Step7 Approx 48x Playback speed of fast reverse playback will be changed in the following order each time the fast reverse button is clicked Step2 Approx...

Страница 28: ...me The date time operation panel will change to playback display page 30 At the same time the playback operation panel page 26 is dis played at the bottom of the date time operation panel Note Unless...

Страница 29: ...26 is displayed at the bottom of the date time operation panel Step 2 To stop playback and return to live images click the Live button or the stop button on the playback oper ation panel Playback wil...

Страница 30: ...recorded images will be dis played in pink Event Event recorded images will be displayed in red Information VMD When this box is checked the time zone recorded when the VMD function was activated mot...

Страница 31: ...panel playback display Playback slider Displays the time during playback Drag and drop the playback slider to a desired time on the timeline to start playback from that time Note The playback slider...

Страница 32: ...searching methods Play images selected from alarm and error logs Log search Search and play images recorded triggered by the motion detection of the camera VMD search Play images selected from logs l...

Страница 33: ...ameras that support the motion detection search function in advance Refer to the readme txt on the provided CD ROM about the supported camera Refer to the operating instructions of the camera in use f...

Страница 34: ...e VMD search setup panel will be displayed The VMD search function searches the entire camera image by default To designate a search area click the Setup button next to Detection area Mask duration on...

Страница 35: ...ready contains the file P1000999 JPG a folder with a new number will be created Step 4 If VMD search takes too much time or the search pro duces too many results set a mask duration to reduce the sear...

Страница 36: ...being played back Note It is also possible to set the start point and end point of the filter range by clicking the Start End buttons after selecting the desired time in the Playback box and clicking...

Страница 37: ...tings A in the following table Recording only Performs only recording filing alarm logs and moving to camera presets B in the following table Alarm action Performs only alarm actions according to the...

Страница 38: ...o the Panasonic alarm protocol setting When an event occurs a notification will be sent to a PC in accordance with the settings made under Panasonic alarm protocol Installation Guide Display the image...

Страница 39: ...nt on the setup menu Installation Guide the following actions will automatically be taken unless the alarm action is canceled by clicking the alarm Reset button The alarm indicator on the front panel...

Страница 40: ...g on a DVD disc is available only with DVD drive equipped models Pause the playback before starting copying when playing recorded images on the recorder To copy recorded images onto an SD memory card...

Страница 41: ...opied Checking Check all will copy the recorded data of all cameras Copy drive Indicates the copy destination DVD will be displayed only for DVD drive equipped mod els Date Time range Specify times an...

Страница 42: ...mages and audio may not be copied Clicking the Copy button during the copying pro cess will display the copy cancel confirmation window allowing you to cancel copying Copying continues while the copy...

Страница 43: ...icating that the DVD disc can be removed Then press the eject button Finalize the copy from the copy window After copying is complete first click the Advanced setup button on the copy panel and then t...

Страница 44: ...restored Step 1 Click the Copy button on the operation panel of the main monitor Page 40 The copy start confirmation window will be dis played Step 2 Click the Advanced button The Advanced setup windo...

Страница 45: ...all facial images A detected person displayed on the face matching result window may sometimes not be the same as the one who has registered the facial image Refer to the installation guide for setup...

Страница 46: ...w is opened Reset face matching alarm Proceed as described below to cancel the face matching alarm Step 1 Click the Alarm button on the status display panel The alarm Reset button will be displayed St...

Страница 47: ...splay on the wide view screen it changes to 3 screen display It will not work on the multiscreen 1 screen or 4 screen display when the screen segments are equally divided by the setting The function w...

Страница 48: ...a fixed camera the buttons on the camera control panel and other controls will be disabled Camera control panel Operate the cameras displayed as selected inside selection frame in the image display a...

Страница 49: ...eens Panning Tilting Adjusts the horizontal vertical position of the camera Step 1 When displaying the images on a 4 screen select the desired cameras Step 2 Click the Control button Click the desired...

Страница 50: ...trol panel When selecting an area in the image display area by dragging the mouse the selected area will be located at the center of the image display area and the zoom ratio will be adjusted automati...

Страница 51: ...Click the auto mode button C of the camera and select one of the following auto modes Auto track The camera will automatically track an object moving on the screen Auto pan The camera direction will a...

Страница 52: ...era direction will be registered to the selected preset position number Move camera preset positions Move the camera to the registered preset position It is necessary to register preset positions in a...

Страница 53: ...preset number will be registered as the home position Step 5 Click the Back button The camera setup window closes and the display returns to the Camera control Advanced panel Execute auto back focus...

Страница 54: ...are cov ered with white translucent masks Step 2 Click a segment in the image display area Each click of the segment toggles between On and Off for the mask area setting Step 3 Click the End button T...

Страница 55: ...168 0 254 Subnet mask 255 255 255 0 Default gateway 192 168 0 1 When the settings are configured differently from the above configure the network settings of the recorder or a PC Configure the networ...

Страница 56: ...Local Area Connection The Local Area Connection Status window will be displayed Step 4 Click Properties The Local Area Connection Properties window will be displayed Step 5 Click Internet Protocol Ve...

Страница 57: ...mask as follows IP address 192 168 0 9 Subnet mask 255 255 255 0 Depending on the network configuration it is neces sary to configure Default gateway Refer to a sys tem administrator for further info...

Страница 58: ...added security Enhance network security It is possible to enhance the network security by dividing the subnet using a router to authenticate users twice by the recorder and by the router When connect...

Страница 59: ...s 192 168 1 100 Subnet mask 255 255 255 0 Default gateway 192 168 1 1 IP address 192 168 0 250 Subnet mask 255 255 255 0 Default gateway 192 168 0 1 IP address 192 168 0 1 Subnet mask 255 255 255 0 IP...

Страница 60: ...ot be displayed when Off is selected for User authentication on the Basic tab of User management of the setup menu Important Refer to a system administrator for further infor mation about the set IP a...

Страница 61: ...rding status etc will be displayed Current time display area The current date time will be displayed Image display area Playback images and live images will be displayed The camera title is displayed...

Страница 62: ...Disk Medium to display this but ton The recording event search window will be dis played VMD button Select HDD for Disk Medium to display this but ton The motion detection search window will be dis p...

Страница 63: ...e Multiscreen box Wide view box and Digital zoom box refer to Control Panel page 62 Camera selection box Clicking the camera title will display images from the selected camera on a 1 screen in the ima...

Страница 64: ...he recording schedules and alarms Monitor button Configure the settings relating to the main monitor and the live monitor Network button Configure the settings relating to the network User management...

Страница 65: ...memory card is selected as playback media Indicates that the DVD disc is selected as playback media DVD drive equipped models only The DVD disc is being finalized Indicates that the formatting of SD m...

Страница 66: ...cking the Near but ton or the Far button The auto focus function can be performed by clicking the Auto button Auto mode box Activates the auto mode function of the camera Select the auto mode function...

Страница 67: ...h time this button is clicked Step2 Approx 4x Step3 Approx 8x Step4 Approx 16x Step5 Approx 32x Step6 Approx 48x Step7 Approx 96x Next record Prev record button Skips to the next recorded image or pre...

Страница 68: ...start playback from a point around 30 seconds before the latest recorded image of the camera currently being dis played Use digital zoom Enlarges the displayed live images When playing recorded images...

Страница 69: ...played on the image to display on a 1 screen again The display returns to the 1 screen Note To change the screen pattern to a multi screen right click on the live images and select the item from the d...

Страница 70: ...l be heard When starting playback for the first time after login playback will start from a point around 30 seconds before the latest recorded image When both a web browser and the viewer soft ware ar...

Страница 71: ...performed with the refresh interval setting of the camera Next record Prev record button When the Next record button is clicked playback point will skip to the start time of the next recorded images...

Страница 72: ...rt from the image corresponding to the designated date time Playback operation Playback downloaded images page 88 Note When playing H 264 MPEG 4 image by designat ing date time playback may start from...

Страница 73: ...ons filters Date time range Select a time range by designating a start and end date time The designated time range will be searched REC event Searches for images recorded by the selected record ing mo...

Страница 74: ...d ing recorded images are stored will be displayed Audio When audio is attached to recorded images the audio icon will be displayed Note The All list button will become unavailable during playback To...

Страница 75: ...Display of live images and display of playback images will be paused Step 2 Specify the search conditions filters Camera Select the camera for VMD search Date time range Select a time range by designa...

Страница 76: ...aved in the list When more than 100 logs are filed in the search result 100 will be indicated Recorded images will be played on a 1 screen To play on a multi screen click the Multiscreen but ton after...

Страница 77: ...cording will be displayed Step 1 Insert an SD memory card or a DVD disc on which recording data is copied into the SDHC SD memory card slot or the DVD slot Page 9 Step 2 Click the Control button on th...

Страница 78: ...ortant Do not remove the SD memory card during play back of copied data on the SD memory card It may damage data on the SD memory card Note When checking a list after inserting the other SD memory car...

Страница 79: ...m a PC when an event occurs are described below Display the alarm message A window that notifies of an event occurrence will be displayed Click the OK button or the x button to close the window When s...

Страница 80: ...on a series of actions that notifies of the error occurrence An error display window providing information on the error that occurred will be displayed on the web browser To cancel the error action ma...

Страница 81: ...d Specify the information to be set as condi tions Date time range Designate the start date time and the end date time of recorded images to be copied Click the C button and then designate date time C...

Страница 82: ...rt time copying will not start even when the OK button is clicked When copy medium lacks enough storage space data will be copied until the copy medium is full Use a medium with sufficient storage cap...

Страница 83: ...t the download is to click the start time box and enter date time The date time of the start point will be displayed next to the Start button Step 3 Click the End button in the download operation area...

Страница 84: ...is selected the Download window will be displayed again after the download is complete If a message is displayed on the information bar see page 98 When playing on a multiscreen it is impossible to d...

Страница 85: ...memory card Folder Drive PRIVATE MEIGROUP PSS NVR ND_Viewer Copying on a DVD disc Folder Drive Refer to page 87 for how to use the viewer software Note The viewer software copied onto an SD memory car...

Страница 86: ...Complete if the Setup Type page is dis played Step 2 Click the Install button The Installation will start When installation is complete and the completion window is dis played click the Finish button...

Страница 87: ...x List display area Image display area Date Time Displays a start time and an end time for copying the recorded images Cam Displays the camera number Note Do not change the file name of the copied or...

Страница 88: ...be synchronized exactly When the Search button is clicked after selecting Date Time and Camera ch in the search box play back of the image data of the selected camera data will start from the top of...

Страница 89: ...e date time when paused using the viewer software will be printed Alteration detection It is possible to detect alterations in data page 83 if a code for alteration detection has been attached to the...

Страница 90: ...t a camera in the clicked direction Control pad Click to move pan tilt a camera in the clicked direction Panning tilting speed will be faster if a clicked point gets farther from the center point of t...

Страница 91: ...can be registered only when using a camera supporting the preset position function Step 1 Perform the pan tilt operation to move the camera to the position to be registered Step 2 Click the C button...

Страница 92: ...n between the start point and end point set in advance Preset sequence The camera will move pan to the preset positions registered in advance in order of the preset position number numerical order Pat...

Страница 93: ...the user management are applied all login users will be forcibly logged out Recording may not be performed for around 4 seconds just after the settings are applied Note If the license for the Addition...

Страница 94: ...the firmware of the latest version onto a hard disk drive of a PC Step 2 Click the Maintenance button and then click the System management tab Step 3 Designate the downloaded firmware by clicking the...

Страница 95: ...RMAL ERROR Indication Description Date Date time when the trouble occurred will be displayed Status The description of the trouble will be displayed xx is the camera number y is the disk number and f...

Страница 96: ...it is not lit connection to a LAN is not established or a network is not working correctly Confirm that the connection indicator of the 10BASE T 100BASE TX port is lit Refer to the system administra t...

Страница 97: ...loaded file is not a complete file and it is impossible to play it An error message is displayed when trying to launch the viewer software by dragging and dropping multiple files onto it Try to launch...

Страница 98: ...downloading files to your computer Click here for options Click the information bar and select Download File When downloading fails even though you selected Download File perform the following operati...

Страница 99: ...addresses that are used in network environments are difficult to remem ber which makes them impractical This is why PCs are given an easy to follow name domain name which is converted to an IP address...

Страница 100: ...ddress The identification number assigned to PCs connected via IP networks such as the Internet or an Intranet or to individual communications devices Do not assign the same address to multiple device...

Страница 101: ...ervers usually have more than 2 systems and the secondary server is the sub system If there is trouble with the primary server the secondary server takes over SMTP Simple Mail Transfer Protocol A prot...

Страница 102: ...rivate lines Many companies are using this as a new medium of communication instead of costly private lines Depending on service VPN also provides a secure line using authentication technology and enc...

Страница 103: ...w Jersey 07094 U S A Panasonic Canada Inc 5770 Ambler Drive Mississauga Ontario L4W 2T3 Canada 905 624 5010 www panasonic ca Panasonic System Networks Co Ltd 2012 N0811 2022 3TR006580HDB Printed in Ch...

Отзывы: